• Updated 2023-07-12: Hello, Guest! Welcome back, and be sure to check out this follow-up post about our outage a week or so ago.

PowerBook 540c Restoration Project

jmacz

Well-known member
Painted Internal Chassis Frame

Used Rustoleum flat black spray paint (which has corrosion resistance). And again, will sand off the paint in any areas with metal to metal contact as I begin reassembly in the coming days.
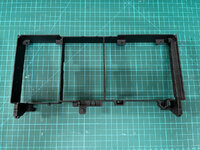
IMG_4883.JPG

Replace Broken Screw Mounts on Lid

Modeled after @GregorHouse's design as well as YouTuber Action Retro's updates. My model is split it into two pieces because originally I was only going to do one hinge. But later discovered a crack in the other side as well so will do both. Perhaps making it one single piece (like the other two original designs) might be better but we'll see how this goes. One change is I will be using M2.5 threaded brass inserts where the screw holes are (they are in the mail). I will then use epoxy to hold the 3d printed parts to the cover.
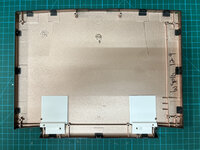
IMG_4885.JPG

I will probably also apply a thin coat of epoxy around each of the remaining screw mounts across the lid just to give them more strength.
 

3lectr1cPPC

Well-known member
Great work! For the hinge mounts on my 540 I went ahead and epoxied up around the originals since they were actually still completely intact. Just blobs and bunches of epoxy filling all the empty space. 540c is starting to go and it's getting this hinge fix part fitted eventually.
Did you modify the original design because your printer wasn't large enough?
 

croissantking

Well-known member
Painted Internal Chassis Frame

Used Rustoleum flat black spray paint (which has corrosion resistance). And again, will sand off the paint in any areas with metal to metal contact as I begin reassembly in the coming days.

View attachment 60235

Replace Broken Screw Mounts on Lid

Modeled after @GregorHouse's design as well as YouTuber Action Retro's updates. My model is split it into two pieces because originally I was only going to do one hinge. But later discovered a crack in the other side as well so will do both. Perhaps making it one single piece (like the other two original designs) might be better but we'll see how this goes. One change is I will be using M2.5 threaded brass inserts where the screw holes are (they are in the mail). I will then use epoxy to hold the 3d printed parts to the cover.

View attachment 60236

I will probably also apply a thin coat of epoxy around each of the remaining screw mounts across the lid just to give them more strength.
I’m impressed with the quality of your work - well done
 

jmacz

Well-known member
Great work! For the hinge mounts on my 540 I went ahead and epoxied up around the originals since they were actually still completely intact. Just blobs and bunches of epoxy filling all the empty space. 540c is starting to go and it's getting this hinge fix part fitted eventually.
Did you modify the original design because your printer wasn't large enough?

No, I was only going to do one hinge only (because I only saw a break on one side) so I made a new model with two separate pieces. But then discovered a crack on the other side later so printed both sides. I also had to increase the size of the holes as I plan on using a brass threaded insert (I didn't want to screw directly into the 3d printed plastic). I can definitely print the whole thing in one piece (which might actually be stronger) but going to try these two pieces first.
 

3lectr1cPPC

Well-known member
Is it designed to screw direct to the plastic? Because I'm pretty sure it's like the 100 and 1400 series ones, where you have to melt the original threaded inserts into the part with a soldering iron. Never done a 500 series one yet though so maybe that one's different.
 

jmacz

Well-known member
Is it designed to screw direct to the plastic? Because I'm pretty sure it's like the 100 and 1400 series ones, where you have to melt the original threaded inserts into the part with a soldering iron. Never done a 500 series one yet though so maybe that one's different.

For mine I made the holes large enough to accommodate an M2.5 brass threaded insert. But for the existing designs I found, the hole was really tiny and looked like it was meant to have the screws go directly into the 3d printed plastic. Action Retro's video on YouTube also looks like he's screwing directly into the 3d printed part. I don't think that will last nearly as long as using a brass insert.
 

3lectr1cPPC

Well-known member
Yeah that isn't great for longevity. Once you're done would you mind uploading your finished design here so myself and others can use it in the future? Are the original screws M2.5?

Would be ideal to have both the split off design you're doing and the full part so that people can print both depending on which fits their needs. Some people's printers are not large enough to print the full part in one piece I believe.
 

jmacz

Well-known member
Yeah that isn't great for longevity. Once you're done would you mind uploading your finished design here so myself and others can use it in the future? Are the original screws M2.5?

I have a pack of M2.5's in the mail (hopefully arriving tomorrow) so I will confirm. I believe it is as I tried a #2-56 today and although the pitch was correct, the #2-56 was slightly too small so I do think it's an M2.5 (since it's slightly larger than a standard #2 screw and also has a 56 tpi). I did however confirm that the two smaller screws in the lid are M2s so that adds evidence to the larger ones being M2.5s. Will know for sure tomorrow.

Yes, once I fit the threaded inserts and it works, I will upload the final design here as attachments. And yes, I can do both a one piece and a two piece model.

Would be ideal to have both the split off design you're doing and the full part so that people can print both depending on which fits their needs. Some people's printers are not large enough to print the full part in one piece I believe.

Yup, no problem!
 

3lectr1cPPC

Well-known member
Are the sizes close enough that it would be possible with your design to melt the original brass inserts in do you think? So the original screws can be reused?
 

jmacz

Well-known member
Are the sizes close enough that it would be possible with your design to melt the original brass inserts in do you think? So the original screws can be reused?

If I'm correct and the original screws are M2.5, then my design's ability to incorporate an M2.5 threaded insert should allow you to reuse the original screws.

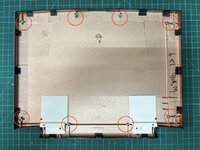
But unless my 540c is different from yours, the original laptop didn't have brass inserts for the lid. It does have brass inserts in the body but not in the lid. Take for example this picture:

IMG_4885.JPG

The red circles are the original screw mounts. There are no brass inserts in them. And the broken ones I'm replacing with the 3d printed part were the same, also with no brass inserts. If yours has brass inserts in the lid, I guess I have an older revision?
 

3lectr1cPPC

Well-known member
Ohhh really? Well no wonder they break like they do. Wow, that's a genuinely terrible design. I thought they did have them, but I guess not.

I'm surprised any are still intact at this point if that's the case.
 

jmacz

Well-known member
Ohhh really? Well no wonder they break like they do. Wow, that's a genuinely terrible design. I thought they did have them, but I guess not.

I'm surprised any are still intact at this point if that's the case.

Yeah, I was thinking the same thing. If added epoxy doesn't strengthen the existing non-broken ones, I was thinking I will eventually have to expand the 3d printed parts to all of these screw locations. 🤪
 

3lectr1cPPC

Well-known member
Well if you've got CAD skills and know how to design this stuff (I don't) - there are a lot of PowerBook 190 and 5300 owners right now that are looking for someone to design a hinge fix part for them, myself included. One you're done with this project, maybe look out for one of those as your next! You're clearly very talented, from this to you Q700 and such. And great work thus far.
 

LaPorta

Well-known member
My 1400 has a new PRAM battery in it, and it works properly....but that is likely because I have rebuilt regular batteries as well. Never knew about that guy offering them rebuilt...I just made one myself.
 

3lectr1cPPC

Well-known member
The guy making new ones only started in the last year or so, so after your restoration from 2021(?). And yeah yours works since your main battery works.
Another strange note on the 1400 though, my 166MHz unit actually had two PRAM batteries, identical ones, one on each side. Molding and ribbon cables were different to accommodate. Any idea why that is?
 

3lectr1cPPC

Well-known member
Oh yeah you're right! Guess that guy's 1400 was a dual-battery unit. So that confirms we have at least two of these in the wild.
 
Top