jmacz
Well-known member
27 years ago, I sold my PowerBook 540c via a Usenet posting. It was tough seeing it go but I needed the funds to expand my experiments with Linux at the time. Well after all this time, I took delivery today of a "parts only" PowerBook 540c for a really low price. Came with a power supply also.
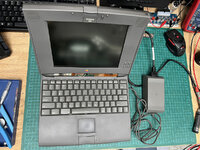
I had been keeping an eye open for a reasonably priced 540c and this particular one I purchased for parts. I figured it would be completely dead.
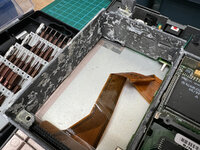
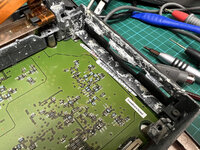
Task #1: Check it physically - I visually inspected the unit. Not a lot of scuffs and was in reasonably good condition. The plastic hadn't really yellowed. The rear port cover is present but one of the latch tabs is missing and thus it won't stay closed. The lid latch works. I did receive the front screen hinge cover but it's cracked and thus does not stay on (removed in the picture above). The hinge end caps look fine. Battery bays show signs of corrosion. There is residue on the walls of both battery compartments and there's corrosion present on the connectors. The power supply isn't cracked and seems in reasonable shape.
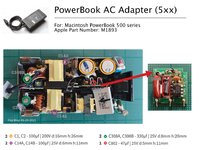
Task #2: Check the power supply - I left the power supply disconnected from the laptop and just plugged it into an outlet. I then used a multimeter to measure the voltage on the pins. Two were showing 16.4V or around there. I believe that's to spec so it looked like the power supply was actually working!
Task #3: Does the 540c power up? - I plugged the power supply into the laptop, held my breath, and pushed the power button. Nothing. Pushed it again. Nothing. Held it down for a few seconds. Nothing. Ok, as I expected. I was not expecting it to boot. I then went to clean up the box it came in and came back around a minute later. I tried pushing the power button one more time and woah... I heard the startup chime, hard disk came to life, and a few moments later, the screen turned on. And then it started booting!
Task #4: OS and Memory - After the Finder came up, checked the about screen. It's running System 7.5.5 and has 20MB of memory. So I guess that means 4MB on board and a 16MB expansion card.
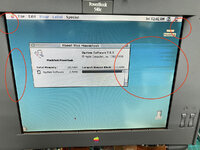
Task #5: Check the screen - The screen brightness is fine. Both the contrast and brightness buttons work. However, a couple issues. As noted above, there's some ghosting to the right side of all screen elements. This ghosting moves with the elements on screen (like the window). It doesn't look like damage to the LCD panel itself because the ghosting moves with the window for example. I'm hoping I can figure out what's wrong with this and fix it. There's also unevenness with the backlighting. The upper left and upper right corners have bright spots and the left edge also has a bright spot. Perhaps the backlight is going bad?
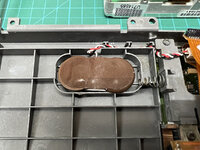
Task #6: PRAM battery - Clearly dead and of course that's expected. It's not holding time across shutdown and disconnect of the power supply.
Task #7: Sound, Keyboard, Trackpad - All working. No issues. Tested every key using Key Caps, tested the trackpad and trackpad button. Played some sounds back. All good here.
Task #8: Does the floppy work? - I placed a known good disk in and after pushing it in, the laptop lost power. What?? Tried to turn it back on and no go. Waited 30 seconds and tried again. The laptop started powering up. Go to the Finder. And then the disk loaded and appeared on the Finder with the proper contents. I tried ejecting and re-inserting the disk and that worked fine. Not sure what that reboot was but I couldn't reproduce it after that. So the floppy drive is working.
Task #9: How's the hard disk? - Did not do an extensive test here but it's booting and seems to be ok. Sounds a little wonky though. But working as of now.
So the unit seems to be ok. I was going to use this as a parts machine but given the condition it's in, I may just use this and try to restore it. The physical stuff I will deal with later. But this weekend I plan to open it up and check the boards. I have not done proper research yet on these 540c's so I don't know what the capacitor situation is. Also need to see how much damage there is from the corrosion in the battery bays. Hoping it's not too bad. Will first clean up the boards. Replace any capacitors as needed. Then go from there.
First question for those with deeper 540c knowledge (re: power supply) - with these power supplies, if it's working for me (which it currently is), do I just keep using it until it dies and then go through the pain of slicing it open to recap it. Or should I not wait and just slice it open now and replace the caps? Not clear to me how much damage I am exposing myself to by waiting to replace the caps.
Second question (re: power up procedure) - I don't think it's normal that I could not get the laptop to boot until about a minute or so after I had plugged it into the power supply. I would have expected the power button to work almost immediately. That seems to suggest a bad capacitor somewhere? But would that be in the laptop itself or would that be in power supply? I'm going to leave it disconnected for a bit and then reconnect just the power supply and see if I immediately see 16V+ on the two pins. If I do, I am going to assume the issue is with the laptop itself rather than the power supply. But then again, the fact that when I first tried the floppy drive and saw the laptop shut off by itself, seems like the power might not be 100% stable?
Anyhow, this is the beginning of a new adventure. Hopefully not too much of the plastic is brittle and I can 3d print or use plastic weld to fix some of the problem areas.

I had been keeping an eye open for a reasonably priced 540c and this particular one I purchased for parts. I figured it would be completely dead.
Task #1: Check it physically - I visually inspected the unit. Not a lot of scuffs and was in reasonably good condition. The plastic hadn't really yellowed. The rear port cover is present but one of the latch tabs is missing and thus it won't stay closed. The lid latch works. I did receive the front screen hinge cover but it's cracked and thus does not stay on (removed in the picture above). The hinge end caps look fine. Battery bays show signs of corrosion. There is residue on the walls of both battery compartments and there's corrosion present on the connectors. The power supply isn't cracked and seems in reasonable shape.
Task #2: Check the power supply - I left the power supply disconnected from the laptop and just plugged it into an outlet. I then used a multimeter to measure the voltage on the pins. Two were showing 16.4V or around there. I believe that's to spec so it looked like the power supply was actually working!
Task #3: Does the 540c power up? - I plugged the power supply into the laptop, held my breath, and pushed the power button. Nothing. Pushed it again. Nothing. Held it down for a few seconds. Nothing. Ok, as I expected. I was not expecting it to boot. I then went to clean up the box it came in and came back around a minute later. I tried pushing the power button one more time and woah... I heard the startup chime, hard disk came to life, and a few moments later, the screen turned on. And then it started booting!
Task #4: OS and Memory - After the Finder came up, checked the about screen. It's running System 7.5.5 and has 20MB of memory. So I guess that means 4MB on board and a 16MB expansion card.

Task #5: Check the screen - The screen brightness is fine. Both the contrast and brightness buttons work. However, a couple issues. As noted above, there's some ghosting to the right side of all screen elements. This ghosting moves with the elements on screen (like the window). It doesn't look like damage to the LCD panel itself because the ghosting moves with the window for example. I'm hoping I can figure out what's wrong with this and fix it. There's also unevenness with the backlighting. The upper left and upper right corners have bright spots and the left edge also has a bright spot. Perhaps the backlight is going bad?
Task #6: PRAM battery - Clearly dead and of course that's expected. It's not holding time across shutdown and disconnect of the power supply.
Task #7: Sound, Keyboard, Trackpad - All working. No issues. Tested every key using Key Caps, tested the trackpad and trackpad button. Played some sounds back. All good here.
Task #8: Does the floppy work? - I placed a known good disk in and after pushing it in, the laptop lost power. What?? Tried to turn it back on and no go. Waited 30 seconds and tried again. The laptop started powering up. Go to the Finder. And then the disk loaded and appeared on the Finder with the proper contents. I tried ejecting and re-inserting the disk and that worked fine. Not sure what that reboot was but I couldn't reproduce it after that. So the floppy drive is working.
Task #9: How's the hard disk? - Did not do an extensive test here but it's booting and seems to be ok. Sounds a little wonky though. But working as of now.
So the unit seems to be ok. I was going to use this as a parts machine but given the condition it's in, I may just use this and try to restore it. The physical stuff I will deal with later. But this weekend I plan to open it up and check the boards. I have not done proper research yet on these 540c's so I don't know what the capacitor situation is. Also need to see how much damage there is from the corrosion in the battery bays. Hoping it's not too bad. Will first clean up the boards. Replace any capacitors as needed. Then go from there.
First question for those with deeper 540c knowledge (re: power supply) - with these power supplies, if it's working for me (which it currently is), do I just keep using it until it dies and then go through the pain of slicing it open to recap it. Or should I not wait and just slice it open now and replace the caps? Not clear to me how much damage I am exposing myself to by waiting to replace the caps.
Second question (re: power up procedure) - I don't think it's normal that I could not get the laptop to boot until about a minute or so after I had plugged it into the power supply. I would have expected the power button to work almost immediately. That seems to suggest a bad capacitor somewhere? But would that be in the laptop itself or would that be in power supply? I'm going to leave it disconnected for a bit and then reconnect just the power supply and see if I immediately see 16V+ on the two pins. If I do, I am going to assume the issue is with the laptop itself rather than the power supply. But then again, the fact that when I first tried the floppy drive and saw the laptop shut off by itself, seems like the power might not be 100% stable?
Anyhow, this is the beginning of a new adventure. Hopefully not too much of the plastic is brittle and I can 3d print or use plastic weld to fix some of the problem areas.


