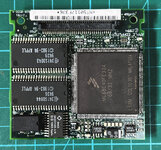
Overclocked CPU Upgrade For My 540C!
@croissantking recently procured a batch of full 68040s at 33MHz and I was able to pick up a couple from him (he's got more!).

My intent was to follow his footsteps and upgrade the 68LC040 in my restored PB540c with a full 68040 with FPU.
His thread on this upgrade is here. He had both Freescale parts as well as Motorola parts. I wanted a Freescale as the thought was they run cooler and would be a better candidate for overclocking.
After the CPU arrived, I utilized some Chip Quik to remove the Freescale CPU from the donor PCB, except the CPU would not come off! The Chip Quik had done its thing and freed the pins and kept them freed at low temperature, but the chip would only slightly twist and would not come off. Turns out the CPU had also been glued onto the PCB...

not only that, the glue wasn't concentrated in the center of the chip, rather the glue was off to the side and had overrun and gotten onto the pins as well. After realizing this, I had to switch over to hot air (in order to soften the glue). After many curse words and frustrating moments, I was able to get the Freescale CPU off the board but about 1/3rd of the pins were mangled in the process.

At that point, I was beyond frustrated and put the chip aside.
Next morning, I came back refreshed and pulled out a microscope to examine the damage. I used a pick to test each pin and nothing was broken or about to fall off. But they were bent way out of shape. I then spent the next few hours straightening each pin as best as I could into a position that would allow them to attach to the pad. In many cases, I focused only on getting it clear of the neighboring pins and able to attach to the pad. I didn't want to get it perfect out of fear that excessive bending would cause the pin to break off. Finally I got something that would work... ugly... but it should work.
I wasn't about to mess with my existing working CPU board (68LC040 33MHz overclocked to 40MHz). So I used a spare board I had lying around from a 520. The part number on the board was the same but I knew the crystal was different. After examining the board, I noticed one other difference. The 520 board had 0 ohm resistor bridging two pads whereas the 540c board did not have this. So I removed that resistor. Then I replaced the 12.5MHz crystal with a 16.5MHz crystal. And then started the painstaking process of attaching each of the pins on the Freescale CPU to the pads on this spare board. Given each pin was not exactly same as the one next to it, the soldering process was slow as I had to nudge each pin into place, ensure it really wasn't shorted to its neighbors, etc. Only ended up with 2-3 shorts in this process and quickly found those on a second pass and fixed them. I then used a multimeter to check every pin with its neighbors to confirm no remaining shorts and found none (there were a few pins that had connectivity with its neighbors but these were intentional cases which I confirmed with my other working cpu/board).
Ugliest thing I've ever done and totally embarrassed by it, but I was able to salvage the chip.

I installed the board into my PB540c and pressed the power button.. chime! Machine booted just fine and TattleTech confirmed the FPU was detected. Win!
I then took the 16.5MHz crystal out and replaced it with a 20MHz crystal to overclock the CPU from 33MHz to 40MHz. Then installed my modified 32MB memory card, and then booted again. All good.
I just completed running MacBench consecutively three times trying to put some heat/load onto the CPU to a.) ensure it's working and b.) ensure it's not going to overheat due to the overclocking. Everything seems fine.
Mission complete! PB 540c with full 68040 overclocked to 40MHz. I want to thank
@croissantking for showing that this could work, for helping me get the chip, and for providing valuable encouragement.

At this point I think I'm finally finished with this PB540c... fixed plastics and chassis.. working display.. two fully working batteries.. working PRAM battery.. newly greased keyboard that is a pleasure to type on now.. fixed front center bezel.. fully recapped... recapped power adapter and custom power adapter... upgraded memory module from 16MB to 32MB... and now 40MHz full 68040.


