• Updated 2023-07-12: Hello, Guest! Welcome back, and be sure to check out this follow-up post about our outage a week or so ago.

Reverse Engineering the Macintosh SE PCB & Custom Chips for 1:1 reproduction

Trash80toHP_Mini

NIGHT STALKER
Sure i'd take that method - as long as i get scans of the layers, i don't care how they were obtained - if someone else wants to do the disassembly and scan the layers at 1200dpi, i'll do the work in sprint. 
What's really nice about using the epoxy embedment/milling machine approach is that you don't need to desolder anything but the proprietary logic and anything else you might want. The first couple of passes will remove all the solder cones/pins and raze the metal bits off at each layer. [}:)]

Also be fore-warned: the official SE/30 schematics are missing a couple pages, and they contain all the test points, and resistor networks. So DONT forget those! 
Don't we have all that on the Bomarc schematic? Gotta get that one to see if it has the info missing from Apple's.


Bolle

Well-known member
I'll see what I can do. Also might try to sand one of them down to take a peek at the inner layers... oh this is going to be a mess :)


Trash80toHP_Mini

NIGHT STALKER
[:)] Me loves messes! Make sure to wear a good mask and have airflow outside whilst sanding, there's lead in them thar hills

Was thinking about the notion of bfanching off to a dedicated thread. This one shows the methodology, the way it builds, segues into the next project, while the first one goes into the testing phase. Maybe a title modification and a link to the fourth or 5th page, the dawn of the SE/30 project would suffice?


Bolle

Well-known member
I actually put them on a infrared preheater and hot-aired the shit out of the board. If you’re careful and got everything dialed in correctly with the temperature settings you can just pick up everything from the board - even the through hole components - without burning anything.

Plastic connectors and sockets don’t like that treatment though, but those are easily replaceable.


archer174

Well-known member
I have a few SE boards and wouldn't mind assembling one of these repros for testing. Sounds like fun. If there's a spare let me know. Definitely +1 for the SE/30 board!


LightBulbFun

Well-known member
Just popping in to say via tip off from @Daniël Oosterhuis

this is really awesome stuff! 

keep up the Awesome work ,im very interested to see how it all turns out :)  

I have a (fortunately working) SE, but really want to get an SE/30 or upgrade my SE with an SE/30 motherboard!


Kai Robinson

Well-known member
What color? :huh: Good on ya!
Just plain green, can bugger about with the extra cost of colours later, finished product I’m aiming for matte black with a clear solder mask, like this; 
7f16f57013c9737a8041cd66b20285f4.jpeg.1dd221197383474dc0760f529540394b.jpeg


rplacd

Well-known member
Hot damn, times like this I wish 68kmla had its own little Kickstarter clone... it'd allow us folk without the technical chops to somehow chip in.


Kai Robinson

Well-known member
I mean if people wanna throw some beer tokens my way eventually, i won't say no, but that's not why i'm doing it - it's ultimately for the preservation effort. 


paws

Well-known member
My impression is that the custom chips in anything after the SE get a lot more complex, but that reimplementing the GLU chip seems fairly easy... The video system in the SE is a variant of the original's, as far as I can tell, very simple stuff. Not saying the later ones are impossible to recreate, of course, but that's when they start keeping separate video RAM etc. If you want to do a faithful clone of a 68k Mac, I think the SE is a good choice.


Kai Robinson

Well-known member
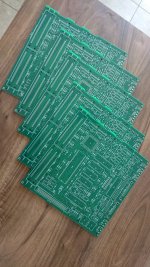
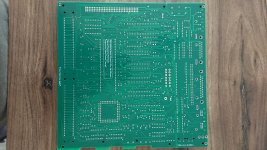
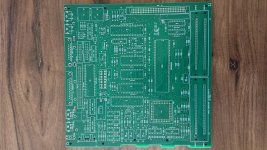
Well, here they are...

So - hands up who's still in? There's a few things i've noticed such as tight holes on the PDS side of things...and the SIMM SLOTS, but other than that sockets fit fine! All holes seem to line up 1:1 as well. 

DSC_0393.JPG

DSC_0395.JPG

DSC_0394.JPG

 
Top