• Updated 2023-07-12: Hello, Guest! Welcome back, and be sure to check out this follow-up post about our outage a week or so ago.

PowerBook 1400c/166 restoration/combination thread

croissantking

Well-known member
Interesting, I did not! Well I've got a 166 board so I'm good for now, but that is good to know. Do you know where I could find resources on downclocking? Would be a good page for my website. I wonder why it doesn't work at 166 though, Newer, Sonnet, Interware, etc, managed to get G3s working on the 117/133 boards no problem. Would love to know the technical explanation behind that if anyone does know.
I’ve done the mod myself - the info is at http://hardsdisk.net/1400clock.html . Can confirm it works 100%.

The issue is the ROMs on the 117MHz board - they do not support/recognise multipliers above 4x, so the maximum setting is 133MHz on a 33MHz bus. Obviously the upgrade card manufacturers found a way around this, perhaps they patched the ROM at startup?

The only difference between the two revisions of motherboard is the version of the ROM chips onboard, the later one supporting multipliers of 5x and beyond. That said, I doubt you’d see much difference between a 133 and 166 in real world use, it’s having the 128kb L2 cache that really matters.
 

3lectr1cPPC

Well-known member
Is that your site? Either way it's great, love the retro styling, frozen in time from the 2000s. Good info, I'll link that page when I do 1400 series pages on my site.
 

croissantking

Well-known member
Is that your site? Either way it's great, love the retro styling, frozen in time from the 2000s. Good info, I'll link that page when I do 1400 series pages on my site.
Ah, it’s not mine. It is informative though. The next part (about overclocking the bus) is interesting, not sure if I can be bothered to try.
 

3lectr1cPPC

Well-known member
Spin up a thread on it if you do decide to, would be a great resource for all the 133 owners out there. I'm not doing any more experiments myself though. After this project is done, I never want to touch the insides of a PowerBook 1400 again.
 

MacUp72

Well-known member
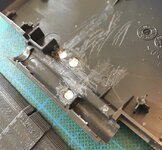
It’s done. And yes, I was basically working continuously on it since my first post where I talked about a plan for a fix to the misalignment. This took absolutely forever and is potentially the most difficult repair job I’ve done, ever. At the very least it’s up there. Now to reassemble the screen and test the hinge.
View attachment 59453
The left side ended up being misaligned as well by the way…


yeah the hinge fix..its a pita but it worked on mine after checking, rechecking the alignment again in my little tut.
I marked the old positions underneath with a silver marker before glueing in the hinge, so that I was quite sure it wasnt completly off..

your fix, I would just have reheated them with the iron just like you did to get them out again..then fill the holes and reposition them
- the reinforcement shim is strong enough even with the two holes slightly shifted now I think, but no idea what that cracking noise was.
the little new crack, I would just fill it with a bit of Weld-On and do a press fit, did that on mine, too.

1.jpeg 2.jpeg


but your weld-On seems quite stable..
 
Last edited:

3lectr1cPPC

Well-known member
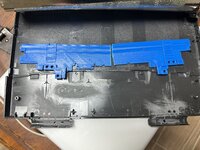
Time to finish up. Second hinge part install is next, and I’m trying to get it done better this time. Already got the sanding down basically done.
AF4D81FE-1639-480A-B6C9-AF6910E70B85.jpeg
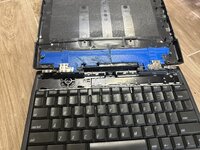
This time in an attempt to avoid the misalignment issue, I went ahead and chopped the hinge fix in half, and then also removed an extra bit of material from it so that the two pieces fit nicely. I’m using those two vertical jutting out bits as a guide. Last time, I could only fit the part into one of them at a time, but now with it split, both sides fit nicely. Looks like it may be a tiny bit vertically misaligned but to a small enough extent that it shouldn’t be an issue. After all, it must have been present on the first one, and that was never an issue, only the horizontal was. If it ends up being a problem I can always adjust the brass inserts.
Tomorrow I’m going to JB one side on and then let it set with weight, then the other side. Once both have cured I’ll reassemble and then assuming all’s well, this project will be finished!
 

greystash

Well-known member
Nice job! I had the same alignment issues with the shim and ended up cutting it to fit. I also found it wasn't helping much, as soon as downward pressure was applied to the lid the cracks started opening again. Instead I filled the area with wood filling compound which is working really well. I haven't got around to posting how I did it yet but I filled the case with it, then put food wrap over top of it and put the screen into position to create the mould. After solidifying it seems do a much better job at distributing the pressure. There now seems to be more stress where the hinges connect to the laptop base (along with creaking), so that's where I will be reinforcing next.
 

3lectr1cPPC

Well-known member
Would love a write up on that! This is all honestly just an experiment - neither of these display housings are honestly in very good shape. The first one is decent, this one has a bunch of scuffs and scratches, but it’s not cracking yet. I’m just seeing what works and what doesn’t, then next time I get my hands on another 1400, I’ll test another method. Yours sounds promising! I’ll stay on the lookout for more cheap parts machines. Can’t ever have too many 1400s, right? 😅
 

greystash

Well-known member
Would love a write up on that! This is all honestly just an experiment - neither of these display housings are honestly in very good shape. The first one is decent, this one has a bunch of scuffs and scratches, but it’s not cracking yet. I’m just seeing what works and what doesn’t, then next time I get my hands on another 1400, I’ll test another method. Yours sounds promising! I’ll stay on the lookout for more cheap parts machines. Can’t ever have too many 1400s, right? 😅
Too right! :LOL: I have four I've picked up slowly over the years so have a few to experiment with too. I just want at least one that will stay together long(ish) term! I'll let you know when I've got something together
 

3lectr1cPPC

Well-known member
Despite me best efforts, I still had to spend multiple hours realigning the left side inserts to the right, and I also had the lower the right side ones slightly IIRC. Not as bad as last time though. Now to reassemble.
E62CB040-2A60-4E17-BBFD-8857D648077E.jpeg
 

AEChadwick

Well-known member
Despite me best efforts, I still had to spend multiple hours realigning the left side inserts to the right, and I also had the lower the right side ones slightly IIRC. Not as bad as last time though. Now to reassemble.

(i've done three 1400s with that piece and never encountered an alignment problem... was your print accidentally scaled? or did it shrink 2%? or something?)
 
Top