• Updated 2023-07-12: Hello, Guest! Welcome back, and be sure to check out this follow-up post about our outage a week or so ago.

Macintosh SE/30 Restoration

PotatoFi

Well-known member
Thanks a bunch, PotatoFi....was just getting ready to ask about Cap options.

note....my board is in GREAT shape, except the right plastic connector for the ROM has cracked.  I would think it should be ok, but has anyone else run into that?

View attachment 30891


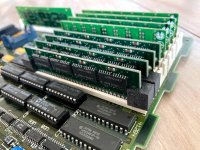
I have a slot on my SE/30 that is similarly broken, so I made these little 3D printed parts that press over the top and hold them in. If you need me to run off a set for you and drop them in the mail, I'd be happy to!

IMG_0028.jpg


PotatoFi

Well-known member
Okay, time for another update! I am restoring several Macs all at the same time right now, so I happened to have a tub of hydrogen peroxide going outside, along with some hot sunny weather. With cold, cloudy weather on the horizon (and the other two Macs done with Retrobrite), I decided to get the SE/30 run through as well.

I'm also getting this written down now, because my photo roll on my phone is three Macs in various stages - very difficult to remember which is which!

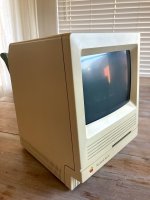
Here it was before teardown.
IMG_0530.jpg

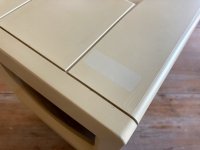
Pretty nice unit! A few scratches but nothing serious.
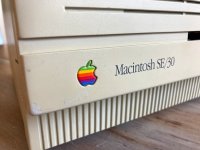
IMG_0531.jpg

There must have been a sticker here.

IMG_0532.jpg

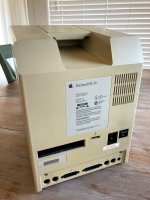
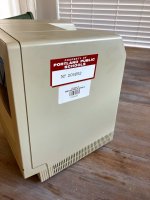
There are absolutely some stickers here! Remember that I bought this one off a guy in Portland, which is about a 6-hour drive from Boise, Idaho where I live.
IMG_0533.jpg

The back is in very nice shape.

IMG_0534.jpg

I had to get these stickers off before I could do retrobrite. I let them soak in Goo Gone for awhile, and then when after the white sticker with my fingernails. I got it off, but it was a real pain.

But nothing could prepare me for the pain of the red sticker! Not only was it difficult to peel... it broke off in teeny tiny pieces. Eventually I used a combination of hair dryer and flat razor blade to get it off. What a pain.

If you look closely, you can see where the UV got through the sticker over the years.

IMG_0542.jpg

Time for teardown! Of course, the first step is to ALWAYS discharge the CRT, even if the machine has been sitting for months. If you are afraid of doing this, I encourage you to not be! I've never heard so much as a "click" when discharging these. Just follow the procedure to the letter, and you'll be fine.

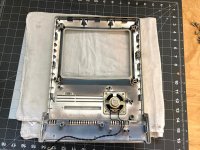
Down to just the front panel!
IMG_0556.jpg

To get the speaker off, I just snip off the melted plastic posts with flush cutters. I was surprised to find a little rubber gasket in here. I've taken apart about 6 SE's now and I'd never seen one of these. But I've never taken apart an SE/30.
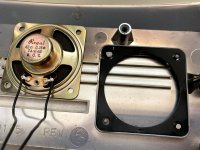
IMG_0557.jpg

Of course, I popped out the Apple badge.
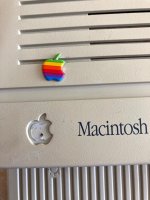
IMG_0559.jpg

I didn't get any photos of Retrobrite in the sun, but this is the exact same container of peroxide from a couple days earlier. Once the water his 110°F, things really start moving. I used 5 or 6 32-oz bottles of 40-proof peroxide.
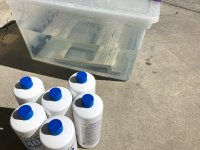
IMG_0425.jpg

The back (bucket) had plenty of time in the sun and peroxide, but the front needed a little bit extra time after the weather turned bad. So I put it in the garage with the fish tank heater and UV light. To be honest, even after 10 hours, I didn't see much improvement. But I decided that it was good enough and moved on.
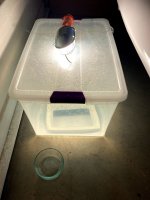
IMG_0623.jpg

Last week, I placed an order from DigiKey, and with that order I got a muxer chip and some spares. It was very cheap - less than $1, so I ordered four to have some spares. I also ordered some Chip Quik, which is a special low-temperature solder designed to help you desolder SMD parts without a hot air station.

Here's the chip before desoldering. The legs are just an oxidized, awful mess!
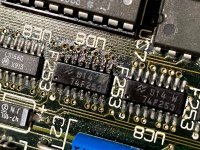
IMG_0630.jpg

I didn't get any photos of the Chip Quik, but it's basically some pieces of "desoldering alloy". It melts extremely easily, and stays liquid for a super long time. You apply the included flux to the legs, and melt a bunch of solder on all the legs of the chip. Keep your iron moving around, the heat spreads onto all of the pads, and suddenly the chip pops off! I was surprised at how fast and easy it was.

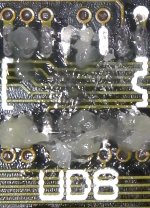
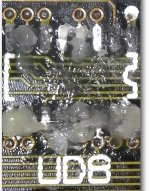
This is the mess I was left with. The leftover flux hides the horrible condition of these pads. At first, I thought a bunch of pads were gone, but then I realized that they were covered in a truly impressive amount of junk. No wonder this chip wasn't working! Well... the chip probably worked fine, but it had little connectivity to the board.
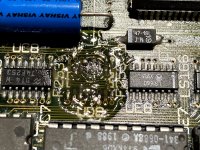
IMG_0632.jpg

After cleaning up the flux with alcohol and cotton swabs, I added a bit more flux, and dragged the desoldering braid across everything a few times. Then I dug out the microscope to get a closer look. Ugh, what a mess! And this was after some cleaning!
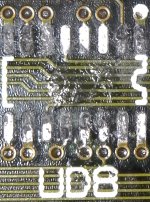
Screen Shot 2020-06-07 at 7.06.16 PM.jpg

More flux...

Screen Shot 2020-06-07 at 7.07.21 PM.jpg

I tried a whole bunch of stuff. Applying flux, and burning through the junk with the iron directly, scratching at each pad with my tweezers, and finally, a bunch of flux and dragging the desoldering braid across each pad. I found that if the braid had a bit of solder in it, and if I used it kinda like sandpaper, it eventually got through everything. I was shocked that I hadn't lifted any pads by this point!
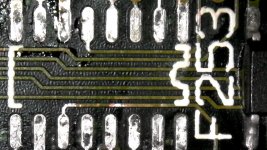
Screen Shot 2020-06-07 at 7.31.01 PM.jpg

As step before soldering down the chip: a bit more flux.
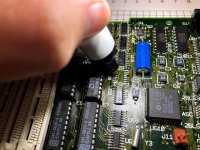
IMG_0633.jpg

Time to solder down the chip! I didn't get a final photo, but my strategy is just like with my capacitors. I tin one leg, heat that pad, slide the part into place, and remove the heat. Then I solder all of the other pads, and drag away any excess solder. Not a perfect job, but it turned out okay!

In this photo the IC is a bit crooked, but I straightened it out.
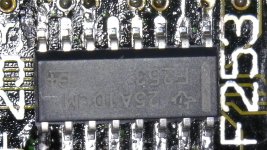
Screen Shot 2020-06-07 at 8.33.21 PM.jpg

With the new chip soldered in, it was almost time to test! Aaaaaafter I reassemble the whole computer. First, I hot glued the speaker back in:
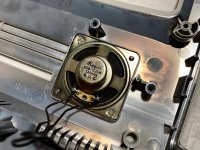
IMG_0642.jpg

Chassis installed, CRT installed, then analog board (not shown):
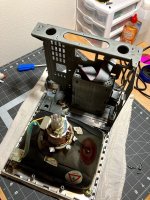
IMG_0643.jpg

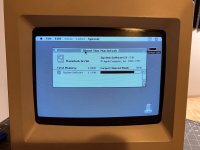
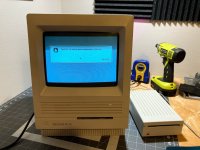
And now, the moment of truth... does it work?
IMG_0645.jpg

It does! Hooray! Not sure what the RAM complaint is all about. Just happy that I have an SE/30 that works!

I also did notice that the sound is not working; there's no chime. So I will be investigating both that and the RAM issue next. I guess it's also just about time to find some RAM for this machine... what's the crowd thing? 32, 64, or 128 MB of RAM? Let me know if you think you know what is wrong with the sound, and how much RAM I should install.
Screen Shot 2020-06-07 at 7.07.21 PM.jpg


techknight

Well-known member
I have 32Megs in mine, I dont need more than that. But it all really depends on what your going to do with it. 
Sure you could max it out to 128MB just to say you did, but Not sure what would occupy that amount of RAM. 


Daniël

Well-known member
I'd agree 32MB is probably a good spot to be at. If you're going over that, I would recommend a custom ROM that disables the memory check. You're going to need a clean 32-bit ROM for such high memory capacity anyways, and the reason you'd want the memory check disabled is because SE/30s will take a really long time to do that, making cold power ons excruciatingly slow. Sure, the memory check was important back in the day when doing mission critical work, but I think for most of our 68k kicks, it's not that important  :eek:)


erichelgeson

Well-known member
I'd like to get to 32mb as well, but I don't see any 8MB SIMMs - or how you'd make a combination to get to 32 :D

We've been talking about what/where to buy in this thread - actually bought a set that did not work :/


techknight

Well-known member
Yea, not sure what they cost. I simply used what I had laying around that ive collected over the decades. 


PotatoFi

Well-known member
Okay, I think I need a bit more help. @techknight, I'm looking to you a little bit! Still waiting on RAM so I haven't actually booted up an OS on this thing, but as noted early, there is no chime or bong. It's the same thing from both the speaker and the 3.5mm headphone jack. There are a couple of very short pops or clicks from the speaker when I first turn on the power switch.

I went ahead and recapped my analog board (not the power supply, just the A/B) not expecting a fix, but worth nothing that there was no change in behavior.

My guesses:

  • Bad/eaten trace on the logic board
  • Corrosion on a critical sound IC somewhere
  • Missing -12v rail, I think I heard that can cause this

I know where the two Sony chips are, but isn't there one more IC that handles sound?

 
Last edited by a moderator:

PotatoFi

Well-known member
Okay, I have some good news, and some bad news.

The good news is that the sound does seem to work!

The bad news is that I installed my 4x16mb sticks of RAM in Bank A, and now when I power on the machine, it shows horizontal zebra stripes, and goes "CHIIIIIIIIIIIIIIIIIIIIIME" continuously, and very loudly.


PotatoFi

Well-known member
More news! I swapped my 4x16 mb sticks into Bank B, and I installed my 4x256 kb sticks into Bank A. Backwards, I know... but it boots again! I was able to boot into a System Tools disk, and it shows 2 mb of RAM. Is that an indicator that it's working, and I just need to install mode32?

Also, the sound is still not working. When I adjust the sound, the speaker pops, but there is no actual sound.


erichelgeson

Well-known member
I just installed 4x16mb + 2mb (66 total) today for the first time - for me it showed 66mb before installing mode32 - just the finder was "using" 60mb of it. After installing mode32 the finder (7.5.3) was using 4mb and the rest showed as free. If it's not showing I don't think it's working. If it's the "yellow" ones from amazon, I could not get them to work and had to RMA.

View attachment 34799

 
Last edited by a moderator:

PotatoFi

Well-known member
Thanks @erichelgeson! I'm happy to report that I've found some success, but not how I expected. The machine came with 4x256kb sticks in Bank A. I was under the impression that you must use larger sticks of memory in Bank A, and smaller sticks in Bank B. This source in particular notes that you must also put something in Bank B if you plan to use 4x16mb.

As you'll see in a moment, it turns out that the RAM configurations for the SE/30 are all over the place, as you can see documented here and also here by @jessenator.

I tried 4x16mb in Bank A, and nothing in Bank B. Horizontal zebra stripes, and the never-ending "BOOOOOOOOOONG" sound.

I tried 4x16mb in Bank A, and 4x256kb in Bank B. Horizontal zebra stripes, and the never-ending "BOOOOOOOOOONG" sound.

I tried 4x256kb in Bank A, and 4x16mb in Bank B, and it worked, showing 2,048k!

IMG_0684.jpg

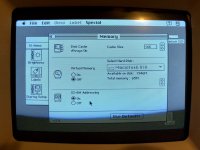
Next, I installed MODE32 from the Macintosh Garden. After the installation, I went to the Memory app in the Control Panel and turned 32-bit Addressing on. I'd already done it here, but I figured it would be good to document this with a screenshot.

I was also impressed that MODE32 added a control to the Memory app. Very slick.

IMG_0686.jpg

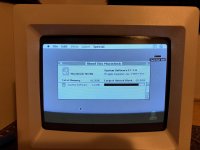
I rebooted (not power cycled), I get 66,560k!

IMG_0685.jpg

Also, I noticed that after a full power cycle, the machine seems to "POST" or whatever we call that here very, very fast. I'm used to a blank screen when the 4mb memory check slowly happens on my SE FDHD. On this machine, it's nearly instant. Then, it hangs on the Happy Mac for quite awhile (about as long as I'd expect) before booting.

Also also, I am shocked at how performant this machine is. I'm used to the Plus, SE, Classic II, and LCII. I know I haven't installed much, but with a SCSI2SD, this thing is blazing fast. I'm looking forward to do doing more on it!

Tomorrow is supposed to be rainy, which is great. That means I can work on my SE/30! Here are my plans for tomorrow and the days after that:

  • borrow the hard drive bracket, LED, and screws from my Trash SE FDHD that I just restored
  • 3D print a SCSI2SD bracket
  • Service the floppy drive
  • Install the floppy/SCSI2SD assembly
  • Tune the size, centering, and rotation of the CRT
  • Track down the "no sound" issue
  • Decide what version of System 7 to install, and install it
  • Install my Asante Ethernet card and see if it works (an awesome gift from my friend @sclements)
 
Last edited by a moderator:

PotatoFi

Well-known member
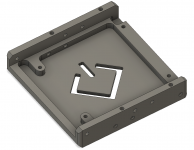
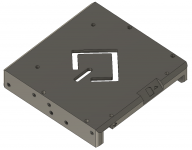
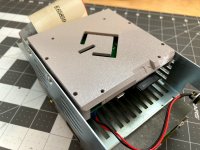
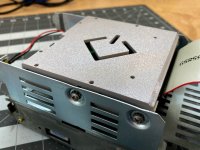
More progress today! I modeled up a SCSI2SD bracket for it. I designed it to fit in SE's, Classics, and LC-series machines.

Screen Shot 2020-06-13 at 1.36.33 PM.png

On LC-series machines, it will mount to the chassis with the board facing up. In a Classic II, SE, or SE/30, it will mount with the SCSI logo facing up.

Screen Shot 2020-06-13 at 1.36.49 PM.png

I started that on the printer in grey, which I think will look nice in the machine.

IMG_0694.jpg

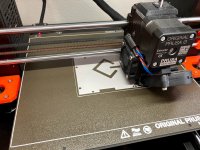
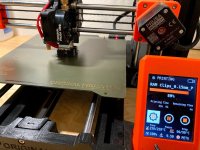
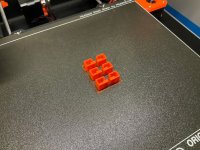
You also probably remember that one of my RAM slots is broken. I tweaked my "RAM Clip" design a bit and ran set of those off on my Prusa MINI.

IMG_0695.jpg

It was a pretty fast print! Here are the results.

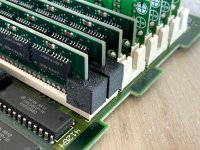
IMG_0698.jpg

Extreme closeup! I printed these with PETG, which doesn't print quite as clean as PLA. But it's a bit "springier" which I like. The RAM stick doesn't move around at all! I used some clips on the adjacent slot as well just to show them off.

IMG_0699.jpg

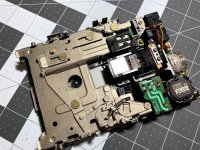
Next I tackled the floppy drive. I've documented this in several other threads (such as my Classic II Restoration), so I won't go over it again here. But for the sake of documentation, here it was before. It was one of the cleanest drives I've seen.

IMG_0696.jpg

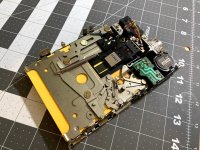
Here it is after a clean and lubrication. Disks fly out of it now!

IMG_0697.jpg

With the floppy drive done and the SCSI2SD mount finished, I assembled everything.

IMG_0702.jpg

IMG_0704.jpg

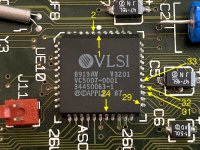
This afternoon, I also spent some time troubleshooting the sound issue on the logic board. I spent a lot of time looking at the SE/30 schematics, and looking for broken traces. I especially looked between UE10 (ASC), UB10, and UB11, since there are four caps between them. I also checked a few traces between UE10 (ASC) and the GLUE chip. Everything seems fine.'

I did check output voltages from the 14-pin logic board/analog board connector, and found -10v coming from that. Could that be the problem? I see the the schematic that -12v is used a in a few places.

Just to reiterate what the problem is: there's no sound, except for if the RAM is misconfigured or if there is a hardware fault that causes that horribly loud looping chime thing. When the machine is working, there are little pops and clicks whenever a sound is meant to be played. The problem exists at both the speaker and the the headphone jack.

By the way, one thing I could NOT figure out was how to count pins on those square packages. Everyone said to look for a dot. Couldn't find it. Finally, I realized that the dot was printed on the board itself. D'oh! Here's a quick reference guide for UE10 that I made.

IMG_0700.jpg

 
Last edited by a moderator:

VMSZealot

Well-known member
What configuration did you use for SCSI2SD?  I'm having no luck at all with mine.  This is the story.

With the old hard drive, my Mac was Sad Mac'ing on every boot.  I tried fitting my spare hard disk, loose in the case, and it booted fine (so I don't think that the problem is with my SE/30).  Feeling pleased with myself (and also very tired after a long day at work) I fitted it to my SE/30 - and put a mounting screw through the controller board on the hard drive.  Which shouldn't even be possible, don't ask, I totally doofus'd.

Without another hard drive available, I bought a SCSI2SD, imaged an SD card, fitted it - and nothing.  Turns out that if I boot from a floppy with Silverlining installed then the SD card mounts - so it's partially working, but it won't boot from it.  Furthermore, if I try writing to the card (whilst booted from the floppy, of course), the copy soon hangs.  If I try running something from the card then I quickly get a bus error.

What configuration is known 'good'?  What size SD card? How did you write the SD card?  What configuration should I use for the SCSI2SD adaptor? How can I make my Mac happy again!?


davidg5678

Well-known member
What configuration did you use for SCSI2SD?  I'm having no luck at all with mine.  This is the story.

With the old hard drive, my Mac was Sad Mac'ing on every boot.  I tried fitting my spare hard disk, loose in the case, and it booted fine (so I don't think that the problem is with my SE/30).  Feeling pleased with myself (and also very tired after a long day at work) I fitted it to my SE/30 - and put a mounting screw through the controller board on the hard drive.  Which shouldn't even be possible, don't ask, I totally doofus'd.

Without another hard drive available, I bought a SCSI2SD, imaged an SD card, fitted it - and nothing.  Turns out that if I boot from a floppy with Silverlining installed then the SD card mounts - so it's partially working, but it won't boot from it.  Furthermore, if I try writing to the card (whilst booted from the floppy, of course), the copy soon hangs.  If I try running something from the card then I quickly get a bus error.

What configuration is known 'good'?  What size SD card? How did you write the SD card?  What configuration should I use for the SCSI2SD adaptor? How can I make my Mac happy again!?
I'd recommend following the guide on this website. It should have all of the information you'll need to get your SCSI2SD working.


davidg5678

Well-known member
Yeah - I tried that (and it's an excellent resource).  Sadly, it still isn't working!
Why don't we continue this troubleshooting in another thread? I wouldn't want to hijack PotatoFi's restoration posts.

Did you power your computer on after putting a screw through the hard disk's controller board? This could have fried the SE/30's SCSI controller if it was powered up...


PotatoFi

Well-known member
I like your SCSI2SD mount. Would you be willing to share the STL?
Yes! I am doing a bit of final tweaking to the design but plan to release it soon. The STL will of course be free for anyone who has a printer, and if someone wants to buy a printed part from me, I'd be happy to run one off for them. Please keep reminding me to get everything posted.

Why don't we continue this troubleshooting in another thread? I wouldn't want to hijack PotatoFi's restoration posts.
Thank you very much for this suggestion! But please loop me in on the new thread, I'd like to watch the discussion.

---

Back to the SE/30! Sadly, I'm in a bit of a holding pattern right now. If anyone has recommendations, please let me know.

  • There is no chime on startup, just a couple of subtle, sad "pops" from the speaker
  • The problem is the same on the speaker and the headphone jack
  • From the "Sound" Control Panel, some sounds work great, some sounds crackle, and some do not work at all
  • Usually, invoking a few different sounds eventually causes the machine to lock up solidly
  • "Quack" in particular sounds clear and doesn't ever seem to cause the machine to lock up
  • Sound in Microsoft Flight Simulator 4.0 is erratic, with a clear engine sound for a few seconds and then no sound for the rest of the session


I've buzzed a few (but not all) of the traces between the the ASC and GLUE chip. All the ones I tested seemed okay. I also popped out the ROM, hit the contacts with an eraser, and reinstalled it. I even went out to the garage to see if my IIsi had a ROM I could steal; sadly there is a ROM slot but no ROM installed.

So... other than buzz every single address and data trace between the ASC and GLUE, I do not know what else to try. Hey @Bolle? @techknight? Any ideas on this one?

 
Last edited by a moderator:
Top