Fizzbinn
Well-known member
*** This content is from a thread lost in the 6/30/2021 outage. I'm reposting attempting to include info (if not images) posted by others. ***
** @Fizzbinn 5/3/2021 **
A while ago I picked up a cheap Duo 230 with a cracked screen that was otherwise working, been on the lookout for parts machine and recently found one that appeared to have a good screen.
Combining them into one did result in a working machine (yay!), but both screen lids had broken hinge area screw stand-offs that needed repair, and before buttoning everything up I thought it would be a good idea to replace the logic board and LCD capacitors too.
Hinge Repair:
There is a lot of info/discussion out there on this problem common to a lot of PowerBooks, the bottom line is the plastic case pieces that secure brass stand-offs crack and break off over time and use which not only leads to non-secured components but also further case damage due to new stress points.
The fixes/repairs all involve finding a way to reestablish a case secured mounting point for the screws in question. Most seem to focus on resecuring the original brass stand-offs but I have seen drill holes and use case external screw nuts.
I had thought about making an ABS slurry with broken bits of other PowerBook plastic and acetone but after some unsuccessful tests I decided use JB Weld PlasticWeld epoxy. I was hopeful as it specifically mentions ABS plastic compatibility.
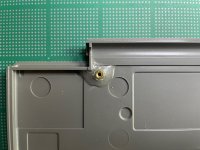
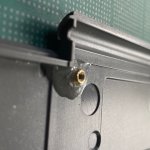
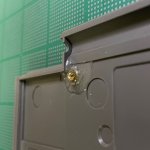
I cut away the broken/remaining plastic pieces of the brass stand-off support, made sure the brass stand-offs were seated in the remain original depression and applied the epoxy with a wooden chopstick. The thickish epoxy sets relatively quickly but you have plenty of time to work with it. The fact that it spreads seems like a plus to me, more surface area to to bond with.
I think It turned out great, although I guess only time will really tell.
** @Fizzbinn 5/4/2021 **
On to the logic board capacitors:
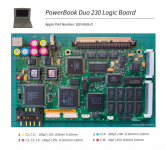
PowerBook Duo 230 (820-0426-D) logic board capacitors:
2 x 100uf - 25v - D:8mm H:10mm (C2, C11)
3 x 100uf - 35v - D:10mm H:10mm (C3, C5, C9)
1 x 330uf - 16v - D:10mm H:10mm (C14)
1 x 33uf - 25v - D:6mm H:6mm (C36)
I didn’t see any leakage so I did hesitate a bit but decided to proceed since I had two working boards and they are bound to leak eventually.
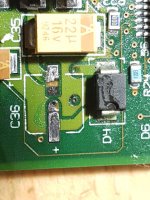
Removing the capacitors turned out to be a bit of a chore, mainly since I didn’t feel comfortable using the twist off method with the larger, non-corroded, cans and how tight they are packed together. I ended up using ChipQuik, a very small amount melted into each pad (with lots of flux) stays liquid long enough that you can remove the caps with a single soldering iron and a gentle nudge.
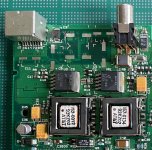
(Note in this picture I had already replaced C36...)
For the replacement capacitors I decided to use Aluminum Organic Polymer Capacitors and see if I could find smaller diameter equivalents (I could!) to make them easier to install. Here’s what I ended up with along with the Mouser part numbers:
2 x 100uf - 25v - D:6.3mm H:8mm (C2, C11) - 647-PCH1E101MCL4GS
3 x 100uf - 35v - D:8mm H:10mm (C3, C5, C9) - 647-PCZ1V101MCL6GS
1 x 330uf - 20v - D:8mm H:10mm (C14) - 647-PCH1D331MCL6GS
1 x 33uf - 25v - D:5mm H:5.9mm (C36) - 667-25SVPK33M
...and partially reassembled, with my fingers crossed, it passed the start up chime test and proceed to boot just fine!
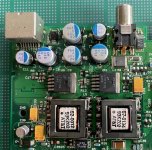
...and partially reassembled, with my fingers crossed, it passed the start up chime test and proceed to boot just fine!
And lastly the LCD panel capacitors:
The passive matrix LCD display was working pretty good from my prospective but again the capacitors would eventually go and I had already had some experience replacing caps like this on my PowerBook 100’s LCD panel.

PowerBook Duo 230 Sharp LCD panel (LM64N794) capacitors:
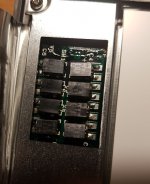
8 x 3.3uf - 35v - “Plastic Encased Electrolytic” (C1 - C8)
Those are the same quantity and specifications as the capacitors I had replaced in my PowerBook 100 LCD! In that case I had used size B tantalum capacitors but even with their small size it was a somewhat tight fit.
After reading this post I decided to use smaller Multilayer Ceramic Capacitors (thanks @superjer2000!)
<link lost>
Info with Mouser part number:
8 x 3.3uF - 35V - MLCC (C1 - C8) - 810-C3216X7R1V335M6A
Removing the old caps showed a couple had started to leak and corrode their pads.
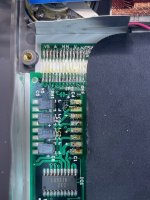
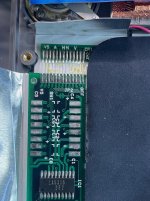
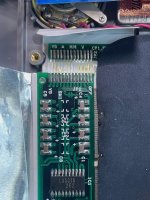
...another partially reassembled test ....and success!
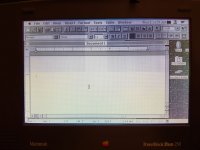
Before:
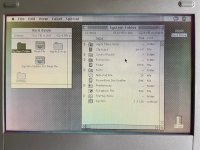
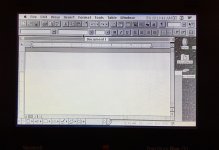
After:
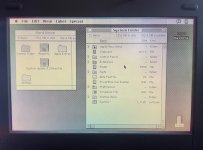
Above pictures are with default brightness and contrast. It’s subtle but definitely improved, noticeably less banding overall in use. Re-capped passive matrix screens look pretty good to me! Wonder if the modern capacitors actually perform better than the originals?
** @sutekh 5/4/2021 **
This is the way. ABS / acetone slurry is quite porous after the solvent evaporates and lacks sufficient strength for this application.
** @Fizzbinn 5/3/2021 **
A while ago I picked up a cheap Duo 230 with a cracked screen that was otherwise working, been on the lookout for parts machine and recently found one that appeared to have a good screen.
Combining them into one did result in a working machine (yay!), but both screen lids had broken hinge area screw stand-offs that needed repair, and before buttoning everything up I thought it would be a good idea to replace the logic board and LCD capacitors too.
Hinge Repair:
There is a lot of info/discussion out there on this problem common to a lot of PowerBooks, the bottom line is the plastic case pieces that secure brass stand-offs crack and break off over time and use which not only leads to non-secured components but also further case damage due to new stress points.
The fixes/repairs all involve finding a way to reestablish a case secured mounting point for the screws in question. Most seem to focus on resecuring the original brass stand-offs but I have seen drill holes and use case external screw nuts.
I had thought about making an ABS slurry with broken bits of other PowerBook plastic and acetone but after some unsuccessful tests I decided use JB Weld PlasticWeld epoxy. I was hopeful as it specifically mentions ABS plastic compatibility.
I cut away the broken/remaining plastic pieces of the brass stand-off support, made sure the brass stand-offs were seated in the remain original depression and applied the epoxy with a wooden chopstick. The thickish epoxy sets relatively quickly but you have plenty of time to work with it. The fact that it spreads seems like a plus to me, more surface area to to bond with.
I think It turned out great, although I guess only time will really tell.


** @Fizzbinn 5/4/2021 **
On to the logic board capacitors:

PowerBook Duo 230 (820-0426-D) logic board capacitors:
2 x 100uf - 25v - D:8mm H:10mm (C2, C11)
3 x 100uf - 35v - D:10mm H:10mm (C3, C5, C9)
1 x 330uf - 16v - D:10mm H:10mm (C14)
1 x 33uf - 25v - D:6mm H:6mm (C36)
I didn’t see any leakage so I did hesitate a bit but decided to proceed since I had two working boards and they are bound to leak eventually.
Removing the capacitors turned out to be a bit of a chore, mainly since I didn’t feel comfortable using the twist off method with the larger, non-corroded, cans and how tight they are packed together. I ended up using ChipQuik, a very small amount melted into each pad (with lots of flux) stays liquid long enough that you can remove the caps with a single soldering iron and a gentle nudge.

(Note in this picture I had already replaced C36...)
For the replacement capacitors I decided to use Aluminum Organic Polymer Capacitors and see if I could find smaller diameter equivalents (I could!) to make them easier to install. Here’s what I ended up with along with the Mouser part numbers:
2 x 100uf - 25v - D:6.3mm H:8mm (C2, C11) - 647-PCH1E101MCL4GS
3 x 100uf - 35v - D:8mm H:10mm (C3, C5, C9) - 647-PCZ1V101MCL6GS
1 x 330uf - 20v - D:8mm H:10mm (C14) - 647-PCH1D331MCL6GS
1 x 33uf - 25v - D:5mm H:5.9mm (C36) - 667-25SVPK33M
...and partially reassembled, with my fingers crossed, it passed the start up chime test and proceed to boot just fine!

...and partially reassembled, with my fingers crossed, it passed the start up chime test and proceed to boot just fine!
And lastly the LCD panel capacitors:
The passive matrix LCD display was working pretty good from my prospective but again the capacitors would eventually go and I had already had some experience replacing caps like this on my PowerBook 100’s LCD panel.

PowerBook Duo 230 Sharp LCD panel (LM64N794) capacitors:
8 x 3.3uf - 35v - “Plastic Encased Electrolytic” (C1 - C8)
Those are the same quantity and specifications as the capacitors I had replaced in my PowerBook 100 LCD! In that case I had used size B tantalum capacitors but even with their small size it was a somewhat tight fit.
After reading this post I decided to use smaller Multilayer Ceramic Capacitors (thanks @superjer2000!)
<link lost>
Info with Mouser part number:
8 x 3.3uF - 35V - MLCC (C1 - C8) - 810-C3216X7R1V335M6A
Removing the old caps showed a couple had started to leak and corrode their pads.


...another partially reassembled test ....and success!
Before:

After:

Above pictures are with default brightness and contrast. It’s subtle but definitely improved, noticeably less banding overall in use. Re-capped passive matrix screens look pretty good to me! Wonder if the modern capacitors actually perform better than the originals?
** @sutekh 5/4/2021 **
2 hours ago, Fizzbinn said:
I had thought about making an ABS slurry with broken bits of other PowerBook plastic and acetone but after some unsuccessful tests I decided use JB Weld PlasticWeld epoxy. I was hopeful as it specifically mentions ABS plastic compatibility.
This is the way. ABS / acetone slurry is quite porous after the solvent evaporates and lacks sufficient strength for this application.

