You are using an out of date browser. It may not display this or other websites correctly.
You should upgrade or use an alternative browser.
You should upgrade or use an alternative browser.
Powerbook Duo 280c + Accessories Maintenance
- Thread starter jmacz
- Start date
3lectr1cPPC
Well-known member
I have one from that same brand, yes. I've only rebuilt one battery with it so far (my PowerBook 1400 battery), so far so good. Works well.
finkmac
NORTHERN TELECOM
very nice. very very nice.The battery cover won't stay attached to the battery as the clips were broken off. Tried a few things to fix it but none of them worked. Ended up spending time modeling a brand new cover.
First test print was close but I need to fix a few things. Will try a second test print tomorrow.
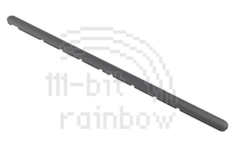
now if only someone would model the side bumpers that love to harden and crumble to bits.... that would be so awesome. that would be so cool.
No, the Duos appear to use two LIR2032 cells soldered together and a little plastic connector to connect to the logic board.
See this post for pics:
https://68kmla.org/bb/index.php?threads/duo-270c-yay-or-nay.38012/post-411863
See this post for pics:
https://68kmla.org/bb/index.php?threads/duo-270c-yay-or-nay.38012/post-411863
jmacz
Well-known member
very nice. very very nice.
now if only someone would model the side bumpers that love to harden and crumble to bits.... that would be so awesome. that would be so cool.
I will see if I can spend time modeling it.
jmacz
Well-known member
Is the PRAM battery the same Panasonic rechargeable thing as in the 1xx series ?
Yes, same Panasonic VL-2330 rechargeable cell, but different count and configuration.
Duo and 190/5300: 2 of them stacked with three wired plug providing 6V, 3V, ground (the 3V wire goes between the two serially connected cells and only provides power from one of the two cells).
500s: 2 of them side by side with three wired plug providing 6V, 3V, ground (the 3V wire is again between the two serially connected cells and only provides power from one of the two cells).
100s: only 1 cell which is soldered directly onto a PCB.
jmacz
Well-known member
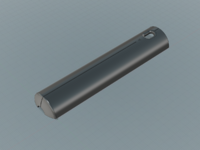
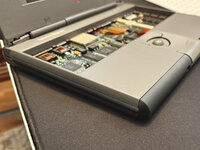
@finkmac, FYI I printed the side bumper model and it fits great. I printed it in PLA and of course since it's not that rubbery material, it's less forgiving when installing/uninstalling. I didn't do any sanding or anything in the picture below. Attached the STL model for the bumper to this post. The battery cover still needs some more work.

Attachments
demik
Well-known member
Good to know thank you. I'm gonna order more for my 500 buildYes, same Panasonic VL-2330 rechargeable cell, but different count and configuration.
Duo and 190/5300: 2 of them stacked with three wired plug providing 6V, 3V, ground (the 3V wire goes between the two serially connected cells and only provides power from one of the two cells).
500s: 2 of them side by side with three wired plug providing 6V, 3V, ground (the 3V wire is again between the two serially connected cells and only provides power from one of the two cells).
100s: only 1 cell which is soldered directly onto a PCB.
jmacz
Well-known member
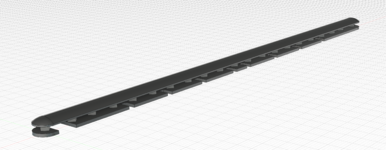
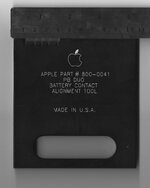
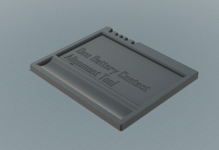
Made a battery contact alignment tool based on the service manual and just inferring what it might look like. Not sure if it actually is to spec with the original tool from Apple but at least on my system, it did allow me to adjust the contacts where it's aligned properly now. Model available via the printables link in my signature.

jmacz
Well-known member
Final revision of the battery slot cover. It clips on to the battery well but still has good sliding movement which is great. Once the battery is in, the cover holds the battery securely to the main PowerBook Duo body. It's a bit on the stiff side so it takes a little effort to open it again. This is where I have been tweaking it to find a balance between good grip so it doesn't come open easily but also not being too difficult to remove.
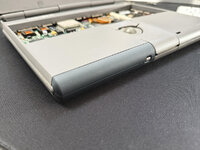
I still have to paint it although I don't have an exact color match with the power book so I think it will still end up darker, but not as dark as this black filament I used to print it.
I've got a couple more PowerBook Duo keyboards coming and I'm hoping at least one of them is in better shape than the one I received with this unit.
And then moving on to a Duo Dock I received which is completely dead. Well, there's some power going to it but it just keeps making a clicking noise and that's it. Plastics are in good shape though so hopefully this can be fixed. The power supply will need to be recapped but the logic board doesn't have any electrolytic capacitors so hopefully it's in good shape. This unit came with the extra VRAM on board as well as the FPU (which I won't be able to use since my Duo has a 68040).
3lectr1cPPC
Well-known member
Now I wish I had taken a photo of the one that showed up on eBay a few months ago...Made a battery contact alignment tool based on the service manual and just inferring what it might look like. Not sure if it actually is to spec with the original tool from Apple but at least on my system, it did allow me to adjust the contacts where it's aligned properly now. Model available via the printables link in my signature.
View attachment 84273
Fizzbinn
Well-known member
jmacz
Well-known member
Yes, think it’s a solid block of aluminum. First AL unibody Mac product!?
LOL
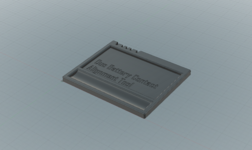
Ok, I was very close. My widths were all spot on. The height was off by 0.5mm near the top (the large indent). And I had diamonds at the end of each contact groove (because that's what's shown in the service manual) whereas the real tool has a circular end.
I've corrected both issues in an updated model on printables (link in my signature). Thanks @Fizzbinn!!
jmacz
Well-known member
From reading a few threads, the clicking noise I'm hearing with the Duo Dock seems to be a power supply capacitor issue. Let's hope it is.
Took apart the PSU which required drilling out the rivets. What's interesting is that someone attempted to take the power supply apart as one of the rivets was already drilled out. But the other three were intact. Go figure.
My PSU doesn't have an SMD electrolytic on one of the daughterboards. It has a tantalum at that location instead. I guess that's good.
Cap list for the Duo Dock PSU. I don't see any other electrolytics inside the Duo Dock, at least on the one I have. Hope I didn't miss any.
- C30, C28, C24: 100uF 25V 85C 6x11
- C31, C6: 47uF 25V 105C 5x11
- C35, C13, C10: 470uF 25V 105C 10x20
- C9, C11, C17: 2200uF 25V 105C 13x39
- C15, C25: 10uF 63V 105C 5x11
- C4: 1200uF 10V 105C 10x23
- C19, C12: 330uF 200V 85C 22x31
Similar threads
- Replies
- 2
- Views
- 572

