• Updated 2023-07-12: Hello, Guest! Welcome back, and be sure to check out this follow-up post about our outage a week or so ago.

PowerBook 5300 Series Battery

jmacz

Well-known member
Ok, my turn to try to rebuild the 5300 battery pack for my 5300c. I'm just starting so will provide updates in this thread as I attempt to figure things out and hopefully don't fail. I couldn't find a successful rebuild on the forum but maybe I'm not searching properly? Anyhow..

The 5300c I bought came with what appears to be an aftermarket battery from BTI.

IMG_5360.JPG

The outside enclosure is identical to the Apple one. I can't tell the capacity -- not sure if by the model number I can infer it's a 1900 or 1950 mah? But it opened pretty easily using the knife method. I just used an x-acto knife and made several passes on the center seam and it came apart pretty quickly. The case is pretty much intact so I should be able to reuse it later.

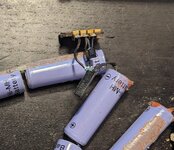
Inside I found 12 cells from Toshiba. They are NIMH cells, 1.2V each. Total 14.4V = 12 * 1.2.

IMG_5357.JPG

The label says these are 4/3A size cells.

IMG_5358.JPG

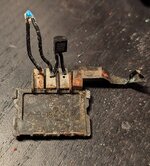
Along with the batteries, there was what appears to be an inline fuse, a thermal sensor, and a circuit board. The circuit board seems to be powered via 5V which it's drawing from the batteries.

IMG_5359.JPG

There's a wire coming from the 5th cell from the end so roughly 6V being taken to power the circuit board. And then for the 5 pins on the exterior of the battery housing, it looks like here's what they are for:

IMG_5361.JPG

Closest to the edge is the positive end of the battery. 2nd is connected to the thermal sensor. 3rd is ground for the circuit board. 4th is Data. 5th is the negative end of the battery.

The batteries were arranged in two rows but staggered to reduce thickness.

Seems straightforward? I didn't test the fuse yet but will check whether it's intact. Hopefully the thermal sensor still works. There was a little bit of crystallization where the 5V/6V wire was attached and in one other spot but I don't see much from a corrosion standpoint. And the circuit board looks very clean.

They still sell 4/3A batteries... but wow, they are expensive. Amazon is showing them for around $8 USD for a single cell (3800mah). There's a cheaper 10 pack for $52 that are pre-tabbed. And they have a long lead time. Will have to shop around.

Will continue this after I find some suitable cells and get them delivered.
 

jmacz

Well-known member
Cells look to be a little bit cheaper if you get them direct. Tenergy's website has 3800mah 4/3A cells pre-tabbed for $4.65 USD per cell.

EDIT: actually they are cheaper anywhere outside of Amazon :) but still roughly $4.50-$5 per cell.
 

3lectr1cPPC

Well-known member
Lucky that you had an aftermarket battery. The cells in the original seem to have a tendency to go REALLY leaky.
 

3lectr1cPPC

Well-known member
I also just moved the size, 4/3A. Last I remember hearing that the OEM batteries used AA size cells. Maybe this was wrong? It was a long time ago that I saw that, and I can’t remember where. Either that or the aftermarket pack used different ones.
 

jmacz

Well-known member
Well, I have a stock one that I acquired that I will also cut up in a few days so I can check if that one also had 4/3A or AA.
 

jmacz

Well-known member
I'm working on the PRAM battery as well which hopefully I can try out if I can get the main battery to work.

The stock one is obviously two coin cells stacked so I cut it open and they are Panasonic VL2330 3V Lithium batteries. They are readily available on Amazon pre-tabbed. So I got a pair. They are around $15 for a pair. Here's the stock one:

IMG_5389.JPG

And with the shrink wrap cut open:

IMG_5390.JPG

And the replacement pre-tabbed ones from Amazon ready to be used.

IMG_5392.JPG

Transplanted the wiring onto the new cells and put some heat shrink around it.

IMG_5393.JPG

Black is ground, red is the two batteries in series, and the white is actually between the two batteries. So 6V on the red, 3V on the white. I will probably remove the shrink wrap and redo it to cover the entire battery and I also need to rewire it so that I can get the combined unit to be thinner.

I also cut open the PRAM battery pack on my PowerBook 540c. It's the same Panasonic coin cells. Just the 500 series is side by side whereas the 5300 series is stacked.

Hopefully I can get the main battery to work so I can use this.
 

bigmessowires

Well-known member
They still sell 4/3A batteries... but wow, they are expensive.
You could rebuild the battery pack using standard size AA instead of 4/3A: they're the same length but the diameter is smaller, so you'd end up with extra space in the battery case that you'd need to fill with something. Of course the battery capacity would be less, if you care.
 

jmacz

Well-known member
You could rebuild the battery pack using standard size AA instead of 4/3A: they're the same length but the diameter is smaller, so you'd end up with extra space in the battery case that you'd need to fill with something. Of course the battery capacity would be less, if you care.

Yeah, I wanted the capacity. I have a set of 4/3A coming from Tenergy directly.
 

mdeverhart

Well-known member
Of course the battery capacity would be less, if you care.
The other thing to watch out for is that different cells have different discharge rates - even if the physically smaller cells had the same nominal voltage and capacity, they might have a lower discharge rate and so the voltage might drop under load.
 

jmacz

Well-known member
Ok so I got the set of twelve 4/3A 3800mAH NiMH batteries directly from Tenergy. Unfortunately, don’t have pictures as in the midst of transferring some files around on my main computer, I deleted them on accident :(

Anyhow, it was really really straightforward. I hot glued together packs of six cells (alternating the direction like the stock ones). This held the batteries in position so I could solder the tabs together. So this resulted in two packs of six. Then soldered the board, the thermal sensor, the fuse, exactly as it was in the original cells. I reused everything but the cells.

After that it was just putting it back together. I taped the case together with kapton tape as it’s thin, resistant to heat, etc. I did not glue as I wanted to ensure it would be easy to take apart if something went wrong and/or I needed to ever get back in there.

Popped the battery into my 5300c and it was immediately detected and works great. This was actually pretty straightforward compared to the mess I’m going through with the battery on my 540c.
 

jmacz

Well-known member
Have you had a chance to do this yet? No problem if not.

Not yet... on my todo list still. Maybe get a chance to crack it open and take a look inside this weekend. The stock battery I have does show signs of corrosion on the outer connector so not sure what I'm going to find inside. But at least in terms of checking out the battery size, should be no problem.
 

3lectr1cPPC

Well-known member
The originals all seem to be fried by corrosion. I’ve never honestly seen a battery that’s worse about it, except of course for the Varta clock batteries, and probably also the IBM ThinkPad 701c.
 

jmacz

Well-known member
Have you had a chance to do this yet? No problem if not.

Ok, cracked it open -- and then immediately closed it back up and gave up on that battery. It's a disaster inside, just a ton of powder and crystals, didn't want to breathe it so closed it up. But before doing so, I did see the batteries and they are indeed AA on the stock Apple battery. The BTI aftermarket one had 4/3A but you were right that the stock were AAs.
 

3lectr1cPPC

Well-known member
Alright, thanks for confirming! Did you catch how many their were by chance?

Shame it was wrecked inside. Most are at this point unfortunately, more than any other laptop main battery I’ve seen from that time, for whatever reason. Both of mine were trashed beyond belief.
 

jmacz

Well-known member
I think it was 12 but I didn't open it up all the way as a huge puff of powder came out and I said, ok, that's enough.

They were arranged differently than the BTI I had that used 4/3A as the physical size of the cells are different. The stock battery looked to have 6 columns of 2 AAs end to end. So 3 columns of 2 batteries on the top row and 3 columns of 2 batteries on the bottom row, they were offset so that the bottom row fits into the grooves of the top row. Whereas the BTI had cells side by side, 6 of them on the top row, 6 of them on the bottom row.

The 4/3As were 1.2V. NiMH AAs are also 1.2V. So makes sense that there are 12 of them.

The capacity on the BTI I had is higher though I think since the 4/3A I got are 3800mah whereas I think the largest capacity NiMH AAs I have seen are around 2800mah?

I'm guessing BTI advertised their batteries as longer run time than stock, and probably because they squeezed these 4/3A cells inside.
 

thecroc15

Member
Hello! This thread has been super helpful as inspiration to tackle a 5300c battery related project. Thank you jmacz and others here!

So, I've got a broken barrel jack (resoldering only solved half the problem) and am thinking about how to provide power from the wall through a 'fake' battery. I haven tried, but am assuming you can't just feed it 14.4-16v through the battery power pins without the additional circuitry on the middle pins. The goal would be to use a 15v USB C cable to feed through a hole in an old battery pack. Before tearing apart any dead-but-not-cruddy battery packs to harvest the thermal sensor and ID tag, I'm wondering if there is a way to recreate a trick circuit on the middle three pins.

The bits in the attached photos are the contacts and circuitry I could recover from a cruddy battery. This is an apple branded NiMH battery. The positive contact is missing in the first pic, and its orientation is flipped vs. jmacz's helpful identifier pic earlier in the thread. I believe the thermal sensor part connected to the Klixon little black box, which was being fed 6v, and not entirely sure how it fed back to the contacts on the battery. Needless to say this is a different, but potentially simpler than jmacz's aftermarket battery.

Anyhow - I'm wondering if just a resistor or cheap new thermal sensor could trick those contacts, and then a new ID tag (mouser link below? Hopefully it is more of an 'I'm here' vs. a specific string it's looking for?) could trick those contacts? May need to feed 6v somewhere into there so the reading on the data contact is what the computer wants to see?

Anyhow, would appreciate any feedback if this is even a plausible idea. And if it is, does someone have a good, charged battery to get any readings off of the middle pins for what the temp sensor is reporting? I'm not an electrical engineer so won't take any offense to 'you're about to blow it up' comments! 😅


Attachments

  • 1000015300.jpg
    1000015300.jpg
    583.1 KB · Views: 8
  • PXL_20240228_230839474~2.jpg
    PXL_20240228_230839474~2.jpg
    657.3 KB · Views: 8
Top