• Updated 2023-07-12: Hello, Guest! Welcome back, and be sure to check out this follow-up post about our outage a week or so ago.

Macintosh PowerBook 145/160/170 battery replacement

Rajel

Well-known member
Ah, that may be the case. The system in the 160 just has the single reflector and light guide. If you could get a strip that's dense enough it might work, but heat and space may quickly become an issue.
I'd love to see it done though! Even if it is a little uneven, it's just at the right edge of the screen where your drive icons typically are and wouldn't get in the way too much.

 
Last edited by a moderator:

Jinnai

Well-known member
Hey, so I built the 3D printed pack their for my PB 150, thanks so much for making that, it looks great! I have to ask though @Westinghouse, whats up with the little tab thingys for holding on the battery cover? They aren't even close to the correct shape for the PB150 cover, is there a model that that's the right shape to hold the cover on?


Westinghouse

Well-known member
Hi jinnai;

Thanks for the kind comments!

The tabs are only there as standoffs to hold the battery secure within the recess against the back of the original sliding case cover. I didn't feel that I'd be able to get the original sliding cover to match up well with a printed tray's sliding cover tracks without doing several rounds of prototyping - and since I don't have a printer of my own, this solution was good enough for my purposes... so the sliding cover from my original battery is a separate part from my printed tray.

They also double as fingerholds so that I can pull the printed tray out when the sliding cover is removed.

 
Last edited by a moderator:

PB170

Well-known member
Hello!

Just thought I'd mention that I recently built a second battery for my PowerBook. Since I'm slow-charging my first battery at 0.1C for 15 hours in order to maximize its lifetime and performance, I soon felt a need for a second one.

This time I used one of the original cases. After an earlier, unsuccessful attempt at cracking them open using a vice following the trick Ferrix97 used with the AC adaptors, I decided to try to cut them open with a scalpel instead, which turned out to work surprisingly well. While using the scalpel the normal way made little progress, I discovered that running it backwards allowed me to carve out thin strips of the plastic which made the process much quicker. The final result isn't topnotch, but quite good.

The biggest achievement however, I feel, was when I finally discovered a way to arrange the batteries inside the case and still have room for the aforementioned charing port on the side where I wanted it :) Interesting how seldom we use our brains for actual practical problem solving in this modern age where all the world's information is available at our fingertips! I share it here free of charge for you all in case anyone would like to repeat the process ;-)

Below are a couple of photos of the result!

Image 1.jpg

Image 2.jpg

Image 3.jpg

Image 4.jpg


PB170

Well-known member
On a side note, another reason for building a second battery was that I wanted one that looked less homemade in order to – hopefully – allow me to take the computer with me while flying. It was with some great worries that I approached the security control at Copenhagen airport about a month ago. I had prepared a variety of explanations about older laptop batteries, and other strategies to talk myself through the control. My optimism for the rest of the the trip grew considerably however, when it passed through the control without any questions whatsoever. In the end, I returned home after going through four additional security controls (two in Finland and two in Japan) without any remarks! No guarantee that it will work everywhere, but at least I deem it a success this time. Here's me in the air: https://www.youtube.com/watch?v=X5HMkCqfhCA ;-)


AmmoJammo

New member
it would matter for internal charging, right?
Maaaybe...
If you include a BMS circuit in the pack, I suspect the laptop could be run off 8.5volts instead of the original 7.5volts, and charge the pack in circuit.

Does anyone have a schematic for any of these laptops? If not, I'll pull my 165 apart and try to figure out if this is a reasonable solution ;)

 
I replaced the cells of original Powerbook 100 series batteries with 5x Panasonic Eneloop Pro cells rated 2500mah. These are good quality Japanase cells and meet exactly the specs of the old Apple battery.
I re-used the 2x auto resettable heat sensors from the original battery pack to protect the cells against overcharging/overheating.

Works fine and is very cheap, easy to build. The cells cost about 15$ for 5. The laptop charges normally and I have a battery life of about 3 hours on a PB145 with LCD and hard drive constantly running.
 
Were you able to charge from the laptop or did you have to set up a way to remove the cells before recharging them? If I were to set up another 5 batteries in parallel to the first set of 5, similarly to the original configuration, would it still work?


superjer2000

Well-known member
Bringing another thread back from the historical archives...

I 3d printed the battery case @Westinghouse designed (I'm not sure if he's still on here but what an incredible job - I was astonished at the extreme level of detail to allow for clean routing of conductors). 

This pseudo-battery worked great with my PB 145B and 5x NiMH batteries for a couple of weeks.  Note I was NOT charging the batteries in the Powerbook and continued to remove them and charge separately. 

As I had previously removed the PRAM battery when I recapped my PB (to avoid potential leaking - note that I have sense ordered replacement rechargeable coin cell batteries) I had taken to plugging in my Powerbook right before removing the battery pack to avoid losing the date/time etc.  I would then unplug the Powerbook right after replacing the battery pack with freshly charged batteries.  This had worked great for a number of cycles but this weekend when I unplugged the adapter the Powerbook just turned off despite having fresh batteries.

As it stands now, the Powerbook will turn on when connected to the AC adapter but will not turn on with only battery power.

Has anybody else experienced an issue like this?

A couple of things:

1) I plan to troubleshoot this a bit more once I get the replacement PRAM battery is delivered but won't be opening the unit until then as I want to limit the number of times I need to take apart Powerbook plastic...  I think some models may have a fuse on the logic board (or elsewhere).  I think it should be pretty easy to probe and see where power isn't getting to.

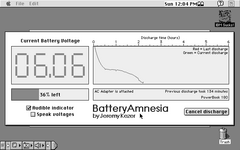
2) My 1.2v rated NiMH cells charge to about 1.4v.  That means that a fully charged pseudo-battery puts out 7v as opposed to an OEM battery at 6v.  The AC adapter is 7.x V so I had thought this would be fine.

3) I did reset the power manager (no power at all for 5+ minutes, hold down reset and interrupt for 10 seconds) with no change.

Thanks!

 
Last edited by a moderator:

Westinghouse

Well-known member
Hi Superjer2000; thanks for the kind words about the case design!

I am on here every once in a while.

Regarding your issue, I wonder if perhaps there is no longer good contact between the battery and the contacts inside the powerbook.

This might not be the case for you (I'm still using my original, before I added the 'lid'), but it would not hurt to check: maybe the case warped a bit under the physical stresses of the cells and cell contacts; I had this to some extent, and I soldered some additional copper over the battery-to-powerbook contacts to ensure good contact.

 
G

Guest

Guest
Hi, I recently got a Powerbook 170 with a dead battery. Is there anywhere I could buy a replacement? I don't think I would be successful in building one.


DRSaylor

New member
I have two working PB 170 machines that I need to have the batteries rebuilt/replaced. Is there anyone who currently can do this? I have 4 original batteries if cases are needed.
 

pfuentes69

Well-known member
I made myself a quick&dirt solution for my 145B and now that I'm reading this post, I'd like to ask for some advice, in case I did something stupid or dangerous...
This is my mastery job:
IMG_2297.jpeg

For not making it too basic, I tucked a thermofuse (65ºC) in the sleeve.
It seems to work fine, it charges and I can use the PB for maybe 20-30 minutes with it (using a BlueSCSI). I don't really need to use it on battery, it was just for the fun, and also because the old cells were starting to leak.

Do you see a potential problem here?
 
Last edited:

joshc

Well-known member
Thank you!

I bought this replacement battery a few years ago at a reasonable price from ebay, which works very well.

Sorry to say I can't find a new source to buy from.

https://www.amazon.co.uk/PowerSmart®-4200mah-Ni-MH-Battery-M5545LL/dp/B008S6Z1KW

View attachment 16819
This is a long shot but...How is this battery performing for you now, 5 years on? I've found a place that still sells these but not sure if it's worth it vs refurbishing an original battery.
 

joshc

Well-known member
Just cracked the lid off my 165c battery... I only sustained one finger cut in the process and broke one scalpel blade.

The lid has to be cut most the way round before it comes off, with some force with a knife.

IMG_7494.jpg
IMG_7495.jpg

IMG_7496.jpg
 

luRaichu

Well-known member
Finished testing my PowerBook 1xx battery build today. Capacity is around 5000mAh with ten AA Ni-Mh cells, a full discharge takes approximately 2 hours and 15 minutes.
IMG_6303.JPG
The aftermarket battery I'd gotten was too dangerous to open. So instead I got a new shell 3D printed.
IMG_6152.JPG
I started with an unknown Ni-Mh pack pulled from the recycling bin.
P2230152.JPG
As you can see it had six cells, I had to remove one to make it fit inside the shell. Already had a thermal fuse installed.
IMG_6304.JPG
*-1.png
Performance was poor with this pack. So I decided to try again with Duracell AA's.
IMG_6305.JPG
Now the battery lasts way longer! I don't have a thermal fuse here though.
*-0.png
 

Attachments

  • *-0.png
    *-0.png
    5.7 KB · Views: 5
Top