• Updated 2023-07-12: Hello, Guest! Welcome back, and be sure to check out this follow-up post about our outage a week or so ago.

Macintosh PowerBook 145/160/170 battery replacement

Westinghouse

Well-known member
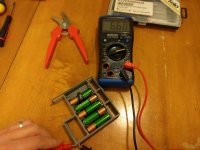
It is. My intent was to use off-the-shelf 1.2v NiMH rechargeables - I thought I could use 6 cells, but in actual practice 6 cells gave over 8v, and I decided to play it safe with just 5, which yeild about 6.6v.

Here are some pics of how it turned out. This works, but as it's a prototype I'd like to make a few tweaks before I post up the .stl - some improvements.

BTW constructive criticism and questions are welcome.
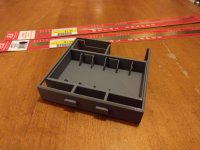
IMG_20170119_204723.jpg

IMG_20170119_221056.jpg

IMG_20170119_223947.jpg

 
Last edited by a moderator:

nvdeynde

Well-known member
I replaced the cells of original Powerbook 100 series batteries with 5x Panasonic Eneloop Pro cells rated 2500mah. These are good quality Japanase cells and meet exactly the specs of the old Apple battery.
I re-used the 2x auto resettable heat sensors from the original battery pack to protect the cells against overcharging/overheating.

Works fine and is very cheap, easy to build. The cells cost about 15$ for 5. The laptop charges normally and I have a battery life of about 3 hours on a PB145 with LCD and hard drive constantly running.


Ferrix97

Well-known member
It is. My intent was to use off-the-shelf 1.2v NiMH rechargeables - I thought I could use 6 cells, but in actual practice 6 cells gave over 8v, and I decided to play it safe with just 5, which yeild about 6.6v.

Here are some pics of how it turned out. This works, but as it's a prototype I'd like to make a few tweaks before I post up the .stl - some improvements.

BTW constructive criticism and questions are welcome.
I'd say you case is perfect, I was planning on making one similar to yours but with off-the-shelf battery housings. but your solution looks a lot neater.

As for the voltage, I think they were rated for 6V, so 5 cells should be ideal. I would consider making a case that could store 10 batteries (5 batteries in parallel with 5 batteries) and with a fuse to protect the PB in case something bad happens (there is already one on the Logic Board, but I think it's only for charging)


Rajel

Well-known member
It is. My intent was to use off-the-shelf 1.2v NiMH rechargeables - I thought I could use 6 cells, but in actual practice 6 cells gave over 8v, and I decided to play it safe with just 5, which yeild about 6.6v.

Here are some pics of how it turned out. This works, but as it's a prototype I'd like to make a few tweaks before I post up the .stl - some improvements.

BTW constructive criticism and questions are welcome.
That looks fantastic. Were you able to fit any protective circuitry into the extra space?

I'd love to break in my printer with this once I do the long-overdue maintenance, now that it's out of storage.

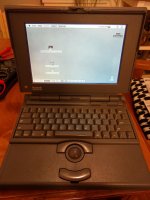
Just picked up a PB160 at a flea market, and aside from the dead battery and trackball in desperate need of cleaning, it works *perfectly*... and had some interesting goodies on the hard drive that I'm trying to get permission to release.

opfR0lFh.jpg.ebf916aea9d41b942736f9841a5ac1f7.jpg


Westinghouse

Well-known member
Were you able to fit any protective circuitry into the extra space?
Since I only use 5 cells in a 6-cell tray, I bridge the gap between terminals in the empty cell location using a thermal fuse, which rests on top of the adjacent cells.

I'm hoping to get around soon to the tweaks I mentioned.


Rajel

Well-known member
Awesome. I'm planning to go full tech-hipster with this thing, getting it online and usable in some fashion.
I just bumped the greyscale depth to 16 shades and notice some issues with the screen now as well, going to have to replace the capacitors there.
SCSI2SD card is ordered, I am excite.
The battery is the only part missing at this point.


zuctronic

Well-known member
I've replaced all the caps in my display(s) and the passive-matrix still has issues with grayscale... let me know if you have better luck! One thing I have not done is recap the inverter board.


Rajel

Well-known member
Inverter board is only two caps, I've found my contrast is constantly drifting so that's a likely cause as well.
This is what my screen looks like right now:
K8QSVitl.jpg.31269c4656313e7df77c6dba262b2e4f.jpg

There's another thread that goes over the cap replacement and it really clears up a bit. You'll still get a bit of ghosting and light vertical lines, it's just the nature of the panel.
This is abnormal though.


zuctronic

Well-known member
Yeah that is a bit much. Mine will be like that if I don't get the contrast adjusted just right... and the contrast drifts, probably because the caps on the inverter board have dried out a bit. I guess I could try and sort that out right now, I'm not doing anything productive today. I should have the right caps around here somewhere.

I've also noticed the bottom-right corner is "washed out" on mine. It looks like it's the same on yours, or is that just a lighting issue with this photo?

 
Last edited by a moderator:

Rajel

Well-known member
I think it's just the lighting here, the angle of the camera combined with the contrast setting.


Westinghouse

Well-known member
I've put up some stl files for the tray - since there's already a thread for 3D printed objects under Hacks & Development, I put them there.

If anyone makes a print, let me know how it turns out!


Rajel

Well-known member
I've put up some stl files for the tray - since there's already a thread for 3D printed objects under Hacks & Development, I put them there.

If anyone makes a print, let me know how it turns out!
WHoooooo! Downloaded, I'll try to get my Rep2 up and running in the next week and get one printed up!

Do you have a recommendation on thermal fuse, or just use the ones from the original battery?


Rajel

Well-known member
There's a couple of printing issues with the screwholes on the main tray, mainly that having them jut out like that ends up with the printer trying to print them in mid-air. By the time it gets to the smaller hole for the screw shaft though, it's leveled out.
Having a slope from the main body to the screw post would solve that issue.

Otherwise it looks freaking great! I'm curious as to what your day job is, because this design is really clean.

Edit: I'm printing three total, one for use with NiMH rechargeables, one for alkalines as an "emergency" battery, and one to send to an engineering buddy down in Houston so he can design a high-capacity Li-Ion pack that'll fit in the tray.
For the lithium variant, is it possible to get a version without the AA compartments to maximize the amount of usable space for flat lithium cells?


Last edited by a moderator:

Rajel

Well-known member
Or if you don't mind sharing the design files, I can make the modifications and re-upload.
These are really great man. Serious kudos.


Westinghouse

Well-known member
...mainly that having them jut out like that ends up with the printer trying to print them in mid-air. By the time it gets to the smaller hole for the screw shaft though, it's leveled out.

Having a slope from the main body to the screw post would solve that issue.
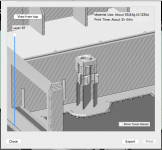
Did the MakerBot app not calculate and lay down support material beneath them?

Screen Shot 2017-03-06 at 3.24.53 PM.png

 
Top