• Updated 2023-07-12: Hello, Guest! Welcome back, and be sure to check out this follow-up post about our outage a week or so ago.

So I tried retrobrighting an ABD Mouse...

JP_2208

Member
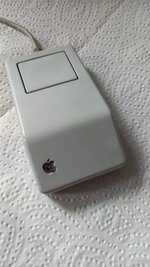
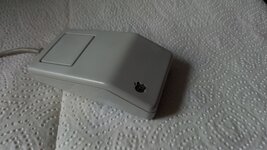
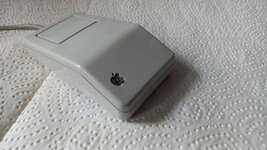
As said in the title. It was my first real experience with the whole process (aside from a GameCube Memory Card). Generally I'm quite happy with the result but the one thing that was unexpected is that I ended up with three spots of the plastic that turned out a bit brighter than the rest (top of the mouse button, lower half opposite the apple logo and on the side in the area of the "edge", see images, second one has them visible the most). Interestingly these happen to be the spots which get the most skin contact when the mouse is actually being used. I'd like to ask if someone has a bit more experience with this process and can tell me what happened there and if i can still get it to a uniform color with a second run. Also is there anything to keep in mind in terms of the specific plastics it's made of?
 

Attachments

  • 20230520_115645(0).jpg
    20230520_115645(0).jpg
    729.7 KB · Views: 26
  • 20230520_115705.jpg
    20230520_115705.jpg
    2.5 MB · Views: 26
  • 20230520_115712.jpg
    20230520_115712.jpg
    2.3 MB · Views: 26

ObeyDaleks

Well-known member
I’ve had similar issues in the past when using the “standard” peroxide/UV combination, resulting in weird bright spots and streaks, brittle plastic, and in some cases, severe over-bleaching (plastic actually ending up much lighter color than the original). Unfortunately, in my experience, there is no way to fix the overbleached spots once they are introduced. I ended up with some C64 gear that is completely ruined by my retrobrighting attempts. Pretty devastating.

After a lot of experimentation, I stopped using peroxide and UV (both of which can be detrimental to old plastics). I now use a my own method using high-powered (non-UV) lighting. All my gear since then is pristine original color. I can provide details if interested although I doubt it would be very helpful since it requires fairly specialized equipment. Maybe somebody else here can provide some tips on how to minimize the damage when using the standard retrobrighting method, but I personally would never use it. It’s just too risky imho.
 

lobust

Well-known member
I’ve had similar issues in the past when using the “standard” peroxide/UV combination, resulting in weird bright spots and streaks, brittle plastic, and in some cases, severe over-bleaching (plastic actually ending up much lighter color than the original). Unfortunately, in my experience, there is no way to fix the overbleached spots once they are introduced. I ended up with some C64 gear that is completely ruined by my retrobrighting attempts. Pretty devastating.

After a lot of experimentation, I stopped using peroxide and UV (both of which can be detrimental to old plastics). I now use a my own method using high-powered (non-UV) lighting. All my gear since then is pristine original color. I can provide details if interested although I doubt it would be very helpful since it requires fairly specialized equipment. Maybe somebody else here can provide some tips on how to minimize the damage when using the standard retrobrighting method, but I personally would never use it. It’s just too risky imho.

New RB methods are always interesting, if you don't mind sharing please do post your techniques!
 

JP_2208

Member
I’ve had similar issues in the past when using the “standard” peroxide/UV combination, resulting in weird bright spots and streaks, brittle plastic, and in some cases, severe over-bleaching (plastic actually ending up much lighter color than the original). Unfortunately, in my experience, there is no way to fix the overbleached spots once they are introduced. I ended up with some C64 gear that is completely ruined by my retrobrighting attempts. Pretty devastating.

After a lot of experimentation, I stopped using peroxide and UV (both of which can be detrimental to old plastics). I now use a my own method using high-powered (non-UV) lighting. All my gear since then is pristine original color. I can provide details if interested although I doubt it would be very helpful since it requires fairly specialized equipment. Maybe somebody else here can provide some tips on how to minimize the damage when using the standard retrobrighting method, but I personally would never use it. It’s just too risky imho.
Appreciate the offer and to be honest I'm also quite curious about your method. The whole deal with my attempt was to avoid extra equipment as I don't expect I'll be doing it often enough for the investment to be worth it (only reason I even bought a UV light was because I got fed up waiting for the weather to be good enough to do it with just sunlight) but it'd still be interesting to know.
Also I think that even the more uniform color may already be "overbleached" as it is rather bright in comparison to (what seems to be) the original color of the ADB keyboard I bought alongside the mouse (then I again find it hard to believe that all the old apple stuff was originally more beige than white).

I know the following question may sound like a joke, but I'm dead serious about it: If anyone knows what color all this gear is originally meant to be, could they look up what the nearest fitting pantone color might be? After all that's what these color standards are meant for.
 

ObeyDaleks

Well-known member
I will post my method as soon as I get a chance to do the write-up.

In terms of the original color, the “platinum” gear like the mouse you have should appear light grey in normal daylight (e.g., light through your windows).
 

s_pupp

Well-known member
I've found that leaving your Mac or accessory sit undisturbed for 10 or 11 years often evens out the uneven colour of a Retr0brite misadventure.
 
Top