• Updated 2023-07-12: Hello, Guest! Welcome back, and be sure to check out this follow-up post about our outage a week or so ago.

SE FDHD Restoration

LaPorta

Well-known member
I've never heard of it failing, but maybe try swapping that big socketed VLSI chip next to the CPU, just to rule it out (just be very gentle to prevent cracking the socket). Also, maybe there's a rotted trace under the SCC or SCSI chip?
I’ll try swapping it. What I would want to know is what the SCSI or SCC chip would do to stop the machine from working entirely and stop it from doing anything.


AwkwardPotato

Well-known member
I'm pretty sure that you would at least get a raster on the display if the SCSI and/or SCC chips were bad. After seeing all the crud that was under the Bourns filters, though, I'm wondering if there's more under one of those chips and it's shorting some signals together.


LaPorta

Well-known member
I agree. I have no way of checking the traces under the SCC without hacking it out, and I don’t have a spare SCC. The solder is so corroded on the legs that desoldering it intact proved impossible (I tried). If I could get a replacement SCC...

PS - I did swap in a known good BBU...no dice.


BadGoldEagle

Well-known member
The serial and scsi chips won't prevent the computer from posting (it won't boot though). But crud and shorts under them will. For removing chips, a desoldering gun is best.

I understand your frustration though. And spending dough on something that looks like a time/money pit may not be a viable option... It's your call.

 
Last edited by a moderator:

LaPorta

Well-known member
Eh, in for a penny, in for a pound ;). I don’t mind spending a few bucks here and there. If someone knows a source for those chips, I’d appreciate it, then I can hack out the ones there and get under them.

Obviously if it looks like it will never work, I’ll salvage all the removable stuff and move on.

 
Last edited by a moderator:

AwkwardPotato

Well-known member
It appears you can get both the SCC and SCSI controller off eBay for roughly $10 each (not my listings). BTW, when buying obsolete parts like these, it's wise not to buy from sellers in China as they have a reputation for relabelling parts as others.

 
Last edited by a moderator:

LaPorta

Well-known member
I was hoping mouser and the like would have them. I saw similar items...but can’t be sure they are exactly the same. Has anyone ever purchased them?

i appreciate you guys taking the time and helping with this.


LaPorta

Well-known member
I ordered three SCCs (in case I need replacements later, or someone else does and I have them on hand). Hacking out the old one will show me what is under there.


LaPorta

Well-known member
and...SUCCESS!

I received my SCCs today. I cut out the old one, and, indeed, one through-hole via was not electrically conductive! I had to actually drill through it with a drill bit and a pin vise. Once that was gone, re-soldering it was a simple matter. New SCC installed and soldered. Bam! Started up, no issue. Connected mouse and external floppy so far - works fine. Included RAM chips are 1 MB each, I know that now. Well, thank you to EVERYONE who helped figure this one out. I hope that it will inspire others to repair boards that appear too far gone. I also started coating the traces that were exposed with green liquid electrical tape: it looks just like the original coating in color and makes for an awesome repair that looks original!

Stay tuned for the restoration of the rest of the unit.

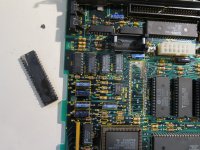
SCC hacked out. Look at the crud!
IMG_4500.JPG

Here is the through-hole via. The one right in the middle that looks crusty.
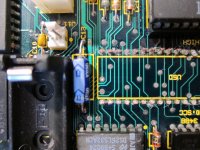
IMG_4501.JPG

Cleaned and ready to re-mount:

out.jpg

New SCC replaced:

done.jpg

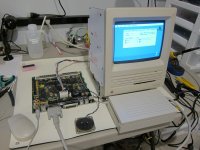
Up and running!:

IMG_4503.JPG


davidg5678

Well-known member
Excellent work!

Can you elaborate on how you found the non-conductive VIA underneath the SCC chip? On one of my broken SE/30 boards, many vias have the same sunken look and corroded color. Did you probe each VIA with a multimeter to find the broken connection? How were you able to drill through the board without damaging it?

Good luck on your SE/30 Resurrection!


LaPorta

Well-known member
The only way I found the degraded via was by hacking out the SCC on a hunch: I didn’t know for sure it was there. Once there, I tested continuity from under the board to the end of the trace on the top side, and there was none. As far as drilling, it was all by hand. The drill bits are the kind you find at a model store: they are even smaller in diameter than the via hole. So, I drilled out the crud/solder but the via hole itself is spared. The board itself was not drilled. I had to do it because the solder was so far gone inside the iron would not touch it.


BadGoldEagle

Well-known member
Congrats! I can imagine how happy you must have been when you saw it post!

7C73001D-6385-4899-9978-F39D3D01A025.gif

 
Last edited by a moderator:

LaPorta

Well-known member
It's been over two months, but now that I am done with a few more projects, I am back at it. I just started cleaning the external case (which cleaned up pretty nicely, actually), and de-rusting the chassis. I will get some more pictures up soon. Floppy drive cleaning underway soon.


BadGoldEagle

Well-known member
Interested in seeing how you're going to restore the chassis. I like the original industrial steel look and I don't really know how to bring that finish back and 'metal' paint just doesn't cut it for me. Perhaps sanding would help?

 
Last edited by a moderator:

LaPorta

Well-known member
I agree having “the look” is important, but at this point I’ll save what I can and see how it all works. Just getting to bare metal is what’s most important to me. Saving a machine that otherwise would be landfill-bound is the best. Overall it was a good survivor: all the crud on the outside cleaned off easily with regular cleaners, and the screen has no burn-in at all. I’ll be overhauling the floppy drive soon. HD may be shot.

 
Last edited by a moderator:

MOS8_030

Well-known member
I agree having “the look” is important, but at this point I’ll save what I can and see how it all works. Just getting to bare metal is what’s most important to me. Saving a machine that otherwise would be landfill-bound is the best. Overall it was a good survivor: all the crud on the outside cleaned off easily with regular cleaners, and the screen has no burn-in at all. I’ll be overhauling the floppy drive soon. HD may be shot.
You can use oven cleaner to remove the rust (and the zinc coating) from the frame.

If you're really ambitious you can get or make a zinc plating setup and re-plate the frame, although some silver paint or clear coat would be easier.

 
Last edited by a moderator:

LaPorta

Well-known member
Running a plating setup would be cool, but doesn't that involve some not-so-friendly chemicals? I must admit I do not know much about the process. Otherwise, I'm using my go-to: evaporust. The stuff works like a charm.


MOS8_030

Well-known member
Running a plating setup would be cool, but doesn't that involve some not-so-friendly chemicals? I must admit I do not know much about the process. Otherwise, I'm using my go-to: evaporust. The stuff works like a charm.
Actually zinc plating is really safe & simple, there's many how-to vids out there.

Yes, evaporust is great stuff, I have used it as well.

 
Top