• Updated 2023-07-12: Hello, Guest! Welcome back, and be sure to check out this follow-up post about our outage a week or so ago.

Recapping Question

NathanHill

Active member
Hey y'all,

Love the resources here - but I don't see a concise recapping thread or guide. If there is and search hasn't helped, let me know.

My father passed recently. He was a lifelong Mac/Apple enthusiast and over the years had piled together a sizable set of Apple II and vintage Mac gear. My brother and I went up and picked a few items for us to tinker with and will probably be looking to part with many other items (6-10 SE FDHDs, Classics, LCs, LC IIs, LC III, a couple of Quadras, plenty of Apple IIe gear, a Next machine, and on and on). So, look for that in the future.

I am working on recapping a Color Classic and an SE/30. I also have a Quadra 610 and Mac Iici board. I am new to this process, and while the Youtube videos make it look easy, it's hardly easy at all in person. Pulling the caps off the IIci board was somewhat okay, but it has battery damage and may be out of commission anyway. It's my practice board for now. I've noticed several of the areas are still not smooth, making the next step difficult.

I am struggling with how to replace the capacitors. Do they need to be completely level on the board? Does the solder serve just to tie them to the board or to keep the circuit flowing? Basically, it's hard to place the replacement capacitor in place and then not move it with even a tiny nudge of the soldering iron. Do you all tape them in place and then solder them? Or is there some helpful method?

 

Bolle

Well-known member
Might want to read through the whole thread right here:


This basically shows step by step how it’s done right.


krishnadraws

Well-known member
Sorry for your loss, @NathanHill - if you haven't already done so, check out the YT channel Branhus Creations. Bruce specializes in re-capping old Macs and has some handy instructional guides that will help you out. Also check out fellow forum member @JDW's excellent YT channel. He has a very detailed, methodical approach as well. I've learned a ton from watching both channels. They gave me the confidence to embark on recapping my own Mac SE FDHD.

 
Last edited by a moderator:

Mr SN

Well-known member
I can definitely recommend Branchus Creations on YouTube for videos about Mac recapping. I find his tutorials to be very informative and easy to follow.
I can second this recommendation, his videos helped me a lot too.  I also bought a junk PC motherboard for a few bucks and used that to practice on first.  Honestly, after about a handful of caps and chips, you will get the hang of it - after watching those videos on techniques. 


cheesestraws

Well-known member
Seconding all the above.  This is something that is much, much easier to understand either through video or, even better, with someone showing you how to do it in person (@joshc kindly walked me through my first few caps!).  Understanding how to do it from text is a bit painful, and I say this as someone who usually much prefers instructions in text to videos.

Basically, it's hard to place the replacement capacitor in place and then not move it with even a tiny nudge of the soldering iron. Do you all tape them in place and then solder them? Or is there some helpful method
I just use flux that's quite sticky, then if they look inclined to move, hold them down with a pair of tweezers (not holding it, just pushing down on the top gently; you could just use a multimeter probe or some other pointy bit of something too).


ScutBoy

Well-known member
I concur the Branchus and JDW videos are great resources.

Practice on a junk board first, and you'll get the hang fairly quickly.

What I often do is tin one pad and use a tweezer to hold the cap down on the pads, then use the soldering iron to heat that tinned pad. That will hold down the cap so you can solder the other side. Then you can touch up/add solder to the first side if necessary. Maybe not the neatest method, but it works for me :)


NathanHill

Active member
This is really helpful advice. I started working on my first board without flux - or the twine - which I do think makes it a little harder to clean up the boards. So, there is solder residue which prevents the chip from laying flat. It's sort of at an angle. It's secure, but there is a slight air gap between the cap and the board, and I was nervous about that. Shouldn't it be perfectly flush and flat?

BTW, I think I pulled up one of the pads on the IIci board, so that will be another thing to learn how to repair.


Lee Adamson

Member
Yeah, practice a little on a junk board first like they said.

But don't overthink it too much.  You just need the right value caps in the right places, with the polarity the right way.  I've recapped Mac boards with through-hole electrolytics (because I didn't have the right SMD components on hand), by just cutting the leads short, bending them right, and soldering them onto the pads.  Machines work fine.  An air gap isn't going to hurt you, and if  you never intend to sell the board then neither will a little ugliness/things not lining up exactly right.  As long as there's a good electrical connection and it's not *too* much of a mess, it'll work fine.  I mean obviously you don't want 1" leads with caps perched way up off the board or anything, but you know what I mean.

Indeed, when you have lifted pads from the electrolyte, I think it's a little easier to fix them with through-hole components.  You can bend the leads to follow the lifted pads/traces, and get a good solid fix.  Scrape solder mask off the lifting pad/trace, bend lead so it follows it back to the nearest via/component, cut it to length, and solder it the whole way.  Solid as a rock, although in 30 years I guess it'll be kind of a pain to remove it for the next recapping.  >_>

 
Last edited by a moderator:

MrFahrenheit

Well-known member
You’ll want to heat the pad AND the contacts of the capacitor simultaneously, with flux on the pad and some solder on the tip of your iron. Once heated properly, the solder flows from your tip onto the cap contacts and the pad. Remove iron but hold it still with tweezers for a few seconds then let go. 
 

The solder holds the cap in place but also must make electrical contact. One problem I ran into early on when learning to recap was that it may be soldered down but it might be a cold solder joint, which doesn’t conduct electricity. My first board was a IIsi and I simply removed and reflowed the solder and it worked. 
 

It takes patience, but I believe almost anyone can learn to solder and recap a Mac if they’re determined enough. I learned by teaching myself through YouTube videos in May and I’ve recapped over 50 Macs since. 


NathanHill

Active member
You’ll want to heat the pad AND the contacts of the capacitor simultaneously, with flux on the pad and some solder on the tip of your iron. Once heated properly, the solder flows from your tip onto the cap contacts and the pad. Remove iron but hold it still with tweezers for a few seconds then let go. 
 

The solder holds the cap in place but also must make electrical contact. One problem I ran into early on when learning to recap was that it may be soldered down but it might be a cold solder joint, which doesn’t conduct electricity. My first board was a IIsi and I simply removed and reflowed the solder and it worked. 
 

It takes patience, but I believe almost anyone can learn to solder and recap a Mac if they’re determined enough. I learned by teaching myself through YouTube videos in May and I’ve recapped over 50 Macs since. 
This is great and answers my questions. We should want the capacitors to sit as flush as possible. For most of the boards, I am using the traditional ones which seem more straightforward, but the tantalum kits are a little different and so small. They were giving me pause.


MrFahrenheit

Well-known member
This is great and answers my questions. We should want the capacitors to sit as flush as possible. For most of the boards, I am using the traditional ones which seem more straightforward, but the tantalum kits are a little different and so small. They were giving me pause.
I saw a video recently of a person recapping a Macintosh Classic.  They claimed because their solder had flux in the core, they didn't need extra flux.  However, looking at their solder blob joints, I was convinced extra flux would have helped.

It is my experience don't hold back the flux.  Even if there is flux in the core, add flux!  I usually use a blob about 1/2 the size of a corn kernel, on each pad.  Doing so, I am able to make nice clean solder 'capsule' blobs.

Also, I stopped cleaning the pads with solder wick.  Instead, I add flux and solder to the pad with solder and leg still attached, and I remove the old solder and leg using the new solder and flux.  Then I use a clean tip and remove most of the solder left on the pads.  I lost too many pads trying to use wick on the pads to clean them off.  They are VERY fragile!


davidg5678

Well-known member
It is my experience don't hold back the flux.
I completely agree. I was convinced for a long time that I didn't need flux, but I was totally wrong. After investing in high-quality parts and tools, the quality of my work has greatly improved. I found that cheap solder wick barely worked at all, but the good stuff does exactly what I want it to do, without damaging pads.

I suppose this argument applies to solder-suckers too, but WOW, good ones are very expensive. I have been able to get by desoldering with wick and flux for now. I gave up entirely on solder suckers because they never work for me at all.

Personally, I prefer the tantalum capacitors over the kind with legs. I think the overall result is much cleaner, and the boards were designed for SMD parts, not through-hole ones anyway. Tweezers are a must for holding them in position (really for any recapping work), but with practice, it is certainly possible to use these. I think patience and practice are really what make the difference bewteen a good recapping job and a bad one.


MDMacGuy

Active member
I recently discovered solder paste as well thanks to someone here. I have a bit of a standing tremor and not the best coordination, and solder paste and my hot air rework station have been my savior with getting my Color Classic going again. 


NathanHill

Active member
I recently discovered solder paste as well thanks to someone here. I have a bit of a standing tremor and not the best coordination, and solder paste and my hot air rework station have been my savior with getting my Color Classic going again. 
Hey, I'm in Maryland too! Maybe we should trade notes.

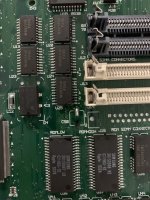
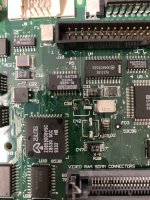
Here's the Quadra board I worked on tonight. I don't have fancy tools, and while I did okay on most of the caps, I lost two negative pads. I watched some videos of replacements, but I don't see the connections to these negative pads to solder a wire too. And I don't have a super close up microscope. Feeling a bit discouraged.

The last two pads I did the push and twist method, and while it was nerve-wracking and left the two "legs" sticking up, I was able to fairly easily disconnected them from the pads.

But this is the part that is over my head a bit - I have some wire that I could try to use to do something, but not sure how to attach them and don't see how they connected.

IMG_4117.jpeg

IMG_4120.jpeg


MDMacGuy

Active member
Ooh! I see the trace there at C50, did the wire pull from the left?

I'm just learning this stuff myself - I have only had one attempt at a recapping with an LC I have downstairs that is flaky at best. Discovering the solder paste may be a gamechanger!

What part of MD are you in?


NathanHill

Active member
Ooh! I see the trace there at C50, did the wire pull from the left?

I'm just learning this stuff myself - I have only had one attempt at a recapping with an LC I have downstairs that is flaky at best. Discovering the solder paste may be a gamechanger!

What part of MD are you in?


I'm over in New Carrollton, MD. Not far at all.

I see the trace too in the picture, but it's so TINY up close. Don't have a magnifier or anything. I was using these boards to practice. The Quadra would turn on but give the Mac chime of death despite the board looking pretty clean. It initially booted a while ago but the screen was discolored, which means it was probably the caps. I was hoping to rehab it, and maybe one of you can give me ideas. So if I can somehow get a wire to the trace, it could still work?


bibilit

Well-known member
Your best option is using a multimeter.

using the continuity test and poking around, you will be able to find the nearest connecting point.

on the C33 pad, i can see the round mark of the pad (above the pad) while on C50, yes, on the left.

 
Top