• Updated 2023-07-12: Hello, Guest! Welcome back, and be sure to check out this follow-up post about our outage a week or so ago.

Macintosh Classic won't start

alexGS

Well-known member
Good stuff. One thing to think about - when you replace the optocoupler - I think they are possible to damage with soldering temperature, and I think that’s why they are socketed in the original Mac/Mac Plus analog board.

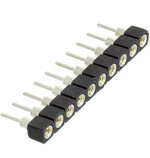
So, the last optocoupler I fitted to a Classic, I took a row of pin header sockets (photo below) and snapped off two rows of three, to make a six-pin IC socket in effect. The two rows are widely-spaced, so I guess a regular IC socket won’t fit.

Now it’s easy to change the optocoupler and I know it won’t be damaged by soldering :) Also seems a little less temperature-sensitive
 

Attachments

  • IMG_8665.jpeg
    IMG_8665.jpeg
    285 KB · Views: 12

patatino

Member
here is the board


FullSizeRender.jpeg

It seems one of the rifa cap has a crack on the side

IMG_0771.jpeg


I have no way to know if that's what popped. I understand the board should anyway work fine with failed rifas (i.e. this is not what causes the low voltage)? I will still look for a proper replacement (Kemet PME295 according to this thread).

Note well taken on not overheating the optocoupler. I am hopeful I did not damage the new one I installed, as I'm using solder paste flowing at rather low temperature, but still I'll give a go at replacing it again, as I can't say otherwise what's causing the low voltage.
 

alexGS

Well-known member
So, next to replace are:


The schottky was full of cap gunk and I broke the leg myself cleaning it
Yep, and then replace the optocoupler again. Voltages will probably be back to normal - for a while.
Cleaning the analog board in hot soapy water does seem like a good idea, if you’ve had that much gunk floating around that a diode leg was corroded off.
 

Dogmander

Active member
Yep, and then replace the optocoupler again. Voltages will probably be back to normal - for a while.
Cleaning the analog board in hot soapy water does seem like a good idea, if you’ve had that much gunk floating around that a diode leg was corroded off.
is it safe to clean the analog board like that? can the water damage any of the components if it gets inside? I'm worried especially about the speaker and the flyback or transformers
 

Big Ben

Well-known member
You should remove the flyback and the speaker. Never had problems with transformers.

I always rinse the board before removing the caps to get rid of most of the gunk and the infamous fish smell, let it dry, then remove all caps, then do a deap clean, then resolder everything, the only classic AB that failed me yet was the one I didn’t clean with dishsoap.

You just really need to rinse properly and make sure it completly dries after each cleaning.
 

68kPlus

Well-known member
This thread makes me nervous about my Mac Classic repair - the analog board has leaky caps, with cap goo on a bunch of stuff.

Eek
 

cheesestraws

Well-known member
You should generally use both water and isopropanol to wash circuit boards, because they dissolve different kinds of gunk - things that dissolve well in water don't dissolve in IPA etc. Soap will help get greasy stuff off, but rinse it carefully afterwards. If you're worried about drying (which you probably should be) make sure you do the isopropanol wash after the water wash. Because of magical chemistry stuff the isopropanol will both help flush the water out of corners (by reducing its surface tension and thus its desire to hang onto things and surfaces) and also help it to evaporate.
 

alexGS

Well-known member
Cheesestraws is absolutely right - I do the wash in hot soapy water (with dishwashing liquid) first, scrubbing with a toothbrush, and then after blow-drying, I use IPA to rinse.

I haven’t had any problems with speakers or flybacks - I’m just careful not to touch the speaker when it’s wet. When it dries, it works just as well as before.
 

patatino

Member
After a break I proceeded as described above.
After cleaning the board again, replacing the rifas, schottky and optocouper, I gave it a try. Unfortunately it did not go well... As soon as I switched the power on, there was a bang again (louder this time I think). The LV was probably still working as the fan kept spinning, however of course I turned power off immediately 🙁
I did not dare to try again. I now need to look if there's any evidence as to what is causing this bang and see if I can do anything more or if I should just give up...
 

imactheknife

Well-known member
After a break I proceeded as described above.
After cleaning the board again, replacing the rifas, schottky and optocouper, I gave it a try. Unfortunately it did not go well... As soon as I switched the power on, there was a bang again (louder this time I think). The LV was probably still working as the fan kept spinning, however of course I turned power off immediately 🙁
I did not dare to try again. I now need to look if there's any evidence as to what is causing this bang and see if I can do anything more or if I should just give up...
Sounds like a cap was in backwards. They can make a loud bang if installed wrong
 

imactheknife

Well-known member
I did this with mine, and noticed it while diagnosing other issues. Luckily it didn't explode during the 4 test runs I did before I noticed it...
I recapped my bondi rev a imac psu. Didn’t realize i had a big cap in backwards, actually it was the wrong size. Turn on and bang!! Smoke everywhere lol.. thought I killed it. Someone was kind enough to let me know the correct value
 

68kPlus

Well-known member
I recapped my bondi rev a imac psu. Didn’t realize i had a big cap in backwards, actually it was the wrong size. Turn on and bang!! Smoke everywhere lol.. thought I killed it. Someone was kind enough to let me know the correct value
Oh nice. I've re-checked mine a few times since then, and I replaced the cap with one from a cheap Dell PSU. I've bought a replacement, as that one is just temporary.
I can imagine it puts the fear of god in you when it happens.
 

Juror22

Well-known member
I did this with mine, and noticed it while diagnosing other issues. Luckily it didn't explode during the 4 test runs I did before I noticed it...
I just did this too! Way too easy with this board, since there are multiple variants and the board has some vague silk-screening (no plus sign and the pos lead was diagrammed over a cutout in the board. I had this happen while re-capping my classic to address a
'wobbly' screen with low voltages.

I always take pictures before, during and (sometimes) after recapping. The first attempt to power up afterward resulted in a blown fuse and so I went over the board and checked all that I could read, as well as several I could not (the one referenced above the glaring exception) and then I re-soldered a couple areas that I thought might be questionable and gave it another go 'round. After it popped again (with a bright flash this time), I took a much closer look at the before pictures and caught my mistake, unsoldered the cap, flipped it around and attached it correctly. When I powered up, I was still a bit low on V12 and V5, so I adjusted P1 up and now I'm at 12.11, 5.00, and -11.78 - no more wobbles. (the -12V did not move up (down?) in the adjustment.

FYI - There was SO much cap goo to clean - previous comments in this thread had that right!
 
Top