• Updated 2023-07-12: Hello, Guest! Welcome back, and be sure to check out this follow-up post about our outage a week or so ago.

Pry marks on case edges

MindWalker

Well-known member
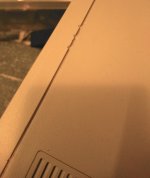
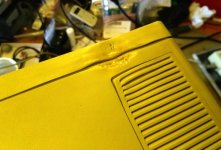
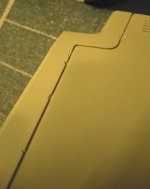
Has anyone come across any good methods on minimizing/hiding/filling pry marks like this on the compact Mac cases? The usual story; some previous owner tried to open the case and with a screwdriver tried to pry the case open (possible without noticing the two screws in the handle-recession). And of course tried it on all sides!  :(

I know mine shown here is a mild example. I used a knife and cut off the plastic sharpnels that were protruding from the case, thus making the damage a bit less noticeable.

Perhaps some sort of plastic filler could be used to further hide the missing bits?

Side:
20201107_181727.jpg

Top:

20201107_181709.jpg

 
Last edited by a moderator:

dcr

Well-known member
I know mine shown here is a mild example.


I have a couple with what I thought were mild pry marks.  If your examples are considered mild, I guess mine are almost non-existent.  8-o

You could possibly use a plastic filler (and then press into it with a mouse or other case piece that has the same texture) but the color will almost certainly not match, especially as the case continues to age.


cheesestraws

Well-known member
This perhaps isn't a useful answer, but I think it's becoming more and more clear that at some point, one just has to admit that these are old objects and they have their scars.  And, if one is doing this for the history, the scars are interesting because they not only tell the stories of individual machines and users, but taken in aggregate, they show the differences between how things were used and how they were intended to be used.


MindWalker

Well-known member
If your examples are considered mild, I guess mine are almost non-existent.  8-o


Well, I called it mild as there are only a couple of marks per side....  could be worse!

Then there is my 512K, which I have no idea what was done to it....  :eek:

20200724_201717.jpg


dcr

Well-known member
This perhaps isn't a useful answer, but I think it's becoming more and more clear that at some point, one just has to admit that these are old objects and they have their scars.  And, if one is doing this for the history, the scars are interesting because they not only tell the stories of individual machines and users, but taken in aggregate, they show the differences between how things were used and how they were intended to be used.


Kintsugi.  If one wishes to go with that philosophy, the pry marks could be filled with a plastic mixed with gold powder to highlight them.


dcr

Well-known member
Then there is my 512K, which I have no idea what was done to it....  :eek:


Way too close to a heat source.  Had a plumber do something like that once.  Not to a Mac, fortunately.  He had his blowtorch in-hand and on and was talking.  He was the type that talked with his hands . . .


cheesestraws

Well-known member
Kintsugi.  If one wishes to go with that philosophy, the pry marks could be filled with a plastic mixed with gold powder to highlight them.


Yes!  I love that.  Or when you see a reconstructed pot or something in a museum and the bits that are missing are very obvious


Torbar

Well-known member
Way too close to a heat source.  Had a plumber do something like that once.  Not to a Mac, fortunately.  He had his blowtorch in-hand and on and was talking.  He was the type that talked with his hands . . .
I had a record player that at some point got moved over close enough to a light bulb that the end started to warp like that over time


dcr

Well-known member
Sometimes it's not heat, though in this case I think it probably was.  Years ago, I had set clear fishing lures (worms) on top of a plastic case.  Then forgot about them.  Who knows how many years later and they had basically melted into the case.  That is, the worms were fine, but they left a worm-shaped indentation in the case.


Garrett

Well-known member
Then there is my 512K, which I have no idea what was done to it....  :eek:
Definitely looks like it was too close to a heat source, especially with the slight discoloration. When I was a kid, my mom turned on a burner that had a portable electric range sitting adjacent to it. Ended up melting the little pilot lamp/LED on it.

Was nowhere as bad as the time I plugged in the FryDaddy to fry something and accidentally left the rubber cap on.  8-o 8-o 8-o That was a huge f***ing mess...


Crutch

Well-known member
I think the only thing you can do here is try to fix it with ABS slurry.  I had luck in the past by breaking off bits of a Mac Plus keyboard I had that was shattered in shipping by someone, crushing them with a hammer and and melting them in acetone.  https://www.matterhackers.com/news/how-to-make-abs-juice-glue-and-slurry

If you use plastic from a color-matched part, the color will match very closely (aside from yellowing, which could of course be retrobrited).  The texture will be wrong, and doing a smooth ABS repair job is tricky (of course you can’t use tape or anything to control the slurry, since the acetone will just melt it ... however something like a small wooden or metal ruler could be used to get a clean line on the edge there), but in my experience usually does significantly reduce the appearance of scratches/chips/gouges.

Of course, do it with the case off so you don’t glue it together. :)  

 
Last edited by a moderator:

ronan

Well-known member
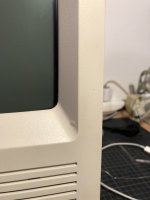
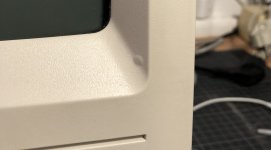
Can also something like that be fixed ? (I think I may have tighten too much my CRT and it made that little bump)

IMG_3145.jpeg

IMG_3145.jpeg

 
Last edited by a moderator:

MindWalker

Well-known member
Thanks for the comments!

I agree that in some cases the history should be let showing, but in case there was something relatively simple to make the damage less visible, I'd like to try. If I can get some plastic filler, I might practice on something smaller first.

@ronan are you sure those were right screws? Looks like they came further than they should've! Or perhaps the CRT has been replaced and the mounting is somewhat different?


ronan

Well-known member
@ronan are you sure those were right screws? Looks like they came further than they should've! Or perhaps the CRT has been replaced and the mounting is somewhat different?


I agree this is super weird.

I'm sure I am the one who did this to the case. I dismounted the mac, remove the back screw of the CRT, and then put back the exact same screw (and the same CRT)) and when I finished assembling the mac back I saw this little bump.

It's super weird that the screw did go that far as they're not supposed to. I still don't understand to be honest. And of coure I can't unsee. :/  


cheesestraws

Well-known member
I agree that in some cases the history should be let showing, but in case there was something relatively simple to make the damage less visible, I'd like to try.


Oh, I hope it didn't sound like I was trying to tell you off or anything.  If it is annoying you, give it a try :) .  It is your machine.  And, I mean, Pluses really aren't rare enough to be worth being precious over, so it would be annoying to make it worse, but probably no worse than annoying.


Stephen

Well-known member
This perhaps isn't a useful answer, but I think it's becoming more and more clear that at some point, one just has to admit that these are old objects and they have their scars.  And, if one is doing this for the history, the scars are interesting because they not only tell the stories of individual machines and users, but taken in aggregate, they show the differences between how things were used and how they were intended to be used.
I like this idea, though I'm not sure I would do it — I would prefer a more pristine look.

Going after the pristine look... it could be tricky to find an epoxy that bonds strongly but that is what I would start with. You could try to level out the pry marks (or even cut them a bit below the surface) and then use a rigid rubber molding compound to copy the texture of the Plus' exterior. With the chosen epoxy (and possibly a colorant), the rubber mold could be applied over the firming but not yet solid epoxy to copy and obscure the repair. As for coloring... if you can't match the epoxy perfectly (sounds challenging) then you could try a color match paint from HomeDepot. I've had reasonably accurate color matches on a Color Classic in the past.


MindWalker

Well-known member
Oh, I hope it didn't sound like I was trying to tell you off or anything.  If it is annoying you, give it a try :) .  It is your machine.  And, I mean, Pluses really aren't rare enough to be worth being precious over, so it would be annoying to make it worse, but probably no worse than annoying.


No worries  :)

And yeah, I am not expecting to be pefrectable, just the little step from obvious damage (bits missing) to less obtrusive would be just fine! I've also faced this when retrobrighting; I usually don't want to go all the way in (and risk damage) but if I can get it from obviously yellowed to just-hint-of-yellowing, I'll be fine with that. (My Plus' case also has some yellowing, but as it only shows on the rear, and I don't have a good setup to do as big as item as the case, I haven't bothered).

 
Top