Macintosh Personal Color, a Fantasy 1986, 68000 Mac with a 4bpp Color Mode (Emulator)

Snial

Well-known member
Sometimes it's argued that the compact Mac era would have done better if Apple had produced one with Atari ST/ Amiga (ish) colour graphics.

Well, now you can try it out for yourself! I modified the PCE Mac emulator to support 256x171x 4bpp graphics as per this proposition on the thread 68k-today. It's supposed to be a 512kB Mac with no SCSI and a maximum RAM of 1MB. Color graphics supports a 16 entry palette table with 11 bits per palette entry. Writing a 16-bit word: 0x8000+(pal<<11)+(blue<<8)+(green<<4)+(red) to 0xbffffa sets a palette entry; writing 0 or 1 set the video mode to black and white / colour.

Thus the Mac Personal Color can support 16 colours from a range of 2048 colours: 8 blue, 16 green and 16 red. A few things to note. Firstly, obviously Apple didn't produce a Mac like this, it's not a serious proposition! Secondly, it'd be pretty challenging to write an app on a base model in 512kB. MacPascal can't integrate assembler sprite routines quickly enough nor write to absolute memory locations easily. MacASM or MDS could have done it, but ASM isn't easy. Consulair C I think did fit in 512kB, so that's possible. No THINK Pascal or THINK C I thought ran in 512kB. Therefore, most Mac Personal Color developers would have needed 1MB from the start.

Thirdly: a real version of the Mac Personal Color would have needed the SE's video trick for reducing video bandwidth. This is because the 4bpp mode needs twice the graphics bandwidth as each scan line uses 128b and odd scan lines duplicate even ones. Even so, it'll have the same performance as a Mac Plus, about 6.5MHz of 68000 rather than 7.5MHz. Without that, you'd be left with a bit under 3MHz of CPU!

Fourthly: the colour frame buffer is chunked not planar. Each byte contains 2 pixels: [left:4][right:4].

Fifthly: at a resolution of 256x171, 16 colour mode is inferior to and incompatible with Atari ST and Amiga Resolutions (since they standardised on 320x200). This would have limited its appeal to gamers anyway.

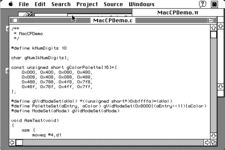
Having said all that, it might have been a fun machine. The emulator seems to work. I've written the most simple demo program I could (it just sets the palette and video mode and goes back to B/W when you click again). In the next update I'll produce a better demo, the emulator and source code!

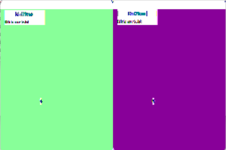
Before (and after clicking again):
1740675412891.png
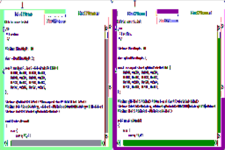
When you run it the screen appears duplicated because as mentioned earlier, each scan line is 2 old scan lines (but then duplicated):
1740675438152.png
I love those chunky, coloured pixels! Let me know how horrified you are!

-cheers from Julz
 

Snial

Well-known member
Here's my first little update. The attached Zip file contains pce-macplus compiled for Intel Mac (the dev machine is running Catalina) + the startup config file for a 512KB Mac (like a standard MacColorPersonal), 64kB ROM, an MFS3.2Disk containing System 3.2 and the demo in a folder. In that folder, there's the THINK C project, .c file (so you can see how it's done) and application.

To use it, first unzip into a folder you can execute apps from. From the terminal type:

./pce-macplus -c pce-mac-256.cfg

The emulator will start up and tell you the Mac's config. At the prompt type g<return>. It should boot. There's a 15s pause before it starts to read the disk properly and then you're in. Click to activate the emulator mouse. Double-click on the MacCPDemoƒ to open it, then double-click on the application. A small window pops up asking you to click the mouse. Click and the screen will go into a 16-colour mode version of the same screen.

1740690067352.png
Click again and it'll return to black and white as normal.

Annoyingly, within Pce-Mac, you can't move the mouse to get out of the application as you can with miniVMac. Instead you can get out by using command-tab to switch applications. When you want to quit; choose FILE:Eject to eject the disk (sometimes pce-mac can leave it write-protected if you don't); then, type <ESC>q . Pce-mac intercepts that as a special sequence.

A couple of final points. I'm thinking about what better demo can be done next; something that can evaluate the speed of these graphics on pce-mac (which runs at about the same speed as a real Mac 512 would). @noglin, you do demos; any idea what would be a good one to start with? You can develop the demo on a Mac Plus configured version of this emulator. Also, I suspect that CopyBits can be used to copy or move bitmaps onto the colour screen, in colour. However, for screenbits you need to double the width of the grafport's bitmap so that things get copied properly (and revert it when you leave).

This means you could design 16-color bitmaps and icons on a Color Mac and use them as resources in a demo or application - saving you some effort on a Sprite library or whatever. You'll need to remember that when you blit (using black and white copybits), you'll have to multiply the x coordinate by 4.

-cheers from Julz
 

Attachments

  • MacCPDemo0.zip
    784.2 KB · Views: 0

joevt

Well-known member
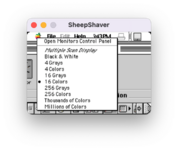
Existing Mac emulators already support arbitrary resolutions and indexed color bit depths (1,2,4,8 bpp) with 48 bit palettes (but probably only 24 bits were used).
SheepShaver 256x171 4bpp.png
Some extra work may be required to support more than one resolution or higher magnification or fullscreen mode or slower cpu speeds.

If you want to limit the palette bits per component, the math for changing bpc is pretty simple. I think this should do it (except remove constexpr for old compilers):
C:
#include <stdio.h>

constexpr int transform_component(int src_component, int src_bits, int dst_bits)
{
	int dst_component = 0;
	do {
		dst_component = (dst_component << src_bits) | src_component;
		dst_bits -= src_bits;
	} while (dst_bits > 0);
	dst_component >>= -dst_bits;
	return dst_component;
}

void transform_color_amiga_to_mac(
	int red_src, int green_src, int blue_src,
	int& red_dst, int& green_dst, int& blue_dst
) {
	red_dst   = transform_component(red_src  , 4, 16);
	green_dst = transform_component(green_src, 4, 16);
	blue_dst  = transform_component(blue_src , 3, 16);
}

int main() {
	int red_src, green_src, blue_src;
	int red_dst, green_dst, blue_dst;
    for (int i=0; i<8; i++) {
        transform_color_amiga_to_mac(i,i,i, red_dst, green_dst, blue_dst);
        printf("%04x.%04x.%04x\n", red_dst, green_dst, blue_dst);
    }
}

Code:
0000.0000.0000
1111.1111.2492
2222.2222.4924
3333.3333.6db6
4444.4444.9249
5555.5555.b6db
6666.6666.db6d
7777.7777.ffff
 

NJRoadfan

Well-known member
Apple did build a machine that did this in 1986...... the Apple IIgs. Technically the 640x200 SHR mode can only support 4 solid colors, but you can have two different palettes staggered across every other column of graphics, leading to 16 dithered colors.


By default:
Palette one (even columns): black/white/blue/yellow
Palette two (odd columns): black/white/red/green

The Apple menu colors are a party trick. The machine can do palette swaps every scan line, to get more colors on the screen for the logo.
 
Last edited:

Snial

Well-known member
Existing Mac emulators already support arbitrary resolutions and indexed color bit depths (1,2,4,8 bpp) with 48 bit palettes (but probably only 24 bits were used).
<snip>
Thanks for the feedback. I understand that Mac emulators that support colour with a set of bit depths only for Macs with 68020 processors and higher? i.e. Macs with Color QuickDraw? This concept is really about the question of whether a pre-Mac II, Colour variant of a minimal Mac 512K type machine (i.e. with a 68000 CPU and no Color QuickDraw) could compete with an Atari ST / Amiga. This means we're limited to an effective 6.5MHz CPU. My changes to the PCE-Mac emulator perform the component conversion you describe for 11-bit to 24-bit conversions. e.g. the 3-bit blue component: BBb => BBbBBbB as an 8-bit component and the 4-bit green or red components, e.g GGGg => GGGgGGGg as 8-bit components.

I didn't know you could do: dst_component >>= -dst_bits; ! Shift by a negative? Is that the same as <<?

Apple did build a machine that did this in 1986...... the Apple IIgs.

The Apple menu colors are a party trick. The machine can do palette swaps every scan line, to get more colors on the screen for the logo.
The IIgs was rightly well received by Apple users when it came out in 1986 and it had a whole host of clever features. I think I'm most impressed by its sound chip, which was well ahead of anything Adlib; the ST or Amiga could do. But, if I understand correctly, its 65816 CPU at 2.8MHz really wasn't anywhere near as fast as the 8MHz 68000 CPUs. For example, it can't do more than 1.4MIPs max, whereas the ST could do 2MIPs max. It didn't have 32-bit pointers; had only a 16-bit version of the A reg ('C') vs 16x32-bit regs on a 68000. It needed multiple instructions to do what a 68000 could often do in one.

This is all down to the dilemmas Apple faced in the mid 1980s. The Apple ][ was still the breadwinner; a colour computer and used a lot in the K-12 school system (equivalent to Primary to Secondary schools in the UK). It was essentially subsidising the Black and White Mac while it took over. By the mid-80s it was losing against 16-bit home computers (and C64). The ||gs threatened the Mac while not really challenging the ST or Amiga, and Apple execs tried to kill it (that's one of the reasons it ran at 2.8MHz to stop it being as fast as existing Macs).

OTOH, after Jobs was sacked, Jean Louis Gassé took over the Big Mac (Apple's first attempt at a 3M computer) and turned it into the Mac II. His concept was high-end Macs though, to push the brand to powerful, desirable workstations.

Mac Color Personal Hardware Changes

The ||gs was quite a radical change, but the Mac Color Personal isn't... it's probably something @bigmessowires could quite easily hack onto a Mac SE.. Good point, I do have a nearly working Mac SE :unsure: ! A classic Mac SE video hardware has a sync generator. For blank lines it just outputs a high after sync, counting each scan line (in hardware), then for video scan lines it steals a memory cycle from the CPU every 4 cycles (CPU, CPU, CPU, Video) to read the next 2x 16-bit words which it then serialises (0=>1V, 1=> 0.3V). At the end of the scan it reads the next word from the sound buffer; increments the scan line and continues reading.

The Mac CP would be fairly close to that in color mode. It steals a 2x 16-bit read every other memory cycle from the Mac, because it needs to read 128B per scan instead of 64. So that means doubling the read rate. Those 32-bits provide 8x 4-bit pixels; which index an 11-bit color palette (176 bits of data), outputting BBB, GGGG, RRRR which are then fed to 3 DACs (11 resistors) driving the RGB guns. So, in colour mode we take the top 4 bits; and shift by 4, whereas in mono mode we take the top bit and shift by 1.

A the end of the scan the video memory pointer will point to the next scan of pixels in real memory, but bit 7 gets cleared if it's an even scan in mode 1 ( VidMemPointer<7>&=(Scan<0>|~Mode))

Palette management is similarly simple. In my emulated version I hijack a 16-bit word write to the SCC. If bit 15 =0, then Mode=bit 0. If bit 15=1, then Palette[DataBus<14:11>] = DataBus<10:0>.

Importantly, it means that the same monochrome video buffer is used for colour - it's a variant that fits into the kind of minimalism in the earliest Mac.
 

Arbee

Well-known member
The ||gs threatened the Mac while not really challenging the ST or Amiga, and Apple execs tried to kill it (that's one of the reasons it ran at 2.8MHz to stop it being as fast as existing Macs).
Common fan theory, but the IIgs hardware engineers have indicated it's because there were no 65816s that would reliably run above roughly 3.5 MHz. Sanyo and Nintendo had to redesign the chip to run the Super NES reliably at 3.58 MHz (and that also enabled IIgs accelerator cards). John Sculley reportedly had approved the IIgs running all the way up to 7.16 MHz if they could pull it off. With what fast RAM cost at the time, a 7.16 MHz IIgs would've cost more than a Mac Plus though.

The Mac CP would be fairly close to that in color mode. It steals a 2x 16-bit read every other memory cycle from the Mac, because it needs to read 128B per scan instead of 64. So that means doubling the read rate. Those 32-bits provide 8x 4-bit pixels; which index an 11-bit color palette (176 bits of data), outputting BBB, GGGG, RRRR which are then fed to 3 DACs (11 resistors) driving the RGB guns. So, in colour mode we take the top 4 bits; and shift by 4, whereas in mono mode we take the top bit and shift by 1.
The major issue there is increasing the required video bandwidth slows down the 68000. The SE famously improved processing speed by having more efficient video.
 

VMSZealot

Well-known member
It's interesting that Scuzzygraph enabled colour (3bit, I think) on the 68000 Macs. I wonder if there's a way to hack this internally? I've also seen kits for resurrecting compact Macs into a desktop case, and driving a VGA monitor - how awesome would these be if they enabled 3bit colour! And is there a list of software which could display colour with Scuzzygraph - because that's definitely something that fantasy personal Mac should include!
If an emulator supported this mode I'd be trying it out for sure!
 

NJRoadfan

Well-known member
QuickDraw has limited support for color prior to the Macintosh II. It mostly existed for color printer support.
 

VMSZealot

Well-known member
QuickDraw has limited support for color prior to the Macintosh II. It mostly existed for color printer support.
Yeah, I know - it's how ScuzzyGraph worked. So, IIRC, CricketDraw supported it. It can't be the only software that did though. I wonder if any games, either deliberately or accidentally, had support?
Weirdly, I don't think that CricketDraw displayed colour on a Mac II or newer - so how did ScuzzyGraph pull off the trick of getting it to show its true capabilities? Or am I misremembering?
 

Snial

Well-known member
<snip> no 65816s <snip> above roughly 3.5 MHz <snip> redesign <snip> Super NES reliably at 3.58 MHz <snip> John Sculley reportedly had approved the IIgs running all the way up to 7.16 MHz if they could pull it off <snip>would've cost more than a Mac Plus though.
Thanks, I didn't know that!
The major issue there is increasing the required video bandwidth slows down the 68000. The SE famously improved processing speed by having more efficient video.
Yes. The Plus and earlier alternated 16-bit video reads and CPU reads: (CPU, Video). Video doesn't use the bus for top & bottom margins + cycles outside reading scan data. Basically. you get (512/16)*342*60.15*4c/read=2,633,126.4c/s=35%CPU, leaving 4.9MHz for the CPU. But the CPU doesn't use the bus all the time (ROM, Internal cycles). This gave 6.5MHz of CPU to those Macs.

The SE performs 2x 16-bit video reads every 4 read cycles: (CPU, CPU, CPU, Video); which halves the bus bandwidth used by video. I think it does that by issuing a full cycle then a FPM cycle. However, for the Mac CP, you need to read video at twice the rate on a given scan line, bringing it back to the same bandwidth used on a Mac Plus. Hence the Mac CP would have 6.5MHz of CPU available. The hardware could reduce the video bandwidth by storing even video scans in a 128b buffer and replaying them for odd scans: then you'd get the same performance as an SE. However, I skipped that by minimising the hardware.

<snip> Scuzzygraph enabled colour (3bit, I think) on the 68000 Macs <snip> hack this internally? <snip> list of software which could display colour with Scuzzygraph - because that's definitely something that fantasy personal Mac should include! <snip> I'd be trying it out for sure!
QuickDraw has limited support for color prior to the Macintosh II. It mostly existed for color printer support.
I might get corrected on this, but from everything I've read about the limited colour support on original Macs, it was itself a hack by getting 1bpp QuickDraw to draw on 3 planes, like the ST or Amiga would. i.e. 3x BitMaps, Red, Green and Blue. That's why it works for printers. Software could tag an object or text as having a given colour and then when it's printed or drawn, those objects are blitted to the right bit plane. It's slow, but fine for printers. And in fact, because early colour printers usually have inverse colours: Cyan, Magenta and Yellow. You'd print it out be first allocating a strip; then Cyan=BluePlane|GreenPlane, Magenta=BluePlane|RedPlane, Yellow=GreenPlane|RedPlane. e.g. then you see green for all green pixels because it's a cyan layer overlaid with a yellow layer and cyan+yellow ink = green. Or maybe I have it back-to-front, because on original Macs, black was 1 and white was 0; so maybe all the bitplanes are inverted Cyan/Magenta/Yellow planes?

Aaaah, was Scuzzygraph a SCSI video thing? Yes. So, that's how it worked. It installed a video driver which contained 3 bit planes; so appropriate software would blit to the right plane. So, an SE could be modified to support that using PDS: containing a video driver with 3 bit plane support. And it's a good point, but I think also it wouldn't be good for games, unless the video driver somehow could also adjust the resolution so you get a control panel to define it.

MacCP video is a more crude hack, because it doesn't need a video driver. It's simple hardware comparable with early 8-bit colour video, like the BBC micro or Amstrad CPC464 (and I'm picking these UK computers because C64 and 8-bit Atari graphics are quite a bit different and in the case of Atari, more sophisticated).
 

joevt

Well-known member
Thanks for the feedback. I understand that Mac emulators that support colour with a set of bit depths only for Macs with 68020 processors and higher? i.e. Macs with Color QuickDraw?
True.

Support for indexed color less than 8bpp is usually removed from graphics controllers of PCI Power Macs and later.

This concept is really about the question of whether a pre-Mac II, Colour variant of a minimal Mac 512K type machine (i.e. with a 68000 CPU and no Color QuickDraw) could compete with an Atari ST / Amiga. This means we're limited to an effective 6.5MHz CPU.
Right. I was just saying that the existing 4bpp mode is very close to your PCE mode.

Color QuickDraw is the software on top of the hardware. You're PCE-Mac graphics hardware could be controlled with Color QuickDraw or whatever you like (though I guess Color QuickDraw would need to be ported to the 68000 if it requires 68020).

My changes to the PCE-Mac emulator perform the component conversion you describe for 11-bit to 24-bit conversions. e.g. the 3-bit blue component: BBb => BBbBBbB as an 8-bit component and the 4-bit green or red components, e.g GGGg => GGGgGGGg as 8-bit components.

I didn't know you could do: dst_component >>= -dst_bits; ! Shift by a negative? Is that the same as <<?
dst_bits is negative or zero at the end, so - just makes it positive.

If you don't mind using multiply, then another method is:
Code:
blue_dst  = blue_src  * 0b001001001 >> 1; // src_bits = 3, dst_bits = 8
red_dst   = red_src   * 0b00010001; // src_bits = 4, dst_bits = 8
green_dst = green_src * 0b00010001; // src_bits = 4, dst_bits = 8
but you need to calculate the multiplier based on src_bits and dst_bits.
 

Snial

Well-known member
Support for indexed color less than 8bpp is usually removed from graphics controllers of PCI Power Macs and later.
Good point. I don't think I've even checked if my PB1400 supports 4bpp.
Right. I was just saying that the existing 4bpp mode is very close to your PCE mode.
Correct, intentionally so, though I'd call it the CP (Color Personal) mode. There was an earlier discussion to do with Doom where I think @VMSZealot or @noglin were remarking on how planar graphics on the ST and Amiga, though good for parallax scrolling games, were far too slow for the new generation of first person 3D. I chose this kind of 4bpp, because it's like contemporary home computers with simplistic colour graphics, like the Archimedes or Amstrad, but also because it's very easy in both hardware and emulation.
Color QuickDraw is the software on top of the hardware. You're PCE-Mac graphics hardware could be controlled with Color QuickDraw or whatever you like (though I guess Color QuickDraw would need to be ported to the 68000 if it requires 68020).
I think existing 1bpp QuickDraw can do most of what one would want anyway. Blitting should work: you just have to blit to X coordinates at multiples of 4. Text display could work if you first Draw characters on a separate 1bpp bitmap, then use CopyBits to stretch them on the x-axis by 4; then AND mask with whatever colour you want then blit to the destination (not fast, but doable). Line drawing should work by repeating the same line at x+1, x+2, x+3. Not sure about circles and arcs.
dst_bits is negative or zero at the end, so - just makes it positive.
OK.
If you don't mind using multiply, then another method is:
Code:
blue_dst  = blue_src  * 0b001001001 >> 1; // src_bits = 3, dst_bits = 8
red_dst   = red_src   * 0b00010001; // src_bits = 4, dst_bits = 8
green_dst = green_src * 0b00010001; // src_bits = 4, dst_bits = 8
In my PCE emulator code I use multiplies by 0x11 for red and green as that'll be as fast on any ARM or Intel CPU, but I didn't think about your blue technique; instead I just add the top blue bit, shifted to the bottom.
but you need to calculate the multiplier based on src_bits and dst_bits.
I'll release my version of PCE soon. It's just that I have some guff in the root folder for the emulator and I also want to check it works on Apple Silicon first too.

-cheers from Julz
 

joevt

Well-known member
In my PCE emulator code I use multiplies by 0x11 for red and green as that'll be as fast on any ARM or Intel CPU, but I didn't think about your blue technique; instead I just add the top blue bit, shifted to the bottom
BBbBBbB is 7 bits. You need the two top bits of blue_src to fill 8 bits for blue_dst.
My "bit shift loop" and "multiply with shift" methods make a 9 bit number and shift right 1 to get the 8 bits we want to keep for blue_dst.

68K compiler optimizers might look at a multiplication and count the number of 1 bits in the multiplier to determine if it should use bit shift and add instead of multiply.
 

Snial

Well-known member
I configured it on my Mac mini 2012 with:

$ ./configure --with-x11

as I think I had problems with configuring for SDL.
BBbBBbB is 7 bits. You need the two top bits of blue_src to fill 8 bits for blue_dst.
My "bit shift loop" and "multiply with shift" methods make a 9 bit number and shift right 1 to get the 8 bits we want to keep for blue_dst.
Aah, OK. But the same rationale works. BBb => BBbBBbBB is BBb*(0b1001001)>>1 or (BBb*0x49)>>1. Oh, that means my emulator is slightly wrong! I have: (((aMode&0x700)>>7)+((aMode&0x400)>>10))*0x11. So, the 11-bit colour is: BBbGGGGRRRR and my calculation does:

((0bBBb00000000)>>7)|(0bB0000000000>>10))*0x11= BBbB*0x11 = BBbBBBbB.

The top 4 bits are right, but the rest aren't. eg. 0b101 => 0b10111011 instead of 0b10110110, 2.7% too blue. I'll fix it.

68K compiler optimizers might look at a multiplication and count the number of 1 bits in the multiplier to determine if it should use bit shift and add instead of multiply.
None of my demo code converts 11-bit to 24-bit colour, it's only an issue for the PCE emulator.
 

Snial

Well-known member
Hi folks,

Finally, here's the distribution so you can recompile it yourself. I only modified the files:

src/arch/macplus/macplus.c src/arch/macplus/video.c src/arch/macplus/video.h

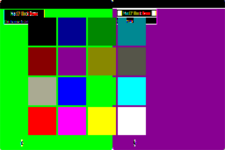
I corrected the 11-bit to 24-bit blue component in the emulator. I updated the demo to draw default set of 16 coloured blocks from the palette (half-bright and full-bright Blue, Green, Cyan, Red, Magenta, Yellow; as well as 0%, 33%, 66% and 100% greys).

1740862913669.png
I've supplied the MythMacD.ROM (which supports the Mythical Mac 256K) and MfsSys3.2.dsk. How to compile. Decompress the distro. Then from the terminal:

Bash:
$ cd PceMacCP
$ ./configure --disable-atari-st --disable-cpm80 --disable-ibmpc --enable-macplus --disable-rc759 --disable-sim405 --disable-sims32 --disable-simarm --disable-vic20 --with-x11
$ make -j4
$ cp src/arch/macplus/pce-macplus .
$ ./pce-macplus -c pce-mac-256.cfg

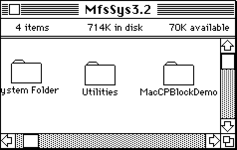
It'll display some setup guff. That's quite interesting though. At the '-' prompt type g<RETURN> . It'll pause for about 15s before simulating a disk insert. From the desktop, open the folder MacCPBlockDemo..

1740863436233.png
You'll see the application and THINK C project with source. Double-click on the MacCPDemo application. When it runs, click on the window, then the palette of blocks appears. You can move your mouse around and you'll see two colourful and thin pointers whose colours change as you move around. Click again and it returns to the desktop in normal monochrome (it's not multifinder so it just regenerates the whole thing. With MultiFinder or System 7+ it leaves odd patterns on the screen when you quit as it's writing to it directly).

Note: it's perfectly possible to modify the project to leave the mode 0 palette with inverted colours or even, e.g. a black background with green text (classic terminal). Or a blue background and yellow text (Turbo C)! What fun can be had :) !

I've only checked it on my Intel Mac so far. There will be another update when I've recompiled on my MacBook M2.

Hope this is of interest... Another addendum: I'm having fun with this. Often emulators are fairly complex and arcane, so I'm super happy that implementing this feature was so simple, a few hours of work really! It makes me think that if Burrell-Smith had been tasked with it, he could have hacked in the feature to a Mac 512K in a week or less ;) !
 

Attachments

  • PceMacCP.zip
    2.5 MB · Views: 3
Last edited:

Snial

Well-known member
OK, I've now compiled it on my MacBook M2. The only difference is that by default I build it using:

./configure --disable-atari-st --disable-cpm80 --disable-ibmpc --enable-macplus --disable-rc759 --disable-sim405 --disable-sims32 --disable-simarm --disable-vic20

(i.e. with no --with-x11 at the end).

Running the app does produce the set of colours as expected, so that's good. There is one oddity though; if I stop interacting with it for a few seconds, the checkerboard desktop pattern seems to blur into a general grey background. @joevt or @mihai , have you seen this kind of behaviour before? I think maybe I saw something similar on at least one emulator on InfiniteMac at some point in the past (though it no longer happens).

Next I'm going to try and get it running on my Raspberry PI 2, 3 and 5. I think on at least one of these it's set up to use sdl1 or sdl2, so I think it's worth checking. Also, I now know that even with MFS disks, and the 64KB ROM, the fake Sony disk driver can allow 1.44MB disks to be mounted. I suppose, also that if a Mac 512K is running System 3.2, it can have the HFS in RAM INIT, so I can boot from MFS and then mount pretty much any sized HFS disk?
 

joevt

Well-known member
This image is showing the remnants of the 512x384 B&W pixels in the new 256x171 4bpp mode.

One row in B&W is 512 bits = 128 four bit pixels - so you see even scan lines on the left and odd scan lines on the right from the original B&W image.

In a B&W image, the checkerboard is like this:
0101
1010
0101
1010

The even scan lines are green - they have pattern 0101 (guessing). The odd scan lines are purple - they have pattern 1010 (opposite of the even scan lines.

Running the app does produce the set of colours as expected, so that's good. There is one oddity though; if I stop interacting with it for a few seconds, the checkerboard desktop pattern seems to blur into a general grey background. @joevt or @mihai , have you seen this kind of behaviour before? I think maybe I saw something similar on at least one emulator on InfiniteMac at some point in the past (though it no longer happens).

DingusPPC doubles the pixels horizontally and vertically on retina displays. DingusPPC has an option to do the scaling with or without bi-linear interpolation (press CTRL-S where S stands for smooth to toggle).

Your emulator might be using no interpolation normally, but then switch to interpolation later during idle.
 

Snial

Well-known member
This image is showing the remnants of the 512x384 B&W pixels in the new 256x171 4bpp mode.
It's wacky, I really like it! Obviously it's because I'm poking the screen memory directly but not clearing it first. Future demos will clear the screen.
One row in B&W is 512 bits = 128 four bit pixels - so you see even scan lines on the left and odd scan lines on the right from the original B&W image.

In a B&W image, the checkerboard is like this:
0101
1010
0101
1010

The even scan lines are green - they have pattern 0101 (guessing). The odd scan lines are purple - they have pattern 1010 (opposite of the even scan lines.
Yep, exactly. Yesterday I played around with trying to generate all the colours with a different desktop pattern:

00000001
00100011
01000101
01100111
10001001
10101011
11001101
11101111

It doesn't look very good though, it's alternating
LHS: Dull Black, Blue pixels ... RHS: Dull Green, Cyan pixels.
LHS: Dull Red, Magenta pixels ... RHS: Dull Yellow, Grey 33% pixels.
LHS: Grey 66%, Bright Blue pixels ... RHS: Bright Green, Cyan pixels.
LHS: BrightRed, Magenta pixels ... RHS: Bright Yellow, White pixels.

DingusPPC doubles the pixels horizontally and vertically on retina displays. DingusPPC has an option to do the scaling with or without bi-linear interpolation (press CTRL-S where S stands for smooth to toggle).
Oh right!
Your emulator might be using no interpolation normally, but then switch to interpolation later during idle.
Thanks, it's not deliberate and maybe I can turn it off!

-cheers from Julz
 

Snial

Well-known member
Another minor update.

I've now basically tested PceMacCP on all my Raspberry PIs: my PI 2 (bought from eBay); my PI 3 (a gift from a friend) and my PI 5 (a leaving gift from work).

I started with the PI 3 (because my PI 2 doesn't have WiFi). It's running Raspbian 32-bit (probably Bullseye). It didn't seemingly have x11 dev, sdl1 or sdl2 installed so I installed it:

Code:
sudo apt-get install libsdl1.2-dev
sudo apt-get install libsdl-image1.2-dev
sudo apt-get install libsdl-ttf2.0-dev

I don't know if I needed the last 2, it might just work with the first one. I configured with:

./configure --disable-atari-st --disable-cpm80 --disable-ibmpc --enable-macplus --disable-rc759 --disable-sim405 --disable-sims32 --disable-simarm --disable-vic20 --with-sdl1

I built it with make -j4 and it built at a reasonable pace, about 1.5 minutes (I didn't time exactly). I copied the emulator and then ran it as normal. The colour blocks demo works as normal. I found that I couldn't swap out of the emulator by pressing <alt>+<tab> as I do with the Mac. But I found that in the Doc/keys.txt file there are other key sequences you can use and <alt>+<ctrl> will release the mouse grab.

I then shutdown, put the microsd card in the PI 2; booted it up and ran the emulator and demo. Again they worked fine. I wanted to check the CPU usage on the PI 2 (900MHz x 4 core I believe). The emulator never seems to use more than 20% of CPU even when I dragged an emulated window around the emulated screen, so that was good!

Finally I switched to the PI 5 (upon which I'm typing this post). This one had a previous install of Pce-Mac, from when I was trying to port the LocalTalk over UDP code from miniVMac ( I think I was some of the way there). I didn't delete it, but I noted that the config log said it was configured to use sdl2, so when I downloaded PceMacCP from here, I just configured it to use that:

./configure --disable-atari-st --disable-cpm80 --disable-ibmpc --enable-macplus --disable-rc759 --disable-sim405 --disable-sims32 --disable-simarm --disable-vic20 --with-sdl2

Again I built it with make -j4 and it built very quickly. I followed the other steps and the emulator and demo worked as expected.

So, I'm happy it works on the Raspberry PI from a PI 2 to a PI 5 (not checked PI 4 as I don't have one!).

Mac Color Personal Applications On 68K and PowerPC Macs

When I first started talking about the Mac Color Personal a user rightly pointed out that direct hardware access on the machine would create incompatibilities with later Macs. It's not so bad for 68020 and 68030 Macs, AFAIK, because you can still get direct access to video memory and the 4bpp modes are very similar; though you'd have to go through the palette manager to update the palette and you'd have to compensate for the different resolutions (e.g. by letter-boxing the game to 256x171 or scaling it, but note: an LC and LC II are both too slow to scale a Color Personal game or app as they're only 1.8x faster, but there's 4x the memory to shift).

Obviously, this can be made less painful by abstracting the Sprite routines so at some point in the future, I plan to take a demo and make it portable to Color QuickDraw supporting Macs.


For PowerPC it's more of a challenge, because I understand most of them don't support 4bpp or 2bpp: though this may only apply to PCI Macs. Frame buffers can still be addressed directly, but again it's another porting job. Perhaps one can take inspiration from the Ingmar's Sprite Animation Toolkit which survived the transition to Mac OS 9.
 

joevt

Well-known member
For PowerPC it's more of a challenge, because I understand most of them don't support 4bpp or 2bpp: though this may only apply to PCI Macs. Frame buffers can still be addressed directly, but again it's another porting job. Perhaps one can take inspiration from the Ingmar's Sprite Animation Toolkit which survived the transition to Mac OS 9.
SheepShaver has a graphics controller that supports all the modes.
DingusPPC will also get a graphics controller that supports all the modes (need to finish the classic macOS ndrv).

You can create a 4bpp offscreen and use CopyBits to copy to onscreen pixels of different modes.
 
Top