• Updated 2023-07-12: Hello, Guest! Welcome back, and be sure to check out this follow-up post about our outage a week or so ago.

Color Classic with weird behavior

flexo

Well-known member
Hi everyone,

I recently got a Color Classic and I'm trying to get it to work properly - the first step was to let it sit plugged in for about two-three days before it would even try to boot up.. then I installed a SCSI2SD and got 7.6 installed on it.

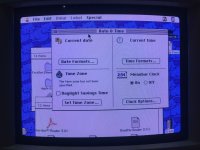
The problem is - it is crashing a lot. When I tried to see when a few files were last modified, I got "," as the modify date and so I've decided to set the date - but to no avail. The attached is what I get when I open the Date & Time panel.

No matter how long I let it stay, it never gives me the current time or allows me to set it.

I've tried zapping the PRAM several times but it's not doing anything..

Any ideas?

IMG_2946.jpg


rsolberg

Well-known member
The first thing I would try here is removing the PRAM battery from the logic board if one is installed.  I haven't observed this missing date and time phenomenon before; usually I see the date resetting to 1904 when there's a clock issue.  Needing to have the system powered on for that long before it would boot is definitely indicative of a hardware problem.  I know that my original CC logic board was very reluctant to boot with a dead PRAM battery installed, but would usually boot on the first or second try with the battery removed.  If you haven't replaced the logic board electrolytic capacitors, now is the time to look at doing it or having it done -- while the system still boots at all.  I let mine go for a few months after I got the computer and its crashing and weirdness got progressively worse until the computer was so unstable it was unusable.  While the logic board looked okay to my eyes, there was a lot of damage hiding underneath and around the capacitors.  I ended up getting a replacement logic board from a LC 575 recapped and upgraded to that, gave the failing CC board to the fellow that did the capacitor replacement for me.


Bolle

Well-known member
The logicboard needs a recap. I suspect there will be corrosion around the CUDA/EGRET chip that’s responsible for power management and the real time clock.

That IC is prone to fail which results in weird behavior if there is leaked cap goo sitting around it or if it started to corrode already.


flexo

Well-known member
That's what I feared :( I've seen some posts about this part of the board especially being prone to break - and the caps looks bulgy..

Don't know much about caps or replacing them so I think I will need to pay someone to do this for me :) (any suggestions?)

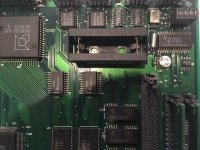
Untitled.jpg

 
Last edited by a moderator:

Alex

Well-known member
removing caps is very easy. The only thing you need to know is to never ever twist them off, ever.

What you need to remove the caps:

You will need flux

You will need a soldering iron (400 degrees Celsius is what I see mine to for this operation)

You will need solder

Needle nose pliers to grip the cap.

(watch the videos, they are very helpful if you've never done this, such good advice there)

Post removal you need (cleanup):

Cotton swabs

Isopropyl alcohol

flux

solder wick (copper braid)

I also strongly encourage the following:

An antistatic mat (blue in image)

connect the antistatic mat to ground point on your outlet

ground yourself to the mat with an antistatic wrist strap (yellow line represent that wrist strap line to the ground point on the mat)

Open a window or otherwise for ventilation, the fumes from the flux can be slightly annoying (maybe an irritant for some, not sure)

Grounding the logic board will protect it from static discharge
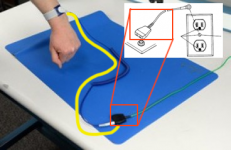
image.png

Note: There is a time when we all are afraid of doing this because we believe we will damage our computers, trust me, there is nothing to fear. Believe in yourself, be analytical (you know just analyze what you are doing) and be patient. 

So here is what I do:

1) I apply a generous amount of flux to both side of the cap. Notice that aluminum electrolytic caps have flat contacts (+ and -). Twisting off the cap will very likely rip the pads off the logic board that they are soldered to. That's why they are NOT to be twisted off. Heat is what sets them free.

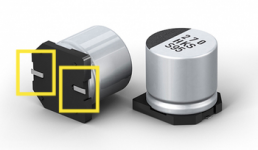
image.png

image.png

2) Using the hot soldering iron melt a generous amount of solder to the locations where the caps "feet" are (marked in yellow)

Note: The flux helps spread and keep the heat on the solder so that it remains melted slightly longer than normal. This will yield a very dirty looking region and if this is your first time you may believe you are damaging things - you aren't, all of it will be cleaned up later.

3) Now once the solder and flux are to the left and right sides of the cap, use one hand to grip the cap itself but don't apply any force just hold the cap with the pliers.

4) Using your other hand, hold the soldering iron and alternate back and forth, from the positive side to the negative side of the cap, just back and forth, applying lots of heat, keep going, no fear, the cap will be trashed so don't worry about it, apply heat to where those positive and negative contacts are. Eventually things will heat up and you may need to add more flux and solder, it depends but don't give up. Eventually there will be enough heat around the cap that you can begin to very carefully rock the capacitor until it begins to come loose.

Remember it is the logic board pads that you are being most concerned about so that they do not come off the board. The cap is trash.

That's all there is to it.

Here is an alternate method using a hot air gun and the post clean up: 


Please please, don't be afraid to do this, it is really easy to remove caps, soldering them back on is even easier! If you feel completely afraid of this, simply use some scrap board to practice.

Please ask any questions.
 
Last edited by a moderator:

LaPorta

Well-known member
This is an absolutely awesome post, thanks for sharing...I’m going to watch the videos myself!


Alex

Well-known member
I am truly delighted that a few of you are impressed by the post. The most important thing I want to leave with any one who reads this is:

1) I once had to start from scratch too! There is a first time for anything, be optimistic!

2) Do not be afraid of the process, in fact you will relish in the rewards of doing this yourself.

3) Do not be afraid. (yes I said it twice)

Best of all, the tools required are not expensive at all.

I wish you all the best, keep us posted on the repair and please, if you are stuck or not sure what to do, please ask any questions, there are a lot smarter people than I here.

When you are done, relish in the amazing Color Classic that you own, it's a neat machine, I own a Colour Classic, notice the "u". http://web.archive.org/web/20030623011714/http://kanchan.hn.org:80/

Keep smiling

—Alex

 
Last edited by a moderator:

flexo

Well-known member
Oh my god, thank you so much Alex! It helped me a lot - and I must apologize for the late reply - I was waiting for new capacitors to show up before checking back here (I got this, by the way)

Since it's my first ever try doing soldering, the first attempt resulted in the "Sad Mac tune" followed by absolutely nothing on the screen - after applying some more solder though, I got it to boot from the floppy. There seems to be some noise coming from the speakers so I'll check it some more - I'm just happy I didn't kill the board completely :)

Edit: I spoke too soon - after the Welcome to Macintosh I got a "Bus Error" bomb >_< I'll just check the solders again and maybe start from stratch (thank god I got two sets :p)

 
Last edited by a moderator:
Top