• Updated 2023-07-12: Hello, Guest! Welcome back, and be sure to check out this follow-up post about our outage a week or so ago.

Sad/Death Chime on IIci

pinto_guy

Well-known member
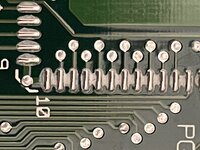
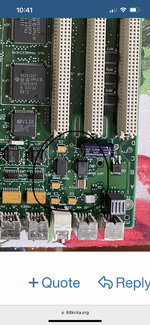
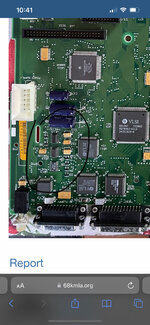
I have a Mac IIci which I recently bought off CL in San Jose. At first, it only powered up if I kept on pushing the power button, and even with that it only showed the power on green light, with no other sign of life. I recapped all electrolytic SMD capacitors on the LB, and I now have good on/off feature. However, I keep getting the chime of death and no video, except for a quick blank screen upon reset. I have two RAM banks and tried all combinations with no success. There is no PRAM battery, but I get the same result if I plug in a 3.6 DCV power to the battery holder. I also checked the PS for obvious cap issues, but apart from a few spider webs, it looks clean. The +5V and +12V lines also look perfect on a scope. There is no chime at all (and a blank screen) if I remove the W1 jumper ROM selector (no ROM SIMM)

I have scoured this board and found many similar issues on the Mac II series, but no obvious solution. The cap corrosion on the board is actually minimal. I'm considering buying the Rom-inator II, but I thought I'd ask this board before I do so. Any help would be appreciated.

2024-01-03 09.48.38.jpg
 

Phipli

Well-known member
I have two RAM banks and tried all combinations with no success.
Each bank of 4 need to be fully populated with "identical" SIMMs, so it looks good in the photo.

Spray contact cleaner in the slots and scrub the SIMM contacts with contact cleaner and paper towel.

How did you clean the board and dry it after recapping?

I'm considering buying the Rom-inator II
Be aware that the ROMinator II disables the ROM parity test and RAM test, so I'd save getting one until after you get it running. The stock ROM is better for testing.
 

Phipli

Well-known member
@pinto_guy one other thing, have you reflowed some of the chips? I think I can see some solder bridges near the serial ports. It might be worth very carefully inspecting anything you've (or others) have been working in for shorts.

1000015194.jpg
 

pinto_guy

Well-known member
How did you clean the board and dry it after recapping?
A full wash cycle in my dishwasher, followed by light muriatic acid/toothbrush scrub, and hair dryer blow. I must say that the sound was unstable (kept coming off/on when poking around that area) after dishwasher wash, but the issue stopped after the toothbrush scrub.

The trace that goes under C16 has some corrosion damage, and I thought that was the issue. But it did still tests OK with the DVM.
 

pinto_guy

Well-known member
I think I can see some solder bridges near the serial ports.
Thanks. No I did not reflow, but I did notice of lot of these "bridges" (see pic below). Looks like some sort of white residue which could create some RF coupling, I agree. I tried to get rid of them all with the scrub, but I obviously missed some spot. Let me try that
 

Attachments

  • 2024-01-02 17.27.55.jpg
    2024-01-02 17.27.55.jpg
    898.1 KB · Views: 19

Phipli

Well-known member
I must say that the sound was unstable (kept coming off/on when poking around that area) after dishwasher wash, but the issue stopped after the toothbrush scrub.
Be aware that that area also controls the board reset, so is very important to make sure is working.
Thanks. No I did not reflow, but I did notice of lot of these "bridges" (see pic below). Looks like some sort of white residue which could create some RF coupling, I agree. I tried to get rid of them all with the scrub, but I obviously missed some spot. Let me try that
Yeah, cleaning that might help. I usually use IPA.
 

pinto_guy

Well-known member
OK so I used a lot of IPA, elbow grease, and a slew of brushes. I even used a scalpel to gently remove the crud from between the pins of some of the ICs, to no avail: I still get the chime of death

By the way, can we decide once and for all that the IIci would or would not boot with no PRAM battery ? In my case, it does not help, but that would save me from connecting my adjustable DC power supply every time I try to boot the LB.
 

Phipli

Well-known member
OK so I used a lot of IPA, elbow grease, and a slew of brushes. I even used a scalpel to gently remove the crud from between the pins of some of the ICs, to no avail: I still get the chime of death

By the way, can we decide once and for all that the IIci would or would not boot with no PRAM battery ? In my case, it does not help, but that would save me from connecting my adjustable DC power supply every time I try to boot the LB.
IIci boots fine without a battery.
 

GRudolf94

Well-known member
@pinto_guy your white residue is just the flux reacting with you having put it in the dishwasher. Generally it's fine to leave it but YMMV.

There is a test mode that can be enabled via those burn-in pads on the top left of your pic - details here: https://web.archive.org/web/20140921020853/https://mac68k.info/wiki/display/mac68k/Diagnostic+Mode
Maybe that'll provide more details.

P.S: the test pads share a serial port with one of the miniDIN connectors, you can just use the trigger pin that goes to the via and interact with the machine via the miniDIN if more convenient to do so.
 

jmacz

Well-known member
The sound chips and the area around it are part of the reset/startup sequence as @Phipli mentioned but in my experience it wouldn’t chime at all if it failed there. I would think that if it’s chiming, the ROM is probably fine so probably some other things to check before getting a Rominator. Like @Phipli my first intuition would be the memory, either bad contacts, the memory slots, or bad memory.
 

imactheknife

Well-known member
The sound chips and the area around it are part of the reset/startup sequence as @Phipli mentioned but in my experience it wouldn’t chime at all if it failed there. I would think that if it’s chiming, the ROM is probably fine so probably some other things to check before getting a Rominator. Like @Phipli my first intuition would be the memory, either bad contacts, the memory slots, or bad memory.
In my experience check all traces around leaky caps. I have also had to remove sound chip and clean pads, fix traces etc in this area. I
 

Attachments

  • 775EF6A4-755B-458B-BC13-A7E705C68BDE.jpeg
    775EF6A4-755B-458B-BC13-A7E705C68BDE.jpeg
    2.2 MB · Views: 16
  • 5157AA34-A88A-463C-AC6F-02DCC2740BA1.jpeg
    5157AA34-A88A-463C-AC6F-02DCC2740BA1.jpeg
    2.3 MB · Views: 16

bigmessowires

Well-known member
I agree with others who've said a RAM problem is the first thing to check. You only need one RAM bank filled in order to boot, so you could try swapping around the sets of SIMMs in order to test them one at a time.
 

Phipli

Well-known member
I agree with others who've said a RAM problem is the first thing to check. You only need one RAM bank filled in order to boot, so you could try swapping around the sets of SIMMs in order to test them one at a time.
But if using one bank you do have to make sure it is in the correct bank, or it won't work.
 

pinto_guy

Well-known member
But if using one bank you do have to make sure it is in the correct bank, or it won't work.
Yes, thanks. My understanding is that Bank A must be populated first. I thought I tried both sets of 4 in Bank A, with no success. I also tried other sets I had in my spare parts, but let me look into this more. Please keep these advices coming :)
 

pinto_guy

Well-known member
By the way, what's the purpose of the edge connector J24 (burnin) ? Wouldn't this allow for some kind of diagnostic, using a scope perhaps ?
 

Phipli

Well-known member
It is the connector they used to test boards in the factory. It has the serial diagnostics on it, I haven't played with it myself, but... People don't tend to have much luck with it to be honest. The reason is that there is only limited documentation available on what the error codes actually mean (the ones that come out don't seem to match what is expected).

If someone has some better documentation, please post it! I'd love to be able to use it.
 

pinto_guy

Well-known member
In my experience check all traces around leaky caps. I have also had to remove sound chip and clean pads, fix traces etc in this area. I
Thanks. When I replaced the caps, I did that, but of course I might have missed something. I might bite the bullet, remove them and replace again
 

pinto_guy

Well-known member
So I tried again swapping the RAM SIMMS, inspecting traces, contacts etc.. I reflowed all the new Ta caps, and I still get the same result. I attach new high res pics of the bad cap areas. I actually looks as clean as I have ever seen on a vintage Mac board.

2024-01-04 12.16.29.jpg2024-01-04 12.17.26.jpg2024-01-04 12.18.50.jpg
 

GRudolf94

Well-known member
The area around C10 and friends is a bit cruddy, not sure if enough to stop the machine working, but D5, Q3, UD13 and UE13, and the vias around them could all use some retouching with fresh flux. For the two HC132 I'd actually pull them to ensure you have no corrosion issues under the ICs.
 
Top