theirongiant
Well-known member
I would have posted my review of the MacEffects 68030 PDS accelerator for the Mac SE on Friday when it arrived, but my hard drive went on the fritz.
Prior to installing the card, I ran MacBench with all the hard drive benchmarks, then shut down the SE and installed the card.
On the next boot, the hard drive was not recognized.
At first I thought, oh no, I've killed it with the tests. But I could hear the head chugging inside, like it was trying to do something. I also heard the fan speed dip slightly from a voltage sag, which indicated a large but very brief power draw on the 12V rail. The little drive was trying desperately to move something!
I left it alone, and tried again the next day. It magically booted!
Then the next day, it didn't boot.
I had heard about stuck hard drive heads on these old drives, so I watched a couple of videos and gathered my tools and supplies.
- socket wrench, 1/4" drive
- 8mm socket
- Philips #1 and #2 screwdrivers
- Two flathead screwdrivers
I "cracked" the six screws on the case. Note: you must apply a lot of downward pressure while turning avoid stripping the screws. These are on very tight from the factory. Do not use a power drill with attachments. You must do it by hand. And ensure you are always using the correct screwdriver size!
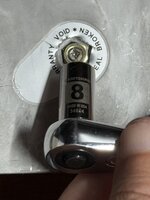
The case is finally held down with a very thin 8mm nut. The screw under that nut MUST NOT be loosened: this one is holding the head in place. I happened to have a set of socket wrenches because I work on my own cars, and have been collecting a lot of tools over the years. The socket wrench made it very easy to remove and install the nut.
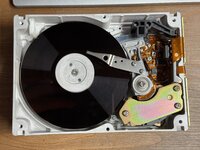
Once the drive cover was off, I removed the screws holding the magnet down. Then I used the two flathead screwdrivers to carefully pry up the magnet. Warning; these are neodymium magnets and insanely strong.
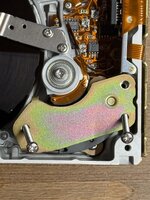
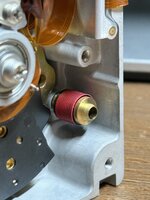
With the magnet off, I could see the rubber bumpers. There's one on the magnet, and one inside the drive. I cut a thin slice of red vinyl electrical tape using an x-acto knife and wrapped it around the bumper. This is some kind of tape with a very fine ribbed surface, not your run-of-the-mill black electrical tape, which would have been too thick for this, in sufficiently adherent, and would have suffered the same fate as the rubber in a few years. Painter's tape doesn't hold well enough either.
I gingerly wrapped the pieces of tape over both bumpers. To install the magnet, I carefully lowered it while being sure to hold back as it got closer to the drive body, but making sure my fingers wouldn't get caught. It suddenly snapped into place, so I wiggled it back and forth to ensure the posts were in the sockets. It did finally click once more as it locked down into the proper position.
I reassembled the drive, and voilà ; it worked!
The Quantum 40 S spins at a leisurely ~3000 RPM, and there are no heads on the top platter, so the operation was reasonably safe. No data was lost, and a scan with Lido shows no bad sectors.
Prior to installing the card, I ran MacBench with all the hard drive benchmarks, then shut down the SE and installed the card.
On the next boot, the hard drive was not recognized.
At first I thought, oh no, I've killed it with the tests. But I could hear the head chugging inside, like it was trying to do something. I also heard the fan speed dip slightly from a voltage sag, which indicated a large but very brief power draw on the 12V rail. The little drive was trying desperately to move something!
I left it alone, and tried again the next day. It magically booted!
Then the next day, it didn't boot.
I had heard about stuck hard drive heads on these old drives, so I watched a couple of videos and gathered my tools and supplies.
- socket wrench, 1/4" drive
- 8mm socket
- Philips #1 and #2 screwdrivers
- Two flathead screwdrivers
I "cracked" the six screws on the case. Note: you must apply a lot of downward pressure while turning avoid stripping the screws. These are on very tight from the factory. Do not use a power drill with attachments. You must do it by hand. And ensure you are always using the correct screwdriver size!
The case is finally held down with a very thin 8mm nut. The screw under that nut MUST NOT be loosened: this one is holding the head in place. I happened to have a set of socket wrenches because I work on my own cars, and have been collecting a lot of tools over the years. The socket wrench made it very easy to remove and install the nut.
Once the drive cover was off, I removed the screws holding the magnet down. Then I used the two flathead screwdrivers to carefully pry up the magnet. Warning; these are neodymium magnets and insanely strong.
With the magnet off, I could see the rubber bumpers. There's one on the magnet, and one inside the drive. I cut a thin slice of red vinyl electrical tape using an x-acto knife and wrapped it around the bumper. This is some kind of tape with a very fine ribbed surface, not your run-of-the-mill black electrical tape, which would have been too thick for this, in sufficiently adherent, and would have suffered the same fate as the rubber in a few years. Painter's tape doesn't hold well enough either.
I gingerly wrapped the pieces of tape over both bumpers. To install the magnet, I carefully lowered it while being sure to hold back as it got closer to the drive body, but making sure my fingers wouldn't get caught. It suddenly snapped into place, so I wiggled it back and forth to ensure the posts were in the sockets. It did finally click once more as it locked down into the proper position.
I reassembled the drive, and voilà ; it worked!
The Quantum 40 S spins at a leisurely ~3000 RPM, and there are no heads on the top platter, so the operation was reasonably safe. No data was lost, and a scan with Lido shows no bad sectors.
Attachments
Last edited:


") ). They measure 3 1/4 inch in height, not diameter. Typical examples are the floppy drives on original IBM PCs and XTs. Some reference:
). They measure 3 1/4 inch in height, not diameter. Typical examples are the floppy drives on original IBM PCs and XTs. Some reference: 

 or maybe just "OOOOOOOOOOOOOO"