Quantum Hard Drives - which models can be (reasonably) fixed?

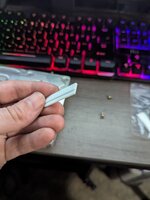
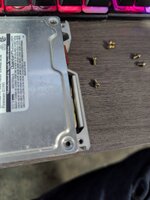
These are photos of my drive. It seems very similar to someone else's who'd made their own via cut up PCB that you based your part off of:

That was my own cut up PCB, which I actually have in my drive right now. I then made the 3D model with its exact measurements, for others to try.

Perhaps one addition you can make to your file is to add extenders to make it thicker in case the tolerances are off instead of making it a single unchange-able part?

I measured everything very precisely with calipers, and was happy with the resting position of the actuator arm, so I think it would be better to leave it as is. If when you come to install the part, you find it needs altering, I can update the model.

Now, I dug up some photos of my Maverick hard drive and it is actually quite similar to yours. Here's a comparison, along with an ELS:

maverick-reference.png

The magnet bracket inside your drive doesn't have a raised bit like the Maverick does. I've attached an STL without the notch for you to try. You can always remove material if you find it does need clearance.

Screenshot 2026-05-27 at 13.02.58.png

I've also corrected the design for the Maverick drive, which had the notch incorrectly offset according to my original PCB mock-up. Here's V2 (also attached):

Screenshot 2026-05-27 at 12.51.22.png
 

Attachments

Last edited:
What printing material would be best for this part? I am thinking some type of Nylon?

I would say FDM/PLA. Easier to cut/sand than resin.

Also I plan on using double sided tape. Don't like the idea of putting any glue material inside the drive that could age and create contaminates at some unknown point in the future. Hopefully I can make it work with that. The double sided tape I have is pretty thin but won't know if the clearances are too tight for something like that or not. I will have wait till June to find out I guess. :P

Yes, the tape will add a bit of thickness (0.1mm I guess?). It will likely still be within tolerance. If not, you can always sand down the 3D print slightly where the actuator arm makes contact.
 
Oh nice. I may just have both printed. Depending where I go to have this printed there may be a minimum quantity to print so I will end up printing all the variations of this anyways. :D

And yeah the tape is pretty thin. Don't know how thick it is. It's either the same thickness or slightly thinner then standard A4 paper at least.
 
Ok found a site that seems to let me make one for cheap. (xometry)

Only paid around 3 bucks shipped...not sure how they are making a profit on that but whatever. :P
(decided to only have the LPS one printed since this one had no minimum part order. Sculpteo had a $50 order minimum so did not use them for this one)

Had to tell it what units to use. I used mm since when I tried inches it appeared to want to make a supersized one. When I selected mm, the length came out to 1.4 inches after conversion so that seems to be correct.

Will find out in about 5 days if this will work. :D
 
Got the 3D Printed shim and unfortunately the drive continues the same behavior. I think the bottom head might have gotten damaged. There is a very subtle brushing noise from it I hear when it spins down. I will include a sound file i recorded that I amplified. It may not indicate anything but it's all I got to go by. If not this then possible the old liquefied bumper came off a little on the head arm and it still sticks despite the shim and pushing it far enough away to not touch prevents the head from reading the inner most track. It may not be possible to repair this one without having to take the platter off and cleaning up the area.

Unless someone else here is willing to look at it, I will have to give up on this one. :(

By the way I've tried adjusting how the shim is installed. Installed with no tape (let gravity hold it in place) and that didn't help. used extra layers of tape...also no dice. (even used enough that resulted in the arm no longer being able to engage the parking lock lever. No difference) I've also flipped it around. The thin part doesn't fit in between the bottom magnet assembly and the wall FYI so there was no point in the thin spot existing for mine. Maybe there being a part missing from that half near the top end would help but practically speaking I don't think it makes a difference in my case since it wasn't enough to prevent me from installing it in place anyways. The clearance would not have been impacted.

Photos of my shim and the sound file I recorded of what it does on startup included as well. I'm not really willing to take the platter off. I don't have the most steady hands so that will likely end in failure. if the head was damaged the entire head assembly could be replaced so I imagine this is technically recoverable but it would require getting a head assembly from another drive. That's assuming none of that gunk got onto the platter as well though it doesn't sound like it because other then that subtle clicking/brushing I hear near the end of it's spin down, it's not making any bad noises. The top of the platter looks pristine so nothing got on that half at least.
 

Attachments

Last edited:
Does the head move when powered up, or is it still stuck? Try powering it on with the lid off so you can see what's happening. It's possible the shim is too thin or too thick for your drive. I wouldn't automatically assume your drive is damaged without further testing.
 
Back
Top