

Eject motors getting weak over time has been a thing with vintage Macs since... well, since they weren't vintage. I've accumulated a small graveyard of them and finally decided to crack one open and see what was going on.
First step: getting in:
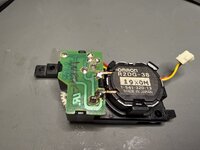
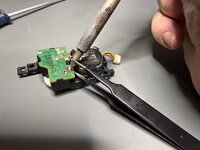
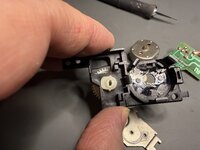
You have to desolder the tabs (or wires) that connect the PCB to the motor. Once that’s free, pop off the bottom cover, pull the gears, remove the motor and, on some models, the board too. You'll know if you have to do that. Be gentle, those plastic tabs are brittle. (Guess how I know.)
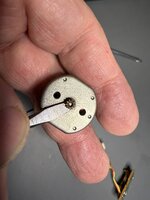
With the motor out, pry open the two metal tabs holding the case closed. After that, use a small screwdriver and work your way around the gear, prying and rotating until it finally gives up. Then the motor will separate.
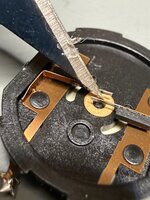
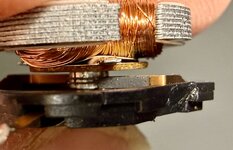
And here’s where the culprit showed itself: the armature and brushes were covered in a hard, black contamination that killed electrical contact. It was stubborn enough that I had to carefully scrape it off with a fresh X-Acto blade. Go slow, don’t bend the contacts, and don’t rush, this part is delicate!
Once cleaned, Reassemble the armature into the end cap first, easing the brushes out of the way as you thread the shaft through. Hold the armature steady, reinstall the stator/cap (magent side), and bend the tabs back down. A drop of DeoxIT inside the motor isn’t a bad idea, either.
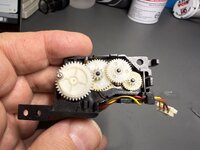
A tip for reattaching the board if you have to remove it: Make sure the pin on the large eject gear is pointing inward so it doesn’t hit the board contacts during assembly. Rotate it outward afterward, reinstall the gears, and, since you’re already in there, swap the small gear with a new one. You can order them from the usual places. They are pretty inexpensive. A little white lithium grease helps, too.
Last step: re-solder the tabs and fire it up.
Vintage Mac motor resurrection complete.
(See attached images in no particular order)
First step: getting in:
You have to desolder the tabs (or wires) that connect the PCB to the motor. Once that’s free, pop off the bottom cover, pull the gears, remove the motor and, on some models, the board too. You'll know if you have to do that. Be gentle, those plastic tabs are brittle. (Guess how I know.)
With the motor out, pry open the two metal tabs holding the case closed. After that, use a small screwdriver and work your way around the gear, prying and rotating until it finally gives up. Then the motor will separate.
And here’s where the culprit showed itself: the armature and brushes were covered in a hard, black contamination that killed electrical contact. It was stubborn enough that I had to carefully scrape it off with a fresh X-Acto blade. Go slow, don’t bend the contacts, and don’t rush, this part is delicate!
Once cleaned, Reassemble the armature into the end cap first, easing the brushes out of the way as you thread the shaft through. Hold the armature steady, reinstall the stator/cap (magent side), and bend the tabs back down. A drop of DeoxIT inside the motor isn’t a bad idea, either.
A tip for reattaching the board if you have to remove it: Make sure the pin on the large eject gear is pointing inward so it doesn’t hit the board contacts during assembly. Rotate it outward afterward, reinstall the gears, and, since you’re already in there, swap the small gear with a new one. You can order them from the usual places. They are pretty inexpensive. A little white lithium grease helps, too.
Last step: re-solder the tabs and fire it up.
Vintage Mac motor resurrection complete.
(See attached images in no particular order)

")


