mactjaap
Well-known member
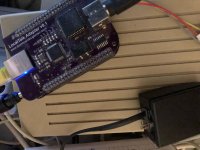
New from MacIP.net the…. MacIPpi Rpi. The MacIPpi concept for Raspberry Pi. The first beta is finished, running MacIPpi 5.0.1

As always. MacIP.net gives you a MacIP gateway out of the box thanks to the linux port of macipgw done by Stefan Bethke.
You can find more information about this port on:
https://github.com/zero2sixd/macipgw
The basics:
You can connect Macintosh computers over LocalTalk with the use of cabling between the printer ports. On this kind of network it is not possible to “speak” TCP/IP right away. To speak TCP/IP on a LocalTalk network it is necessary to encapsulate Internet Protocol (IP) packets within the AppleTalk DDP protocol. To do this right you need a piece of hardware or software to do this.
For now a beta test which runs on a Rasberry Pi is ready. I have Raspberry Pi B3+. Would be nice to find out on which types the images runs.
Download it from:
https://cdn.macip.net/MacIPRpi-5.01-BETA-rc01.img
d906702aaafdd2167125c06ef29873ef MacIPRpi-5.01-BETA-rc01.img (3.8G)
or the compact 7zipped version:
https://cdn.macip.net/MacIPRpi-5.01-BETA-rc01.img.7z
3b8abdfcd83c1efddea6d31be9fb6b89 MacIPRpi-5.01-BETA-rc01.img.7z (949M)
To unzip use 7Zip. Do not try to load the 7z version on the SD card.
Use dd on Linux systems (and MacOSX) to put the image on the SD disk.
This will be a command like this:
dd if=MacIPRpi-5.01-BETA-rc01.img|pv|dd of=/dev/sdX bs=1M
On a Linux/Unix/MacOSX system you can check the name of the SD card with the command:
dmesg
On Mac/Linux/Windows Etcher or on Windows only you can use a tool like Win32DiskImager (this tool is deprecated…but sometimes people work with it). Etcher is THE tool!
Connect you MacIPRpi to the network with a network cable. Do not try to connect the MacIPpi with wifi. No Appletalk over WIFI! It will get an IP address from your home router if you power it on. After a few minutes it will be ready. Take this time because the appletalk daemon needs some time to settle. Even no need to connect a screen. If you want you can login from your Macintosh with Telnet or SSH. You can use IP address 172.16.2.1 to connect. If you want to connect from a Mac OSX, Windows or Linux machine you can connect to macippi.local. If you want to login username is: macipgw and password: macipgw
You can become root by entering
$sudo -i
and password macipgw
What does the MacIPpi has?


Please try it out and test this version. I will add and document more features.
And also improve things. For now there is to little storage. I like to make use of the full storage capacity of your SD card.
If you have feedback or tips you can reach me at info (at) macip.net

As always. MacIP.net gives you a MacIP gateway out of the box thanks to the linux port of macipgw done by Stefan Bethke.
You can find more information about this port on:
https://github.com/zero2sixd/macipgw
The basics:
You can connect Macintosh computers over LocalTalk with the use of cabling between the printer ports. On this kind of network it is not possible to “speak” TCP/IP right away. To speak TCP/IP on a LocalTalk network it is necessary to encapsulate Internet Protocol (IP) packets within the AppleTalk DDP protocol. To do this right you need a piece of hardware or software to do this.
For now a beta test which runs on a Rasberry Pi is ready. I have Raspberry Pi B3+. Would be nice to find out on which types the images runs.
Download it from:
https://cdn.macip.net/MacIPRpi-5.01-BETA-rc01.img
d906702aaafdd2167125c06ef29873ef MacIPRpi-5.01-BETA-rc01.img (3.8G)
or the compact 7zipped version:
https://cdn.macip.net/MacIPRpi-5.01-BETA-rc01.img.7z
3b8abdfcd83c1efddea6d31be9fb6b89 MacIPRpi-5.01-BETA-rc01.img.7z (949M)
To unzip use 7Zip. Do not try to load the 7z version on the SD card.
Use dd on Linux systems (and MacOSX) to put the image on the SD disk.
This will be a command like this:
dd if=MacIPRpi-5.01-BETA-rc01.img|pv|dd of=/dev/sdX bs=1M
On a Linux/Unix/MacOSX system you can check the name of the SD card with the command:
dmesg
On Mac/Linux/Windows Etcher or on Windows only you can use a tool like Win32DiskImager (this tool is deprecated…but sometimes people work with it). Etcher is THE tool!
Connect you MacIPRpi to the network with a network cable. Do not try to connect the MacIPpi with wifi. No Appletalk over WIFI! It will get an IP address from your home router if you power it on. After a few minutes it will be ready. Take this time because the appletalk daemon needs some time to settle. Even no need to connect a screen. If you want you can login from your Macintosh with Telnet or SSH. You can use IP address 172.16.2.1 to connect. If you want to connect from a Mac OSX, Windows or Linux machine you can connect to macippi.local. If you want to login username is: macipgw and password: macipgw
You can become root by entering
$sudo -i
and password macipgw
What does the MacIPpi has?
- FULL NAT on the MacIP connection. You can now surf the Internet without any router configuration
- Newest version of the Web Rendering Proxy on port 8080.
http://macippi.local:8080/ or http://gw.macip.net:8080
Just visit the MacIPRpi with your old browser and see internet pages as images.

- Full file sharing.
– Old school Macintosh 512k, Plus, SE, etc. And System 7,8,9 Macs
– MacOS X
– Windows
– Linux
Even anonymous FTP is supported.
You will allways land in the same map and can share files between different computers.


Please try it out and test this version. I will add and document more features.
And also improve things. For now there is to little storage. I like to make use of the full storage capacity of your SD card.
If you have feedback or tips you can reach me at info (at) macip.net

