Reworking the KeyLargo chip on QS/DA G4 logic boards

obsolete

Well-known member
I thought I got a good deal on a Quicksilver logic board on eBay, but it was DOA. Upon further inspection, I spotted these gouges in the substrate of what I believe is the KeyLargo chip, the smaller BGA on the back side of the board, near the PCI slots. The damage is in the lower right corner, near the Y5 marking:
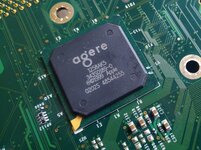
IMG_20250413_150200.jpg

I also have a Digital Audio logic board with damage in another area, but its KeyLargo should be fine. I'm thinking of using it as a parts donor to fix the QS board. I'm proficient in soldering but I've never done BGA work, let alone reballing. This feels like a pretty low-stakes way to get some practice. Where should I start? Should I buy balls, and if so, what size/composition? Should I try to use a stencil and paste?
 

obsolete

Well-known member
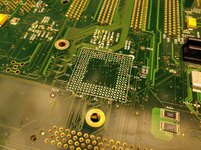
Well, absent any specific advice, I did some reading and watched some YouTube videos. I think I've settled on using balls and flux over solder paste. Step 1 of this process is making sure I am able to remove the bad part without damaging the board, so I did that:
641A1FB86EBA892E15F3C4346D063BBEAF450EFE.jpg

The pads are 0.635mm diameter, 1.27mm center-to-center (or 0.025"/0.050"). Based on this, I think I should use 0.76mm (0.030") diameter 63/37 balls. I ordered a generic Chinese reball station, and that size/spacing appears to be one of the standard stencils that comes with it.

The thing I'm the most worried about now is the warping of the BGA substrate. It's only 0.3mm thick! During desoldering, it warped into a dome shape similar to the "during reflow" picture below:
BGA_reflow.jpg

While the part was hot, I had trouble getting a thin tweezer under the edge of the part to lift it, because it had warped to the point that the edges of the substrate were almost touching the board. The tweezer fit easily under there before heating.

The information I'm reading online suggests using spacers under the edges of the part to mitigate this. It seems that for the 0.76mm balls, I would want about a 0.6mm spacer. I'm not sure whether this would be overkill or not. At least I only have to worry about soldering the perimeter of the part, since there are no pads in the middle. Maybe I can get away with using a PLCC nozzle on my hot air gun, which will focus the heat more on the edges? I'm not sure whether that would reduce the warping or not.
 

Daniël

Well-known member
Are you using a PCB preheater?
Warping is greatly reduced if you do, both for the chip substrate as well as the logic board PCB as well.
 

obsolete

Well-known member
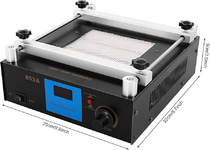
Thanks. Yes, I just have the most basic 853A preheater:
1745341563513.png
Of course, it is far too small for the whole logic board, but I did let it warm the board around the KeyLargo chip before removal. I was impatient though, so the board was only 55C (measured from the top with IR gun) before I decided it was time to desolder.
 

Daniël

Well-known member
It's unfortunate the T8280 preheaters seemed to have been discontinued, they're harder to get and more expensive than they used to be, but have a far larger heating size, heating the board more evenly and quickly.
You really do want to heat soak the board, I've worked on this type of chip on a 3DFX card and had no warping on it, so give it some time to properly heat up.

This also greatly reduces the risk of popcorning, in which case moisture within the chip substrate is heated rapidly, causing it to turn to pressurized steam which will blow through the substrate to escape, completely destroying it in the process.
Ideally a board should be slowly prebaked to completely remove this moisture, but I haven't done this on any of the boards I worked on with the preheater, and have never had issues with that, despite these being 20+ year old boards that have had plenty of time to collect moisture.

.76mm balls sound right for that type and era of chip.
You can always put the corresponding stencil on, and see if it all seems to line up correctly.
 

obsolete

Well-known member
Thank you for the advice. I will be much more patient when removing and reinstalling the working chip, maybe even enlisting the kitchen oven to give the whole board a thorough heat-soak/drying beforehand :) I don't want to make any popcorn!
 
Top