• Updated 2023-07-12: Hello, Guest! Welcome back, and be sure to check out this follow-up post about our outage a week or so ago.

Pro tip for recapping boards

Mk.558

Well-known member
mcdermd passed this tip on to me, it help me lift 0 pads on this 2300c inverter board rather than my other inverter board which suffered all four pads lifted (they aren't held down very well).

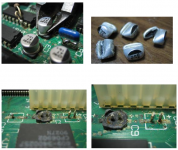
Use a pair of dykes (diagonal pliers for the PC folk, I was taught they were called dykes) to cut the capacitor off near the lower crimp line. Do not pry the capacitor off - rely on a strong, clean cut to remove it. Avoid using Ol' Grandpa's Pliers from 1920 -- instead, use ones that are sharp and have a clean edge, because you don't want rough cuts with this type of work.

If you make a nice, clean cut there will be nothing left except some cut-off leads standing up.

At this point, it is a wash to remove the old remnants. It could help to have a helper with a small pair of pliers to remove the old leads.


PowerPup

Well-known member
Indeed, if only I had considered this for my Classic II board. :p

Great tip Trash80, I'll be sure to use it the next time I do a cap job on a motherboard. ;)


mcdermd

Well-known member
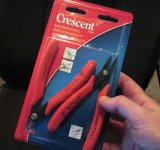
I use a nice pair of Crescent miniature flush angled wire cutters. I usually cut the cap half way down, gently wiggle the remaining metal can and packing off of the two legs with a pair of small needle-nose pliers then break the plastic base in two to remove it. Now I have the two legs sticking up like Mk has which are a cinch to desolder with your soldering pencil. You'll get electrolyte oozing around so remember to clean up really well with alcohol when you're done. You'll probably also see some crusty stuff hiding under the plastic base that needs to be cleaned up too.

Once the crust and ooze is swabbed off, I clean the old solder from the pad with solder wick and re-tin it. A tiny bit of liquid flux down on the pads makes the new caps's leads flow right into the fresh pad. More cleaning to remove any extraneous flux and I'm done.

I don't know if this is a "correct" way or not but I'll be damed if it doesn't keep me from lifting pads and gives a nice, clean board when I'm done.


Trash80toHP_Mini

NIGHT STALKER
Thanks for the tips, I was just clarifying diagonal cutter terminology. I'll google for the kind you use and see which of mine are close to that spec.

Could you do the dirty deed with the board at an angle, or pretty much upside down, to keep let the glop drop onto an absorbent material? :?:

I still haven't checked any of my collection for problems. I'll have to start doing that. :-/


mcdermd

Well-known member
Whatever leaks out isn't going to be an issue for the ten minutes you're working with it. I think it's only going to be an issue if you cut them all off and don't clean up afterward.

EDIT: Trash, here are the cutters I use (below the pliers):

2qjixwi.jpg.9410d6ab0647e849aea4bf264dbb7553.jpg


Home Depot or the like should have them. Not the nicest by any means but they aren't too expensive and work well enough.


Mk.558

Well-known member
The thin nose pliers that are supplied in that package are just the right size for holding small SMT stuff, or use tweezers. Just don't solder the pliers to the work...

If you want to do better, get such cutters with a (good) spring to auto-open the handles. Also, opt for a more expensive but better cutter. Electronics work often requires great precision, so why cheat yourself of a couple of bucks?


tt

Well-known member
Yes!! That's how I do it. I find if there's room try to, make the cut parallel to the two legs so they don't get bent as much while making the cut. Sometimes a rubber seal gets left behind, that can be removed with tweezers. I also found the plastic base can usually be cracked in half along the axis of the two holes the legs go through to remove it with tweezers.


Mark2000

Member
I wanted to add my two cents to this since I just did a very successful Mac Classic II recap this weekend and it was only my second major soldering job. Use hot air. I have a $80 rework station with a hot air blower and a soldering iron - both temp controlled. I cranked the blower up to 460c (probably too hot) and used it to heat up the caps while I tugged lightly with a needle nose. All 17 caps came off in about 5 minutes without a single lost pad.

If you're going to be doing this often this is the route to go. Zero risk and very easy. If anyone wants I can also setup a deal to do yours for you.


Macdrone

Well-known member
I would love to send you 3 boards that need new caps if your up for it. An SE30, a color classic and a classic. All need caps and no sound, no but except the color classic which the caps are leaking but has been cleaned and works normally. I have an extra se30 board in same condition you could have as we'll as 3 classic boards. Let me know I could use the help.


techknight

Well-known member
Pro tip for cleaning:

Please refresh the solder joints, and wick it back up. Clean the area with acetone/flux remover. This will brighten up the pads so the ENTIRE surface area of the pad will accept solder.


volvo242gt

Well-known member
Deoxit works well for cleaning, too. That's what my buddy James1095 uses when he recaps boards. He bought his can about 10 years ago and still has a lot left. Only a small amount is necessary.

-J


phreakout

Well-known member
I can confirm that this does work, after recapping 2 SE/30 boards. I would probably go so far as to say it may be far more safe, compared to using the dual pencil soldering iron method. No pads are ripped, didn't see any liquid leakage, though. One note, when cutting, if you can't get the tool to cut on the indent of the cap, you can safely cut a bit above that.

Looking inside the cut cap, I see 2 rubber discs (possibly seals) and there appears to be a mostly solid substance used as the electrolyte. Not sure what the chemical or substance is. :-/

Other than that, it is the most clean and pain free method I've tried so far. YMMV. Further study required, please.

73s de Phreakout. :rambo:


directive0

Well-known member
I had this great idea for no hassle Cap removal.

Get your favourite bench supply, set it to the highest output possible and plug it into leads of the offending cap in reverse bias. Be patient, this may take a few seconds; when you see it start to vent the mystic blue smoke you know you're getting close!

SNAP CRACKLE POP!

Nah obviously this is not a good way to do it.

 
Top