• Updated 2023-07-12: Hello, Guest! Welcome back, and be sure to check out this follow-up post about our outage a week or so ago.

Modern PSU for the SE/30

JDW

Well-known member
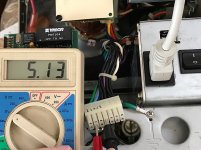
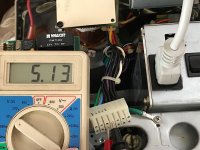
With the motherboard completely disconnected and measuring at the same 14-pin connector, I get 5.13V on both of the 5V lines (pins 13 & 12).  This proves that it is without a doubt the motherboard itself that is pulling the voltage down to about 4.83V.  But why this is happening on my motherboard and not yours still the question. 

9E350F05-CC82-477A-944A-10A60FB3121B.jpeg

6F0B8BE2-5424-43A5-9957-58E3BD9DDD37.jpeg


joethezombie

Well-known member
Perhaps each individual logic board has differing power draws dependent on the condition of the all the components?  One of my SE/30s had such a drop, that any PDS card installed would not allow the machine to boot.  In that case, the issue turned out to be UE8.  Everything appeared to work OK, but that part was hot to the touch, and after replacement the issue was fixed.  I haven't preformed any kind of statistical analysis, but I can only guess that things such as socketed FPUs will draw more power than more recent (relatively) SMD versions.   PAL revisions can also have an impact on power requirements, as could solder joints or a plethora of other components.   I'd guess even a keyboard or mouse can reflect an impact on the draw.


JDW

Well-known member
I have 2 more SE/30 logic boards. These 2 logic boards have been recapped, but even after recapping I found they had Simasimac horizontal lines.  

Several years ago I tried everything I could think of to fix them but to no avail. So one day TeckKnight said he would try to fix them and I shipped it off to him.   Long story short, it took him about 2 years to fix them because he kept having other things come up and he often just forgot about them.  It was a full 2 years later, after I had followed up with him several times through those years, that he finally told me he fixed them, and I paid him and then he ship them back to me. Sadly, the two boards were not shipped with adequate packing material, only sent in antistatic bags, with the boards sitting on top of each other inside a cardboard shipping box.  The metal ground fins on the connector side of one of the motherboards were bent, and I can tell you they were NOT bent when I shipped them off, nor was that how I packed them when I ship them off originally.   

I knew for a fact that such horrible packing would not bode well for the boards, and sure enough when I tested them, both had the same horizontal lines I saw before I ship them off 2 years earlier. I just checked them this morning and they still have the horizontal lines. It’s sad because I spent a lot of time recapping them.  It’s also very, very sad because TechKight kindly installed CPU sockets for them to give me flexibility to add CPU socketed accelerators, thereby allowing me to have another card in the PDS slot. 

I am really bummed about this. I can’t express how disappointed I am. I never mentioned it to TechKnight or even mentioned it in this forum before. But I’m saying it now because honestly I have two boards sitting here that I don’t know how to fix, and my attempt at trusting a very knowledgeable electronics wizard in this forum took two years but still didn’t pan out.  I would really love to use these boards. So if any of you have more genius about these logic board repair matters than I, perhaps you could help me find a way to get them repaired such that I wouldn’t have to wait 2 years AND they will be packed adequately to ensure they will not be broken when they arrive back in my hands.  Thanks.

Anyway, I did check the voltage at the floppy connector and at the 14-pin connector on the solder side of the motherboard, on both of these Simasimac boards, using the same ROM and 32MB RAM as my working SE/30 motherboard.  I get 4.98V and 5.0V respectively.   That has me even more depressed because these 2 nonworking Simasimac boards get the right amount of voltage while my working board which boots fine and runs fine for hours is only 4.83V. And again, that’s in the stock configuration with no accelerators and nothing in the PDS slot and no internal hard disk drive. 

As I was finishing off this post, I decided to put the ROM and RAM back into my working motherboard to ensure that the Simasimac boards did not harm anything. To my delight, everything is fine including the voltage at the floppy connector which is now almost exactly 5.0V!  All I did was remove the ROM and all RAM and then put it back in to invoke this positive change. 

So I consider the matter of low-voltage resolved for now.  But again, if any of you have both experience and the time to repair my two Simasimac boards, assuming you can pack them properly when you ship them back to me, I would be interested in hearing from you.  Both give me the “bong“ sound when I switch the power on, but they only show horizontal lines on the CRT. 

 
Last edited by a moderator:

pb3623

Well-known member
The horizontal lines by themselves don’t seem to be a problem. I was using a ROM-inator in my SE/30 to bypass the memory check and ended up swapping out that code for the Turbo 040 driver (since I couldn’t figure out how to get both). The first think I noticed was the horizontal lines and wow, they stayed there for what seemed like forever. I figured out that it was linked to the memory check and this machine has 128 MB RAM so it took about 3-4 minutes. Anyway, I read somewhere that you could bypass the check by holding down the mouse button when you power-on? I had never heard that but sure enough, it works. 

TL;DR - do the stripes go away if you leave it alone for a few minutes?

 
Last edited by a moderator:

JDW

Well-known member
The horizontal stripes do NOT go away even if I leave it alone for many minutes.  I used the ROM and RAM from a known-good SE/30 motherboard which does NOT display stripes, so I know the main problem is not the ROM or RAM.  And I was not using 128MB of RAM because I know first-hand how long the memory check takes with that setup.

Indeed, I tested everything several years ago in vain to fix the horizontal stripes problem, before I ultimately sent them off to TechKnight for repair.  He described what he repaired and even showed me a couple videos.  The machine he showed me seemed to be working, but again, when the boards arrived back in my hands they were not working.  Had they been properly packed I would have assumed they were never repaired.  But in light of the absolutely horrible packing job, it's anybody's guess what happened to these boards.  And since they both have been recapped and have socketed CPUs, I am quite down about it. 

I have been approached by one kind soul in Germany who offered to give them a look over.  I told him I would take photos today or Monday, top and bottom of both boards, so he (or whoever else) can give the boards a visual inspection.  One board is the very first board I ever recapped, so the replacement caps are electrolytics and not so lovely to behold.  The other board has Trag's excellent yellow tantalum re-cap kit applied to it.  I will post the photos publicly in this forum for everyone to see.  I should perhaps start a new thread about that though, since this thread is about SE/30 replacement power supplies.  I'm still putting together a YouTube video about that, so stay tuned.


CC_333

Well-known member
I'm glad you got your low voltage issue sorted out, and that the SeaSonic PSU is working well as a PSU replacement. I am going to give this a try sometime.

Anyway, I feel I should say a few words about Techknight while I'm here. I'm not trying to take sides, just sharing a anecdote. (I was going to post the following in the other topic, but it got locked; hope that doesn't happen here now because of me (fingers crossed that doesn't happen!))

I first joined this forum back in 2012 to figure out how to get my three SE/30 boards repaired, after various failed attempts on my part, so i asked around, and Techknight (hereafter TK) was happy to oblige.

I sent them to him, and I got the same routine you describe. The repair videos (very informative ones, I might add), and various diagnoses (I opted to remain anonymous at the time because I was somewhat embarrassed by the sheer incompetence of my repairs, but I digress...

He got them back to me within a month or so (I forget exactly how long), and all three were in perfect working order once received. I thanked and payed him, and we went our separate ways, so to speak.

So, for what it's worth, I'm a happy customer of his.

Hope this helps  [:)]

c

 
Last edited by a moderator:

JDW

Well-known member
I posted an appeal for SE/30 motherboard repair help in a new thread so as not to detract from this very important thread on replacement power supplies for the SE and SE/30.  In that other thread I made it very clear that "I am not trying to speak negatively" of any one person, and that remains true.  Both the thread title and the opening sentence in bold illustrated quite clearly my primary intent of getting boards repaired and nothing more.  I have not held any grudges against anyone, nor have I been angry at anyone, nor did I ever ask for money back, nor have I really thought much about my two boards in the closet over the past few years since the day they were returned to me and I found they were unfortunately not fixed; which may have been caused during shipping -- I don't know.  When I found they didn't work, I was very disappointed as anyone in my shoes would be.  Sure, I groaned within myself about the lack of adequate packing material that would have prevented the two boards from banging against each other during intentionally shipping.  Both boards exhibited the same exact SimasiMac they exhibited before I shipped them off for repair, which was at the root of my disappointment.  But please understand that disappointment and anger are two different things.  I never was angry nor bitter.  If anything I merely had a heart of tremendous sorrow.  To avoid creating trouble, and to avoid spending yet more money on two-way international shipping, and to avoid having to possibly wait another lengthy period of time for a 2nd repair attempt, I decided not to say anything a few years ago when those boards arrived back in my hands and I found they still both had SimasiMac.  My decision at the time to say nothing was perhaps not the best course of action, but I cannot travel back in time to change that.  I do not cast blame, directly or indirectly, nor was my post in that other thread any kind of thinly vailed stone throw at anyone.  I only wanted to provide emotionally-neutral facts about past repairs that might assist other board-repair wizards to more appropriately advise me about what to do with my two non-working SE/30 motherboards.  Nevertheless, strong offense was taken in that other thread and it was locked, preventing me from offering apologies or clarifications.  I see now that I should have perhaps handled the situation differently.  Indeed, I should have just left the two boards to sit in my closet and kept silent.  I therefore can only apologize in this post, from the heart, to the individual offended, and to separately also apologize to all of my fellow vintage Mac lovers.  My fumbled attempt at seeking repair help failed to consider the strong emotional reaction of others. I did not then nor do I now mean to sully anyone's good reputation.  The individual who is now very upset with me over that other thread is a very important contributor in this forum and has been for many years, and he has helped countless people, and that is why I chose to send my SE/30 boards to him in the first place many years ago.  I fully realized that my saying all of this is no magic cure for seriously hurt feelings that I alone have caused, but I felt I needed to say these words, especially in light of what CC_333 wrote.  There's more I could say with my head hung low; but to avoid further offense, I shall shut-up about that topic because I've obviously said too much already.

I will close with something on-topic. I've been putting together a video that shows how I chose to install the SEASONIC.  It also shows how I dealt with the harness.  I've been using my Panasonic GH5 to shoot the video in 4K to give the best resolution possible.  When done, I'll upload to YouTube and post the link in this thread.  My intention for the video is to help others who want to install the SEASONIC. Although many have contributed to this thread, and I thank you all, I wish to especially thank joethezomie, superjer2000, and von for sharing their first-hand power supply replacement stories that inspired me to purchase the SEASONIC and give it a try.  They are the heroes of this thread who deserve all the praise.


Gorgonops

Moderator
Staff member
In that other thread I made it very clear that "I am not trying to speak negatively" of any one person, and that remains true.
Keeping this short:

Despite your "disclaimer" that you don't intend to take out your frustrations with the member in question it's really difficult to read your posts on this subject without coming to the conclusion that's what was going on here. From a personal standpoint I can certainly understand and even sympathize with the feelings you're having, but dropping this out of the blue when apparently the person you were disgruntled with wasn't even aware of the problem reads an awful lot like an ambush, and for a thread that's supposedly about troubleshooting the technical problem you went to great lengths to repeat their name a lot. We have a "trade feedback" thread, if you don't feel like someone you contracted work from on this forum lived up to their obligations (did you have an ETA for the original work in writing?) you can post something in there, but I would hope that before resorting to that people would make at least a token attempt to let the target know there's a problem and give them a chance to make it right.

(And, let's be blunt about something: The ugly truth about this hobby is for most people here it's a *hobby*. If you want fast turnarounds and guarantees you're going to be paying a lot more than $170 for someone to troubleshoot and repair your 30 year old electronics. TV and stereo repair shops aren't exactly common anymore but it looks to me like hourly rates in excess of $60 an hour wouldn't be out of line.)

 
Last edited by a moderator:

Crutch

Well-known member
(pivot back to earlier topic)

@ants Did you ever get the picoPSU? I was thinking about trying the same thing and curious if you had any luck.

 
Last edited by a moderator:

ants

Well-known member
Did you ever get the picoPSU?
Yeah I've had it sitting in a box for months now, along with all the parts to make the cable assembly! I've just had zero time to put it all together :(

I'll try and find the time in the next few weeks.


Crutch

Well-known member
@ants sounds good. I may try the same. I have (I think) the exact same situation as you - my stock Sony PSU works fine with my SE/30 running just Ethernet or just Daystar - but as soon as I try running both I get a voltage drop (4.8v roughly ... by the way my 12v disk rail is running 12.6) and random freezes or failure to boot. 


JDW

Well-known member
Stock SE/30 PSU Specs:

+5v = 6.0A

+12Vsweep = 1.25A

+12Vdisk = 2.1A

-12V = 0.5A

Any replacement PSU should have the same or larger current supply capability.  Err on the side of LARGER.


Crutch

Well-known member
Thanks I thought so. Guide to the Macintosh Family Hardware, Second Edition p. 259 has those same numbers, but adds a footnote that peak load on the 12V disk rail may actually reach 4.0A for up to 15 seconds. 


JDW

Well-known member
...peak load on the 12V disk rail may actually reach 4.0A for up to 15 seconds. 
All the more reason to go with the SEASONIC SSP-250SUB...

1323393591_Image202018-08-1020at201_01.4620PM.png.64655abadd1aee0650d0b71d00e21e5d.png


Crutch

Well-known member
I wanted to thank all of you on this thread for the really useful discussion, especially @superjer2000 for the awesome step-by-step detail and photos!

My problem was a creaky PSU that would power the unadorned SE/30 (albeit with lower-than-rated voltages), but intermittently crash as soon as I added any upgraded kit.  Thanks to your advice I picked up the Seasonic SSP-250SUB and installed it in my legacy Apple PSU chassis.  The steps I followed were very much in line with @superjer2000's instructions, but a few details here in case useful for anyone else trying this:

1.  Open and gut the Apple PSU.  Pound down the standoff sort of sticking up in the middle.  Leave the bottom plastic sheet in place.

2.  Open the Seasonic PSU.  I had to chip away a few dabs of epoxy (?) to disconnect the clips, but then it just unscrews neatly from the base.  It's a nice modular PSU with no disassembly required.  The Seasonic plug assembly is held in place with three little tabs; it can be pushed right out of the chassis if you manage to squeeze all the tabs at the same time.  I did this, removed the Apple plug assembly in the same way, and inserted the Seasonic plug into the Apple chassis.  (I left the original Apple switch in place.)

3.  Drill appropriately-spaced holes for motherboard standoffs in the Apple chassis and screw the Seasonic PSU guts into place.  I left the plastic sheeting the came with the Seasonic PSU in place, but trimmed down the sides down for airflow.

4.  The tricky bit, for me, was making the wire harness to connect the Seasonic PSU to the SE/30 analog board.  I had trouble using the "staple trick" to get the pins out of the Seasonic harness and also had bad luck with a cheap pin extraction tool I found online.  Eventually I ponied up the $20 for this one https://smile.amazon.com/gp/product/B00GOIY1NE/ref=oh_aui_detailpage_o03_s00?ie=UTF8&psc=1 and it's amazing how much easier it made things.  I bought a 10-pin Molex power connector and just followed the diagram linked earlier in this tread to make my harness, tidying things up with cable ties.  I also poked in an extra GND wire and a green wire into the PS-ON pin on the Seasonic, which I threaded back under the PSU board to the original Apple switch.

5.  I spliced the PS-ON and extra GND wire to the original wires on one side of the Apple switch, so that turning the switch on shorts PS-ON to GND, enabling soft power on the Seasonic PSU.  I insulated the splices with heat shrink.  Then I snipped the short green grounding wire off of the discarded Apple plug and soldered it to the grounding ring on the Seasonic plug, screwing the other end back onto the Apple PSU grounding ring nearby.

And that's it!  Then I put everything back together and tested it with my meter before putting it back inside my Mac.  Voltages looked perfect, much stronger than my old PSU which struggled to pull 4.75V on the +5 rail.

One note - I am trying this without the PSU fan for now.  Seasonic specs say the fan doesn't come on below 30% utilization anyway, which I'm pretty sure will always be the case.  I also have an upgraded Nanoxia Deep Silence fan in my SE/30 which is rated at higher CFM than the original fan, and am not running any spinning HD (just SCSI2SD).  So far the PSU never seems to get more than a little warm.

Close-up showing the wire harness plugged into the Seasonic PSU (which is screwed into the Apple PSU chassis)--the yellow and black wires were slightly too long so just loop around slightly off the bottom edge.
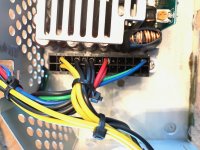
IMG_0135.jpg

Close-up of the PS-ON and GND wires going to one side of the original Apple switch (spliced + heat shrink):
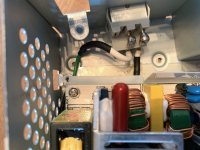
IMG_0134.jpg

Finished product, visible in this shot is the Seasonic plug assembly with blue capacitors (at right) and small green grounding wire soldered to the grounding tab on the Seasonic plug assembly and screwed into the chassis
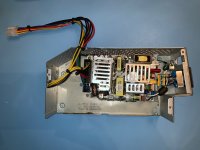
IMG_0162.jpg

All closed up--looks just like an OEM part from the outside.
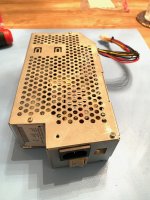
IMG_0165.jpg

Back home inside my SE/30 and running better than ever!
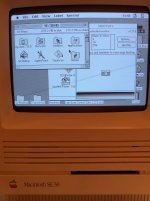
IMG_0179.jpg


JDW

Well-known member
Crutch, is this your replacement fan?

http://nanoxia-world.com/en/products/fans/deep-silence/240/deep-silence-60-mm-2000-u/min

I use a SILENX in one of my SE/30's and am curious how loud your fan is in comparison to the stock ELINA fan (which is quite loud but moves a lot of air).

It's taken me a lot longer than I though to finish my video on the SEASONIC upgrade.  Things keep coming up delaying the video, and then I decided to recap my analog board and run voltage measurements with that.  But the video is now coming to a close, so I intend to upload it this week and post the link here.

 
Top