• Updated 2023-07-12: Hello, Guest! Welcome back, and be sure to check out this follow-up post about our outage a week or so ago.

Combating SE / SE30 voltage drop

zigzagjoe

Well-known member
So: Much to my surprise, the SE logic board harness (from the analog board) uses 22AWG for all wires, even the two +5v leads (orange).

In an accelerated SE / SE30, you could be pushing 6 amps over these two wires, which leads to nasty voltage drop! With the original PSUs, you can at least adjust the voltage to compensate, though your 12v line may be 13v when you're done.

However, on a seasonic PSU where you can't adjust the voltage? It's a real problem. In my SE/30, I was seeing around 4.72v at the LB floppy port with a Carrera clone, Asante MacCon, grandvimage card, HDD, and seasonic PSU. Somehow this was stable, despite visual noise on the GrandVimage's output.

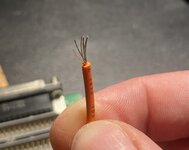
Solution is to replace the 22ga +5v wires with 16ga wires. Happily, molex makes a near-exact replacement, gold plated, too! Just a hair longer than the original. After doing so, that same machine is now sitting at 4.85v - a 0.13v improvement! While it's still not ideal, it's a heck of a lot better, and importantly drastically reduced the noise on the external video output.

1708631642354.jpeg

Molex P/N : 2153402223 , 225mm 16G Red cable w/ gold mini fit jr socket terminators.
Digikey stocks it for $1.39 per: https://www.digikey.com/en/products/detail/molex/2153402223/13144614

You can remove the wires from the original connector with a tactically modified paperclip (pictured above), or the original Molex 11-03-0044 tool.
 
Last edited:

obsolete

Well-known member
Ooh, that's a slick mod. I didn't know these pre-crimped jumpers were available. Will be throwing some into the next Digi-Key cart for sure.
 

ymk

Well-known member
Nice work. I couldn't get my SE above 4.65V with the pot pegged, so I added a resistor to push the adjustment range upward.

It's now at 5.0V / 12.6V with no card installed.

For those with power hungry expansion cards, a buck converter at the LB or card starts to make sense.

If you want to increase the voltage further, is there a reason you can't do the same with the ground wires?
 

cheesestraws

Well-known member
If you want to increase the voltage further, is there a reason you can't do the same with the ground wires?

When I've had to replace the interconnects I always replace them with rather chunkier wire both on power and ground wires - it definitely helps with the voltage, but I can't quantify how much changing all of them makes over just changing the +ve ones,
 

zigzagjoe

Well-known member
Nice work. I couldn't get my SE above 4.65V with the pot pegged, so I added a resistor to push the adjustment range upward.

It's now at 5.0V / 12.6V with no card installed.

For those with power hungry expansion cards, a buck converter at the LB or card starts to make sense.

If you want to increase the voltage further, is there a reason you can't do the same with the ground wires?

That's a crazy amount of voltage drop - I think you might have something else going on beyond just voltage drop over the wires. What voltage do you see at the AB to PSU connector?

While there's no reason you couldn't do so with the grounds, it has 6 of them on the LB connector, so I'd expect much less voltage drop there even at 22awg. I haven't measured it though.

The other idea I was entertaining - for retrofit PSUs only - was running a couple more +5v leads directly from the ATX unit to double-crimped wires at the LB connector, which would mitigate voltage drop from the 2 minifit connectors on the analog board and 2 18 gauge +5v lines on the original PSU out.
 

ymk

Well-known member
That's a crazy amount of voltage drop - I think you might have something else going on beyond just voltage drop over the wires. What voltage do you see at the AB to PSU connector?

I remember it was low right at the PSU, so the drop over the wires wasn't outrageous. If the source measures <4.75V, no amount of wire is going to help.

The PSU is fully recapped and after the resistor mod, has been working very well.

My theory is, these PSUs expect a certain load on 12V and without it, the 5V line sags.
 

zigzagjoe

Well-known member
I remember it was low right at the PSU, so the drop over the wires wasn't outrageous. If the source measures <4.75V, no amount of wire is going to help.

The PSU is fully recapped and after the resistor mod, has been working very well.

My theory is, these PSUs expect a certain load on 12V and without it, the 5V line sags.
Agreed, the problem is definitely low output at the PSU. Sounds like you've got it sorted though.

Modern group regulated PSUs do have that issue: 12v is the primary regulated rail on group regulated PSUs; the other rails track 12v and go out of tolerance if there's not enough load on 12v. But, at least the Sony and Apple Singapore SE PSUs don't have that issue (of 5V sags with no 12v load) - it's the opposite, 12v tends to go out of range especially if +5v requires adjustment for voltage drop and/or you don't have a HDD installed.
 

AndyMc1280

Well-known member
I may be just being lazy (very) but does anybody sell "beefed up" connectors with upgraded wiring ?
 

zigzagjoe

Well-known member
You probably would be able to get a custom PC cables company like cablemods to make up something for you, though I don't know if they would twist the two pairs of video signals that should be twisted to reduce noise.
 

croissantking

Well-known member
Just done the mod as you suggested, @zigzagjoe . I'm VERY impressed. 😃 I'm seeing 4.99V (up from 4.84V) booting a bare board, and 4.88V (up from 4.53V) with the Micron Xceed SE/306-48 installed. Bear in mind, this is with a long ATX extension lead with 18AWG wires on its 5V lines (should probably get those upgraded too).

How crap is the stock harness!!!

IMG_9514.JPG
 

zigzagjoe

Well-known member
Just done the mod as you suggested, @zigzagjoe . I'm VERY impressed. 😃 I'm seeing 4.99V (up from 4.84V) booting a bare board, and 4.88V (up from 4.53V) with the Micron Xceed SE/306-48 installed. Bear in mind, this is with a long ATX extension lead with 18AWG wires on its 5V lines (should probably get those upgraded too).

How crap is the stock harness!!!

View attachment 76541
Wild, isn't it? The stock harness looks so solid but those wires are 3/4 insulation, I guess. Glad to hear it worked well for you!

I also had good results making a 2 foot LB harness with 18 gauge wires rather than doing an extension, but this is only really useful for a dedicated testbed unit.
 

AndyMc1280

Well-known member
You probably would be able to get a custom PC cables company like cablemods to make up something for you, though I don't know if they would twist the two pairs of video signals that should be twisted to reduce noise.
Or I get some kind soul to sell me a neckboard with blanking plate and new wiring loom. It is now in the UK and I cant wait to get it.

Just done the mod as you suggested, @zigzagjoe . I'm VERY impressed. 😃 I'm seeing 4.99V (up from 4.84V) booting a bare board, and 4.88V (up from 4.53V) with the Micron Xceed SE/306-48 installed. Bear in mind, this is with a long ATX extension lead with 18AWG wires on its 5V lines (should probably get those upgraded too).

How crap is the stock harness!!!

View attachment 76541

Mmm very much so. The one in my brothers machine is not as nice as that. Mind you water damage and age can do that I guess.

Wild, isn't it? The stock harness looks so solid but those wires are 3/4 insulation, I guess. Glad to hear it worked well for you!

I also had good results making a 2 foot LB harness with 18 gauge wires rather than doing an extension, but this is only really useful for a dedicated testbed unit.
Yep - looks can be deceptive, voltages are fine (-ish) but loss/drop once you fit expansions can cause things to not work as expected (floppy drive! in my case, probably due to low amps on 5v rail of the XBOX 360 power supply used to test, but this will help along with the Proper PSU for the Pico conversion)

It's absolute must have upgrade. I had no idea!
Yep, agreed. I just have to convince brother dear it was necessary along with the recap and PSU conversion lol.
 

LaPorta

Well-known member
To be fair, Apple used what they could get away with. Using 16 gauge instead of 22 in every SE and SE/30 ever made would have been a lot of money. For the intended use, 22 sufficed.
 

croissantking

Well-known member
I've just upgraded the harness in my other SE/30, which has the Bolle ethernet combo card and Carrera 040. Previous reading when idle was 4.73V, now 4.84V. I still need to adjust the pot inside both PSUs – as I'd like to see a 5V reading with upgrades – but that's a job for another day. This is a solid improvement.
 

croissantking

Well-known member
Any tips for adjusting the voltage trimmer on the CR-44? At first glance, it seems like a tricky job as in how to test your adjustment without completely reassmbling the unit and fixing it to the analog board...
 

zigzagjoe

Well-known member
Any tips for adjusting the voltage trimmer on the CR-44? At first glance, it seems like a tricky job as in how to test your adjustment without completely reassmbling the unit and fixing it to the analog board...

With the hitachi (apple) unit, it's possible to fiddle an adjuster through the vent holes, but on the CR44 your best bet is going to be just leaving the heatsink panel off temporarily and reconnecting it enough to do the adjustment.
 

Bolle

Well-known member
I like to run a little extension so I can place the PSU itself next to the machine so I can do the adjustment with the machine loaded and running.
 
Top