mactjaap
Well-known member
Version 3.0 is now the newest and current version of MacIPgw virtual machine (MacIPgw VM).
An easy and hassle free way of getting your old Macintosh on the Internet. The ultimate TCP/IP over LocalTalk gateway.

I publish it as VirtualBox Appliance. The file is an Open Virtualization Format Archive (.ovf)
You need three things to run the gateway:
– Virtualisation software, like Virtualbox (https://www.virtualbox.org/)
– The virtual machine with macipgw on it . Download below.
– A LocalTalk bridge. Can be hardware or software.
For hardware see: https://en.wikipedia.org/wiki/LocalTalk-to-Ethernet_bridge
For software solution see: http://68kmla.org/fo…&t=22036#p21405


Just download the MacIPgw-VM-3.0.ova file.
( 1.8G md5sum: aa842a6d9907d2d1a55d0fe63ee09876 )
Or the 7z (strong zip) file: MacIPgw-VM-3.0.ova.7z.
( 1.7GB md5sum: d7d0f3119d58918cb19a2af32ed4c269)
Internet Explorer recognizes the file sometimes as a .tar. Be sure to save it as a .ova!
…..and import it in VirtualBox. This is done under File / import Appliance.
Be sure that the network device is on Network Bridge Adapter.
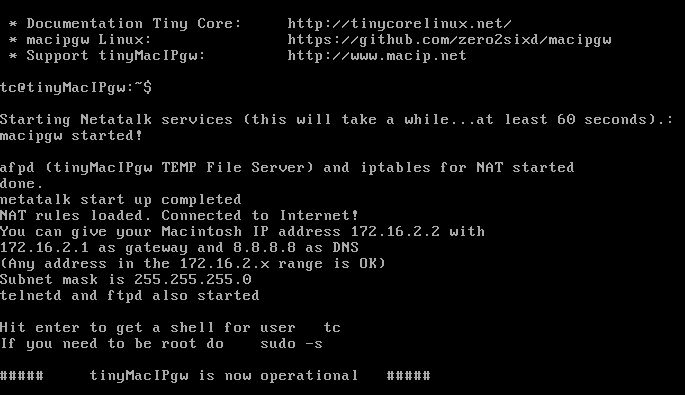
If you start up the virtual machine give it some minutes to boot. Specially the atalkd daemon will take some time to settle. If you login an nbplkup is done so you see all the AppleTalk devices in your network
NEW in MacIPgw virtual machine version 3.0
A BIG NEW ONE. Full NAT ROUTING!
You can now surf the Internet without any router configuration.
Enter 172.16.2.2 as your IP address in the MacTCP or TCP/IP control panel on your old Macintosh, 172.16.2.1 as gateway and 8.8.8.8 as your DNS and you are done. The MacIPgw VM takes care of sending your TCP packages to the Internet. You can startup your telnet session, browser or any TCP/IP application.
I have a special prepared 800K disk image which works perfect in combination with the Floppy Emu.
Or make it to a real disk with DiskCopy 4.2.
Download it here:
http://cdn.macip.net/macipgw-800k.dsk
You can also use a special prepared Basilisk II disk image. Boot from it and start an ancient Mosaic. Will work direct.
MacIPgw-VM-3.0.hfv
About the MacIPgw virtual machine:
• Linux Ubuntu 16.04 Xenial32 bits
• FULL NAT on the MacIP connection. You can now surf the Internet without any router configuration
• sshd started at boot. You can login with ssh. User macipgw can login with ssh. Password is also macipgw. If you like to be root login as root or do a sudo su and enter the macipgw user password: macipgw
• telnetd started at boot. You can login with telnet. Use user macipgw and password macipgw
• Host name resolution. You can point to gw.macip.net and it is resolved as 172.16.2.1 and you can point to mac.macip.net as your Macintosh with IP address 172.16.2.2
• motd updated. You now see a lot of information, like all the Macintosh and Appletalk devices in your network
• Small disk 1.5 GB, but can grow to 10GB
• gw.macip.net and mac.macip.net are now resolved by DNS
• Installed nmap for testing
• Installed aecho for testing
• Installed nbplkup for finding AppleTalk devices
• Some more old services are starting up, besides telnetd and ftpd also tftpd, finger, daytime are started. Nice for testing old MacTCP applications. For ftp login with the macipgw account with password macipgw. Or anonymous login with user anonymous and any password
• Web server on port 80 so you can test a web browser. Point it to http://172.16.2.1and you will see a page telling you reaches a default web page.
• Lynx web browser. Login with telnet user: lynx and password: lynx and you will get the text only web browser so you can surf the web. No support for https however….If you close lynx your shell access will also be closed.
• Elinks web browser. Login with telnet user: elinks and password: elinks and you will get the text only web browser so you can surf the web. And yes… support for https! If you close lynx your shell access will also be closed. If you are logged in you can also type: MacWWW
• Add any package you want to add. Use apt install .. or apt-get install .. to install and apt-cache search … to find packages
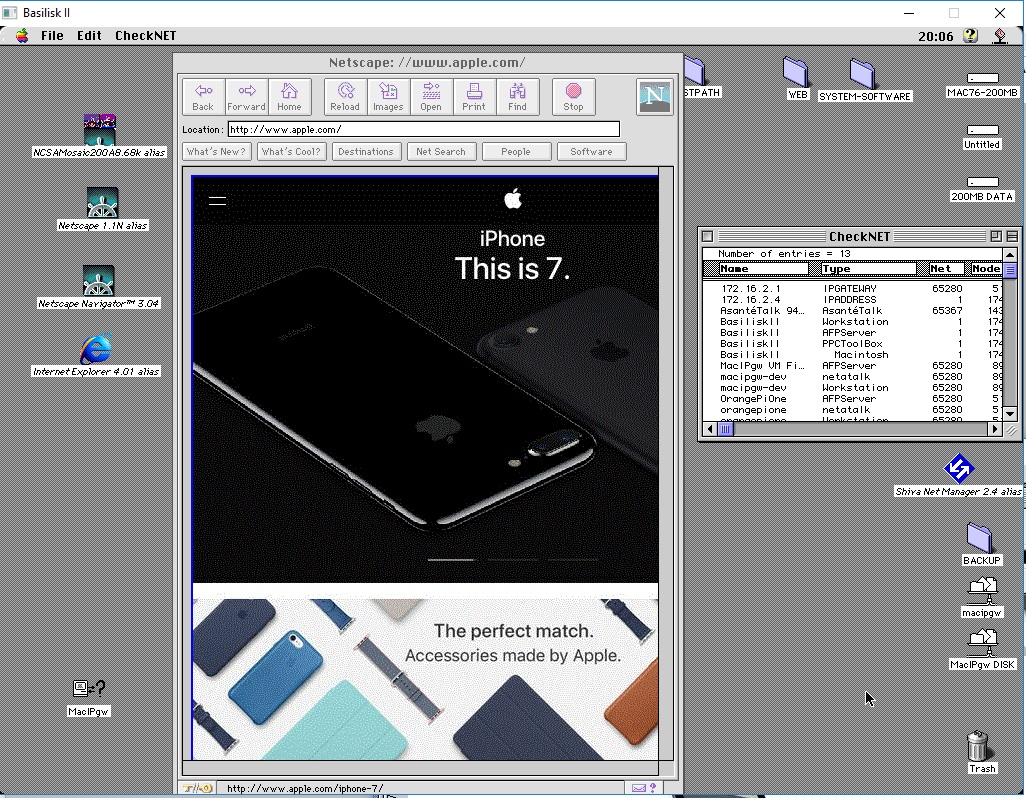
MacIPgw VM File ServerAgain out of the box AppleShare file sharing with Netatalk 2.2.5 installed. If you open the Chooser you will find the “MacIPgw VM File Server”. On this server is a volume called: MacIPgw VM DISK.
.png")
Login with the macipgw credentials:
username: macipgw
passwd: macipgwI also put some old Internet Abandonware on the disk so you can start right away with some applications
There is also a volume called Home Directory. This is the home directory of user macipgw
PROXIES– HTTP 1.1 to 1.0 proxy
– Web Rendering Proxy
– stunnel TLS Proxy ( for email clients without SSL)
HTTP 1.1 to 1.0 proxy
Starts at boot and listens on port 8082. It allows old web browsers (e.g., Netscape 0.9 or Mosaic) to communicate with modern web servers by inserting the missing “Host:” header. Many sites are hosted now on shared servers. That wasn’t the case in the old days. So one IP address had one web servers. HTTPS is not supported!
Read all about it on:
https://www.jwz.org/blog/2008/03/happy-run-some-old-web-browsers-day/
Download old browser on: http://home.mcom.com/archives/
Web Rendering Proxy
If you are adventures you could try the Web Rendering Proxy. The Web Rendering proxy(WRP) is a HTTP proxy service that renders web pages in to GIF images associated with a clickable image map of the original web links. It basically allows to use historical and obsolete web browsers on the modern web.
Read all about it on:
https://virtuallyfun.superglobalmegacorp.com/2014/03/11/web-rendering-proxy-update/
https://github.com/tenox7/wrp
You have to start this by yourself. Do it from a terminal window in VNC. It needs a graphical environment to start. Use a VNC client to connect to the VM.
Use the command /root/wrp11/wrp11-qt.py to start up. If it gives an error stop it echo with ^C and start over again. Be patience! It’s buggy. You can have an error easy. No https is supported. It will give an error and give up. Start over again.
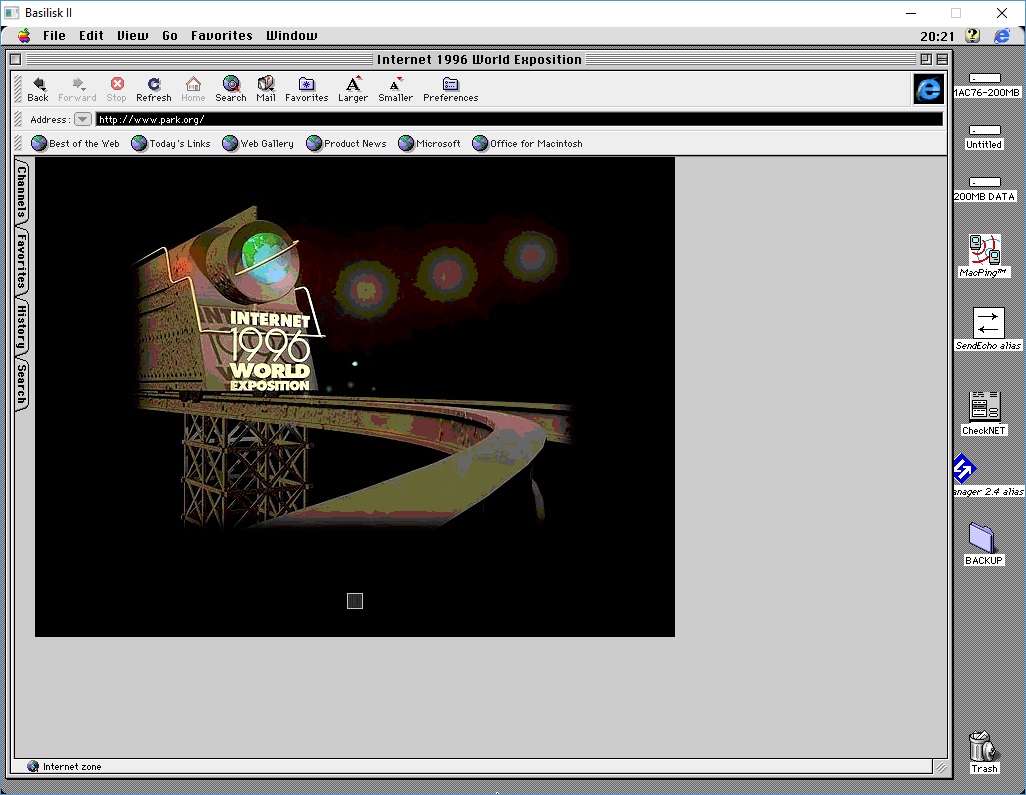
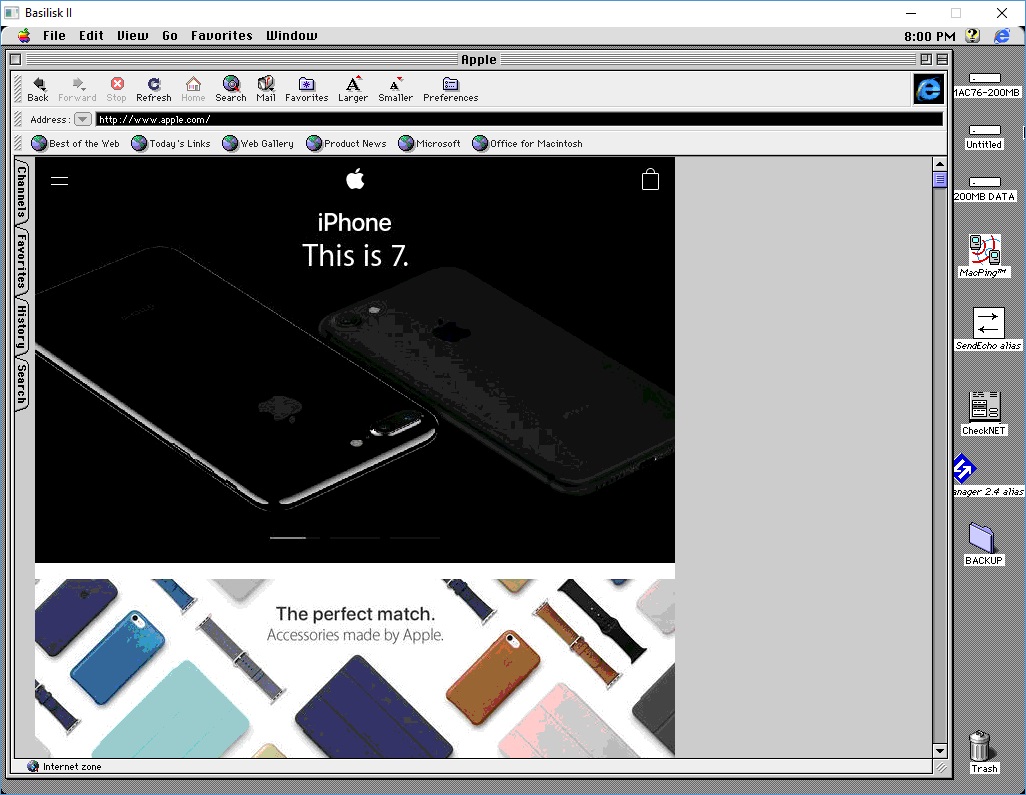
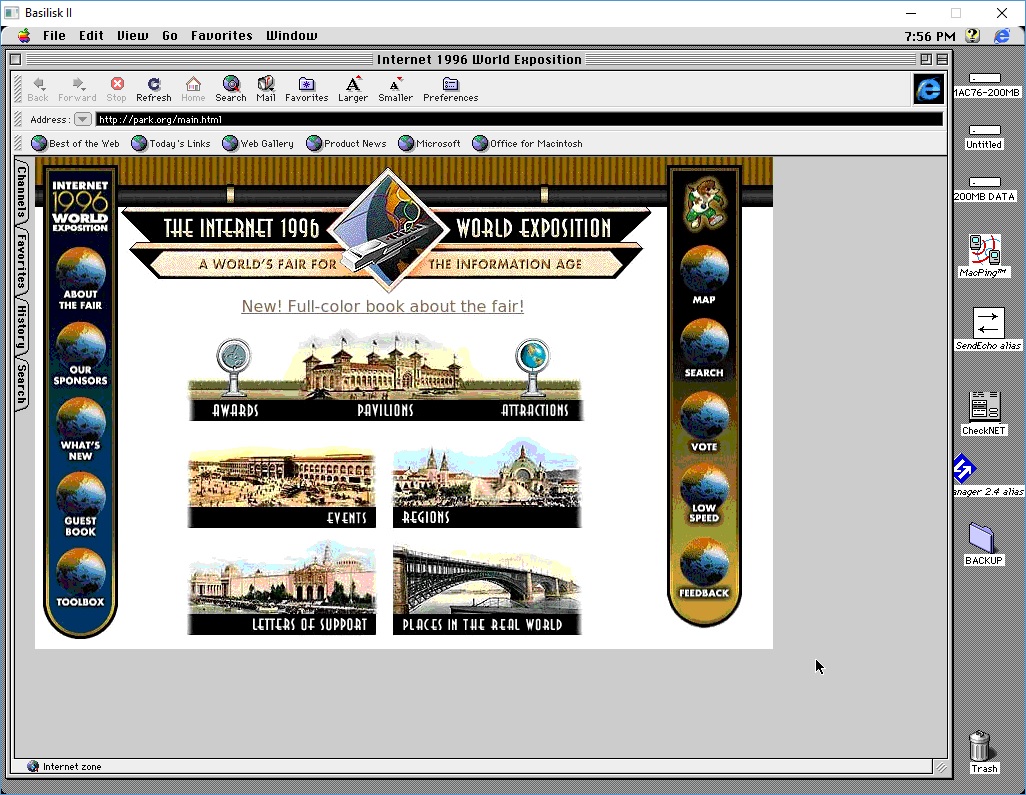
Try http://www.park.org/main.htmlor http://www.apple.com in your old browser. These two sites work perfect. It will run on port 8080 of this VM
See it in action below:


stunnel email proxy
The stunnel program is designed to work as TLS encryption wrapper between remote clients and local (inetd-startable) or remote servers. The concept is that having non-TLS aware daemons running on your system you can easily set them up to communicate with clients over secure TLS channels.
stunnel can be used to add TLS functionality to commonly used Inetd daemons like POP-2, POP-3, and IMAP servers, to standalone daemons like NNTP, SMTP and HTTP, and in tunneling PPP over network sockets without changes to the source code.
Default configuration for Gmail on board.
Read more about it on:
https://supportdesk.win911.com/support/solutions/articles/1689-configuring-gmail-use-stunnel-as-an-ssl-email-proxy
https://www.stunnel.org/static/stunnel.html
Let me know how you like the MacIPgw VM! Check out also the MacIPpi.
An easy and hassle free way of getting your old Macintosh on the Internet. The ultimate TCP/IP over LocalTalk gateway.
I publish it as VirtualBox Appliance. The file is an Open Virtualization Format Archive (.ovf)
You need three things to run the gateway:
– Virtualisation software, like Virtualbox (https://www.virtualbox.org/)
– The virtual machine with macipgw on it . Download below.
– A LocalTalk bridge. Can be hardware or software.
For hardware see: https://en.wikipedia.org/wiki/LocalTalk-to-Ethernet_bridge
For software solution see: http://68kmla.org/fo…&t=22036#p21405
Just download the MacIPgw-VM-3.0.ova file.
( 1.8G md5sum: aa842a6d9907d2d1a55d0fe63ee09876 )
Or the 7z (strong zip) file: MacIPgw-VM-3.0.ova.7z.
( 1.7GB md5sum: d7d0f3119d58918cb19a2af32ed4c269)
Internet Explorer recognizes the file sometimes as a .tar. Be sure to save it as a .ova!
…..and import it in VirtualBox. This is done under File / import Appliance.
Be sure that the network device is on Network Bridge Adapter.
If you start up the virtual machine give it some minutes to boot. Specially the atalkd daemon will take some time to settle. If you login an nbplkup is done so you see all the AppleTalk devices in your network
NEW in MacIPgw virtual machine version 3.0
A BIG NEW ONE. Full NAT ROUTING!
You can now surf the Internet without any router configuration.
Enter 172.16.2.2 as your IP address in the MacTCP or TCP/IP control panel on your old Macintosh, 172.16.2.1 as gateway and 8.8.8.8 as your DNS and you are done. The MacIPgw VM takes care of sending your TCP packages to the Internet. You can startup your telnet session, browser or any TCP/IP application.
I have a special prepared 800K disk image which works perfect in combination with the Floppy Emu.
Or make it to a real disk with DiskCopy 4.2.
Download it here:
http://cdn.macip.net/macipgw-800k.dsk
You can also use a special prepared Basilisk II disk image. Boot from it and start an ancient Mosaic. Will work direct.
MacIPgw-VM-3.0.hfv
About the MacIPgw virtual machine:
• Linux Ubuntu 16.04 Xenial32 bits
• FULL NAT on the MacIP connection. You can now surf the Internet without any router configuration
• sshd started at boot. You can login with ssh. User macipgw can login with ssh. Password is also macipgw. If you like to be root login as root or do a sudo su and enter the macipgw user password: macipgw
• telnetd started at boot. You can login with telnet. Use user macipgw and password macipgw
• Host name resolution. You can point to gw.macip.net and it is resolved as 172.16.2.1 and you can point to mac.macip.net as your Macintosh with IP address 172.16.2.2
• motd updated. You now see a lot of information, like all the Macintosh and Appletalk devices in your network
• Small disk 1.5 GB, but can grow to 10GB
• gw.macip.net and mac.macip.net are now resolved by DNS
• Installed nmap for testing
• Installed aecho for testing
• Installed nbplkup for finding AppleTalk devices
• Some more old services are starting up, besides telnetd and ftpd also tftpd, finger, daytime are started. Nice for testing old MacTCP applications. For ftp login with the macipgw account with password macipgw. Or anonymous login with user anonymous and any password
• Web server on port 80 so you can test a web browser. Point it to http://172.16.2.1and you will see a page telling you reaches a default web page.
• Lynx web browser. Login with telnet user: lynx and password: lynx and you will get the text only web browser so you can surf the web. No support for https however….If you close lynx your shell access will also be closed.
• Elinks web browser. Login with telnet user: elinks and password: elinks and you will get the text only web browser so you can surf the web. And yes… support for https! If you close lynx your shell access will also be closed. If you are logged in you can also type: MacWWW
• Add any package you want to add. Use apt install .. or apt-get install .. to install and apt-cache search … to find packages
MacIPgw VM File ServerAgain out of the box AppleShare file sharing with Netatalk 2.2.5 installed. If you open the Chooser you will find the “MacIPgw VM File Server”. On this server is a volume called: MacIPgw VM DISK.
Login with the macipgw credentials:
username: macipgw
passwd: macipgwI also put some old Internet Abandonware on the disk so you can start right away with some applications
There is also a volume called Home Directory. This is the home directory of user macipgw
PROXIES– HTTP 1.1 to 1.0 proxy
– Web Rendering Proxy
– stunnel TLS Proxy ( for email clients without SSL)
HTTP 1.1 to 1.0 proxy
Starts at boot and listens on port 8082. It allows old web browsers (e.g., Netscape 0.9 or Mosaic) to communicate with modern web servers by inserting the missing “Host:” header. Many sites are hosted now on shared servers. That wasn’t the case in the old days. So one IP address had one web servers. HTTPS is not supported!
Read all about it on:
https://www.jwz.org/blog/2008/03/happy-run-some-old-web-browsers-day/
Download old browser on: http://home.mcom.com/archives/
Web Rendering Proxy
If you are adventures you could try the Web Rendering Proxy. The Web Rendering proxy(WRP) is a HTTP proxy service that renders web pages in to GIF images associated with a clickable image map of the original web links. It basically allows to use historical and obsolete web browsers on the modern web.
Read all about it on:
https://virtuallyfun.superglobalmegacorp.com/2014/03/11/web-rendering-proxy-update/
https://github.com/tenox7/wrp
You have to start this by yourself. Do it from a terminal window in VNC. It needs a graphical environment to start. Use a VNC client to connect to the VM.
Use the command /root/wrp11/wrp11-qt.py to start up. If it gives an error stop it echo with ^C and start over again. Be patience! It’s buggy. You can have an error easy. No https is supported. It will give an error and give up. Start over again.
Try http://www.park.org/main.htmlor http://www.apple.com in your old browser. These two sites work perfect. It will run on port 8080 of this VM
See it in action below:
stunnel email proxy
The stunnel program is designed to work as TLS encryption wrapper between remote clients and local (inetd-startable) or remote servers. The concept is that having non-TLS aware daemons running on your system you can easily set them up to communicate with clients over secure TLS channels.
stunnel can be used to add TLS functionality to commonly used Inetd daemons like POP-2, POP-3, and IMAP servers, to standalone daemons like NNTP, SMTP and HTTP, and in tunneling PPP over network sockets without changes to the source code.
Default configuration for Gmail on board.
Read more about it on:
https://supportdesk.win911.com/support/solutions/articles/1689-configuring-gmail-use-stunnel-as-an-ssl-email-proxy
https://www.stunnel.org/static/stunnel.html
Let me know how you like the MacIPgw VM! Check out also the MacIPpi.
")