jmacz journey

jmacz

Well-known member
How are your machines all such a bright, uniform, sparkling platinum color? Retrobright? Camera tricks? ;)

All my keeper machines are painted :)

The ones I don't think I'm going to keep, I leave alone because I know someone people prefer leaving it stock.
 

jmacz

Well-known member
IMG_7804.JPG

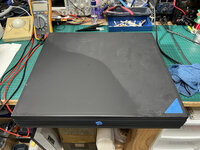
This Meguiar's Ultimate Black is interesting. It's a plastic restorer for exterior plastic trim on cars. It helps restore the plastic (specifically black pieces) that have faded over time.

I used it on half of the NeXTStation lid above and you can see the difference. The other side is only with water and dishwashing soap.
 

jmacz

Well-known member
Fixed my SuperMac Spectrum 24 Series I today (documented here).

That's another SuperMac card brought back from the dead. Only two more to go (the series V which I'm still slowly debugging and the series III that I believe I have diagnosed as a faulty GAL).

My growing SuperMac stable:
  • SuperMac Spectrum 24 Series I - received broken - fixed, bad resistor.
  • SuperMac Spectrum 24 Series III - received broken - diagnosed, faulty GAL on accelerator board and is currently with Bolle for reverse engineering.
  • SuperMac Spectrum 24 Series III - received working.
  • SuperMac Spectrum 24 Series IV - received broken - fixed, bad DAC, bad fuse, bad resistors, bad caps.
  • SuperMac Spectrum 24 Series V - received broken - work in progress.
  • SuperMac Spectrum 24 PDQ - received broken - fixed, bad solder joints on SRAM chip.
  • SuperMac Thunder II 1360 - received working.
 

jmacz

Well-known member
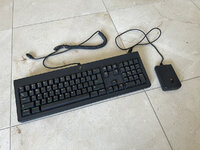
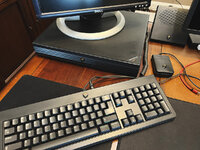
Finally procured a non-ADB NeXT keyboard and mouse.

IMG_8063.JPG

Still can't test the unit until I find myself a sound box (which has the actual keyboard/mouse ports) and a Y-cable to split out to a VGA monitor. Looks like finding a sound box is going to be difficult. Someone made a modernized one that has both non-ADB and ADB ports for the peripherals but looks like it's monochrome only? Need to check what that means since I'm going to be splitting out to a VGA monitor from the base unit, not the sound box. Sorry, non Mac stuff. :)
 

jmacz

Well-known member
Finally released some software. SD Aide which helps with some lockups occurring on PowerBooks running SCSI emulation devices like ZuluSCSI.

sdaide.png


jmacz

Well-known member
Finally found a NeXT Non-ADB Sound Box and got this NeXTStation Color working. In addition to the sound box, also had to get some new 72 pin SIMMs as the machine came with two physically incompatible SIMM modules (they were installed in banks 3 and 7, instead of banks 0 and 1 like they should be, and that was because the SIMMs would not fit consecutively in the slots since they were double sided).

But it's fully functional now. Pretty neat!

IMG_8508.JPG

I need to find a better monitor for it. The DELL I'm using is scaling the output and it looks nasty. Currently looking for an LCD that can display the strange 1120 × 832 px resolution at 1:1 (with letter boxing).
 

jmacz

Well-known member
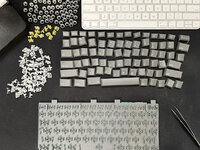
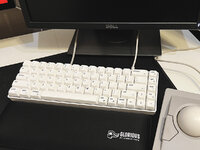
Built yet another Design 68 keyboard. This time went with Gateron Aliaz Silent switches, and I really like them! They are tactile switches but probably closer to the linear side. Went with orange LEDs this time. I've got 4 of these Design 68 keyboards now so put one of them up for sale in the Trading Post.

IMG_8509.JPG
 

jmacz

Well-known member
Removed all the caps on two Apple 13" RGB Trinitron Monitors today. That's a ton of caps!

What's interesting is there are a bunch of labeled and unlabeled revisions of this monitor. The obvious one is the M1297 vs the M0401. Both of the ones I decapped today were M0401s. These are different from the M1297 I recapped last year. Now between these two M0401s, there was also a difference: the PSU is different. One had a Sony. The other I couldn't find a brand label. So different caps for them. I was browsing the M0401 capacitor threads on this forum, there's also apparently a labeled M0401X revision of this monitor. And the other M0401 cap list I saw had a couple differences from mine.

So for future folks recapping their M0401s, don't buy your caps until you decap and inventory what is in your monitor, just to make sure you don't waste time ordering the wrong ones.
 

3lectr1cPPC

Well-known member
Stuff like this is why I haven’t done much PSU and monitor cap reference on macdat. I only want to add something if I’m really positive there isn’t any revisions I don’t know about.
 

jmacz

Well-known member
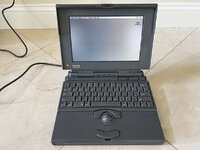
All of sudden my new to me Hosiden 540c LCD developed numerous bad pixels. I had discharged it with Battery Amnesia as part of my battery tests here and then rebooted and left my PB charging the battery. When I came back two hours later, I had about 12 dead pixels in the upper left corner of the screen and 7 dead pixels in the upper right corner of the screen. I had changed the backlight tube earlier in the day, but the display was perfect for hours until these dead pixels popped up out of nowhere. Tried rebooting, power cycling, hoping it was a glitch but nope, did not go away overnight either. Super annoyed.

This morning after remembering some folks had very rare success rubbing the pixels, I took the screen apart down to the actual lcd panel (removed all the polarizer sheets, etc), then heated the lcd up slightly with a hair dryer in the corners and used a microfiber cloth and rubbed the general area with my thumb applying some pressure. Did this for a minute in each corner. Nothing. Figures. But decided what the hell, applied some more heat, more pressure, and did it for 5 minutes in each corner. It worked! The dead pixels were gone. I had been able to see the dark pixels in the LCD panel but they were all gone. Put the display back together and they are gone.

I don’t recommend this as many things can go wrong. But I was super annoyed and decided what the hell. I got lucky. 🍀Of course, they might come back but at least it’s ok for now.
 

jmacz

Well-known member
Every generation of 3D filament printer gets so much better! I recently picked up a Qidi Plus 4 printer and I'm amazed how much better it is than my Creality Ender 3 S1 Pro from a few years back. Prints are 2-3x faster, higher resolution, no warping issues (it's fully enclosed with chamber heating).

I designed new bezels for my Quadra 800 (one for a Magento Optical drive and another for my ZuluSCSI so I can more easily access the SD card) and then printed them on the Qidi.

IMG_8903.JPG

The top and bottom bezels are 3D printed. The middle bezel is the stock floppy bezel. The result was better than the 3D resin printed bezel I had made previously. Overall, I don't think the filament printers meet the details from a resin printer yet, but for things the size of this bezel, it's hard to tell now and I don't have the mess of cleaning up after using the 3D resin printer.
 

jmacz

Well-known member
Working on a few minor overclocking projects thanks to @eharmon's very helpful documentation (see his form signature). Have a clock doubler from @Bolle on the way but in the meantime, been working on my Quadra 800.
IMG_9418.JPG

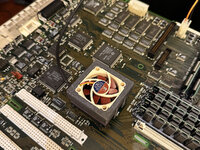
Replaced the stock oscillator with an extra 20MHz part I had sitting around from my earlier PowerBook 540c overclocking project. Replaced the heatsink and added a Noctua fan with a custom 3D printed holder (clips onto the edges of the CPU) and powered via the 4pin connector on the motherboard.

I have a CayMac ROM SIMM and Programmer on the way. Once I get that, will try using 40MHz timings. But for now, it's just using the 33MHz timings in the stock ROM for the standard Quadra 800 gestalt ID. Seems stable. Ran a few MacBench tests and everything seems ok. The CPU was a 02E31F so should be good as it is I think?

For fun, I decided to rebadge the front of the case:

q800.jpg

Haven't transferred the decal yet, the clear coat is still drying.

And then while working on the new decal, also printed up some DayStar decals for my Iici which has a 50MHz PowerCache in it.

daystar.jpg

Not sure if the color version is going to turn up ok once applied so have B&W ones ready as well.
 

jmacz

Well-known member
Replaced the stock oscillator with an extra 20MHz part I had sitting around from my earlier PowerBook 540c overclocking project. Replaced the heatsink and added a Noctua fan with a custom 3D printed holder (clips onto the edges of the CPU) and powered via the 4pin connector on the motherboard.

Just to be clear. I replaced the heat sink with a new lower profile heat sink and the fan sits on top held on by the 3D printed holder. The heat sink itself has a border of thermal tape holding it onto the CPU with some thermal paste in the center.
 

Durosity

Well-known member
For fun, I decided to rebadge the front of the case:

q800.jpg


Haven't transferred the decal yet, the clear coat is still drying.
That’s all very cool, but the replacement decal is probably my favourite bit! Please show us the case when it’s ready!
 
Top