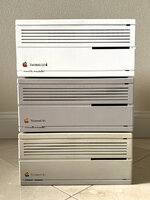
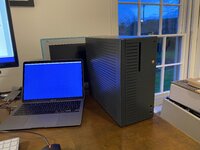
jmacz
Well-known member
From the lot I picked up a month or so back, there were two IIci computers. One went to a forum member. The other was a disaster inside due to the PRAM battery having been left in there all these years. Opening up the case, I was greeted with this (and this was after I had cleaned up what looked like animal/insect debris and dirt:
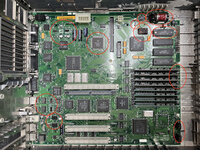
Battery and the holder were toast, the holder was hanging on by one joint. Five to six legs on the nearest ROM chip had rust on them. The oscillator as well as the nearby 32K clock were both rusted/corroded. Two diodes (D7 and D8) were crumbling if you touched them. LED light rusted and one leg broken off. The chips in the upper left corner (UB13, UD13, UE13)... well UD13 was rattling around the case. UE13 had most of its legs corroded and broken. UB13 had legs lifted off the pads. Then in the lower left corner, RP1, RP2, UA4, and UA5 had lifted legs, as did UB2 and UB3. All this chip damage was from capacitor leakage it looks like. Also had the metal holders for the SIMMs rusted and same with the reset/interrupt buttons. The other side of the board had multiple broken traces (under the battery).
A few more shots:
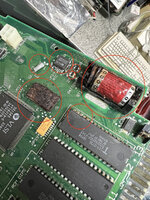
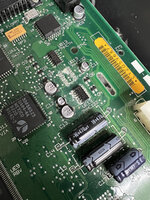
Removed some caps and chips... found a missing pad underneath...
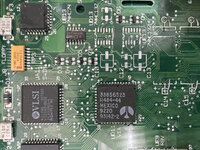
Here's a shot of the diodes and I wasn't feeling good about the RTC chip..
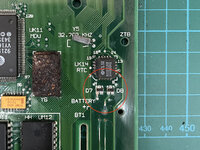
Thought those (D7 and D8) were transistors and puzzled by the third pin on each one unused... @Bolle explained they are just diodes but in a SOT-23 package. They crumbled away when I touched them. Nice. And bunch of broken traces underneath where the battery was.
A shot of a couple of the broken traces... this was on the other side of the battery.
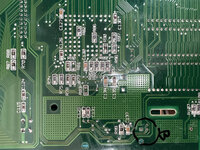
So went to work, scraped away some solder mask to reveal the copper underneath, and started adding bodge wires. The shot below is some of that work plus the new oscillator and clock.
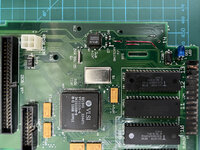
Replaced the D7 and D8 diodes, cleaned up the RTC chip legs and luckily, things seemed ok. One leg was off the pad but that was quickly fixed. Here's a picture with the new battery holder in place. Also replaced the LED, I think the LED itself was ok but the legs corroded off and were too short. I decided to go with a different color since this whole project was just a fun exercise. Not trying to be accurate here.
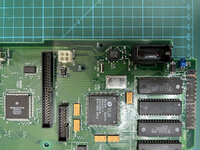
Also cleaned up the legs of the ROM chip, luckily the rust was superficial. I don't use the burnin edge connectors but it looked ugly so decided to clean those up by gently scraping away the oxidation/corrosion. Deoxit helped a bit but it still required scraping.
Ended up scraping off green corrosion on the legs of multiple chips. And of course, had to resolder the lifted legs on all the various chips that had issues.
The 68030 CPU also had a bent leg and it was touching the pin next to it. Had to fix that. And then all the usual capacitors had to be replaced. New tantalums and axials installed as well as a bath in isopropyl alcohol and brushing:
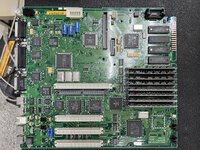
Nice and clean. I was turning it on throughout this process to test as I went along. Really satisfying when I got video for the first time, then a bit later after a few more fixes, a chime, and then a few more fixes later a cursor and blinking disk icon. There were some frustrating moments as well -- for example I totally forgot to look for the ROM select jumper... it was missing and didn't see this for 15 minutes while trying to debug. The CPU leg being bent into another pin, that was annoying too, missed it so many times. Also had the rear power switch twisted so it was constantly rebooting, took me a few minutes to figure that out after a few curse words.
But it was finally up and running. Cleaned and fixed the floppy. Tested the Nubus slots. Tested all ports (except the external floppy drive one as I don't have anything that I can test that with anymore). I borrowed a power supply from another one of my IIci's -- will have to find a stock PSU enclosure so that I can build another ATX conversion later.
To commemorate being saved from the garbage pile, I decided to give this particular IIci a custom decorative touch:
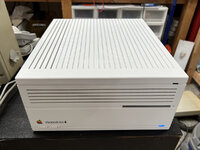
New white case with a bomb icon next to the model badging. and here it is complete with a matching ADB mouse II (I have a keyboard and monitor I'm working on to match the same color scheme).
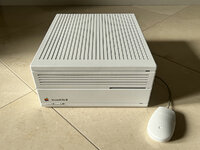
Finally complete. Not quite sure why I need two IIcis, but there ya go. (and I've got a third I received recently). Hmm, the sunlight is making the color look more normal, but the unit (and mouse) is bright white.

Battery and the holder were toast, the holder was hanging on by one joint. Five to six legs on the nearest ROM chip had rust on them. The oscillator as well as the nearby 32K clock were both rusted/corroded. Two diodes (D7 and D8) were crumbling if you touched them. LED light rusted and one leg broken off. The chips in the upper left corner (UB13, UD13, UE13)... well UD13 was rattling around the case. UE13 had most of its legs corroded and broken. UB13 had legs lifted off the pads. Then in the lower left corner, RP1, RP2, UA4, and UA5 had lifted legs, as did UB2 and UB3. All this chip damage was from capacitor leakage it looks like. Also had the metal holders for the SIMMs rusted and same with the reset/interrupt buttons. The other side of the board had multiple broken traces (under the battery).
A few more shots:


Removed some caps and chips... found a missing pad underneath...

Here's a shot of the diodes and I wasn't feeling good about the RTC chip..

Thought those (D7 and D8) were transistors and puzzled by the third pin on each one unused... @Bolle explained they are just diodes but in a SOT-23 package. They crumbled away when I touched them. Nice. And bunch of broken traces underneath where the battery was.
A shot of a couple of the broken traces... this was on the other side of the battery.

So went to work, scraped away some solder mask to reveal the copper underneath, and started adding bodge wires. The shot below is some of that work plus the new oscillator and clock.

Replaced the D7 and D8 diodes, cleaned up the RTC chip legs and luckily, things seemed ok. One leg was off the pad but that was quickly fixed. Here's a picture with the new battery holder in place. Also replaced the LED, I think the LED itself was ok but the legs corroded off and were too short. I decided to go with a different color since this whole project was just a fun exercise. Not trying to be accurate here.

Also cleaned up the legs of the ROM chip, luckily the rust was superficial. I don't use the burnin edge connectors but it looked ugly so decided to clean those up by gently scraping away the oxidation/corrosion. Deoxit helped a bit but it still required scraping.
Ended up scraping off green corrosion on the legs of multiple chips. And of course, had to resolder the lifted legs on all the various chips that had issues.
The 68030 CPU also had a bent leg and it was touching the pin next to it. Had to fix that. And then all the usual capacitors had to be replaced. New tantalums and axials installed as well as a bath in isopropyl alcohol and brushing:

Nice and clean. I was turning it on throughout this process to test as I went along. Really satisfying when I got video for the first time, then a bit later after a few more fixes, a chime, and then a few more fixes later a cursor and blinking disk icon. There were some frustrating moments as well -- for example I totally forgot to look for the ROM select jumper... it was missing and didn't see this for 15 minutes while trying to debug. The CPU leg being bent into another pin, that was annoying too, missed it so many times. Also had the rear power switch twisted so it was constantly rebooting, took me a few minutes to figure that out after a few curse words.
But it was finally up and running. Cleaned and fixed the floppy. Tested the Nubus slots. Tested all ports (except the external floppy drive one as I don't have anything that I can test that with anymore). I borrowed a power supply from another one of my IIci's -- will have to find a stock PSU enclosure so that I can build another ATX conversion later.
To commemorate being saved from the garbage pile, I decided to give this particular IIci a custom decorative touch:

New white case with a bomb icon next to the model badging.

Finally complete. Not quite sure why I need two IIcis, but there ya go. (and I've got a third I received recently). Hmm, the sunlight is making the color look more normal, but the unit (and mouse) is bright white.

