• Updated 2023-07-12: Hello, Guest! Welcome back, and be sure to check out this follow-up post about our outage a week or so ago.

Fitting a SCSI2SD in a 68k Mac

Simon_Carr

Well-known member
Okay, as promised, here is my idiots guide to installing a SCSI2SD to replace a defective HDD. This has been tried and tested in my Centris 650, but should be broadly applicable to any 68k Mac. Thanks to gadget, rezwits and olePigeon for helping me to get it right over the weekend!

Actually, the process is really quite straight-forwards to get a SCSI2SD working in your old 68k Mac. You do need the following (as well as the SCSI2SD and a MicroSD card);

  1. A modern Mac that you can install the SCSI2SD-UTIL software onto (the current version only runs on Intel Macs, but I believe that older versions of the software are available);
  2. A legitimate copy of the OS you are planning to install (I used the freely available System 7.5.3 with 19 1.4mb disk parts (important: these are NOT disk images);
  3. A Floppy Disk of OS 7.5.3 Disk Tools 1, to act as a boot disk for the 68k Mac.  
  4. Basilisk II emulator (actually not really necessary, but handy to have nonetheless);
  5. A floppy disk-drive that you can connect to your modern Mac to add some software to a 'Disk Tools 1' floppy disk that is used to start-up the 68k Mac.
​STEP 1: Install the SCSI2SD-UTIL software: this is available from the SCSI2SD website (link here). When run, this opens Terminal which then activates a GUI to allow you to setup your device:

  • First job is to update the SCSI-SD firmware (there are detailed instructions on doing this on the SCSI2SD website);
  • Then, you need to setup the parameters of your SCSI2SD: As far as I can gather, there is no need to change any of the 'General' settings for a 68k Mac, but you do need to change settings in the Device tab for the system you are using. Detailed information can be found here, but essentially you need to con the Apple SC HD setup software into believing your SCSI2SD is a valid hard drive. To do this, you need to do the following:
    Set the vendor to the string " SEAGATE" (yes, there is a single space in front of SEAGATE for a total of 8 characters)
  • Set the product ID to the string "          ST225N" (10 spaces in front for a total of 16 characters)
  • Set the revision to the string "1.0 " (with a space after, for a total of 4 characters)

[*]You also need to assign your SCSI2SD an ID: if, like me this is going to replace the startup HDD, the ID needs to be set to 0.

STEP 2: Initialise the microSD card: This was the first bit where I got confused, and needed advice from the forum, although the solution ended up being very simple! You need to set up the SD card so that it has a valid Apple Partition Map, thus allowing the drive to operate. There are many alternative ways to do this, but what was simplest (and worked!) was the following

  • Connect the SCSI2SD (with the microSD card inserted) to the relevant SCSI cable port in the 68k Mac. In my situation, I simply replaced the SCSI2D for the original hard drive. Although the newer SCSI2SD's have a molex cable for power, just like normal hard drives, it is not required, as the SCSI cable provides sufficient power to drive the card.
  • One of the disk parts for System 7.5.3 mentioned above is the 'Disk Tools 1', which once saved onto a floppy disk can then be used to start-up the 68k Mac without a hard-drive or other startup disk involved. I cannot remember offhand which part/image it is (17 or 18, maybe?), but they are all freely available. I don't know whether we are allowed to upload an image of that disk, but if someone were to let me know if this is permitted, I would be happy to share it on this forum.
  • On Disk Tools 1 is a utility called Apple HD SC Setup 7.3.5 (also available here); however, the original version only works with Apple Hard Drives, so a patch is required to permit the initialising of the SCS2SD (once it has been camouflaged as a Seagate drive in Step 1). Save the patch to Disk Tools 1, update the Apple HD SC software (which will create a new, patched version of the utility on the floppy disk - don't worry, there is available space!) and then insert the floppy into the disk drive and start up the 68k.
  • Open Apple HDSC (patched), and first of all 'Initialise' the drive. This will create a small 20Mb partition, as well as the bit that runs the HFS filesystem. Then you can enter the 'Partition' section and first of all remove the feeble 20Mb partition, and then by clicking on the grey area of the drive map you can create a new 'Macintosh Volume' (or as many as you like, up to 2Gb each) for which you can set the size and the name.
STEP 3: Installing the OS: This is another area that many other forum posts seem to have identified different ways of achieving the end result, but the following worked perfectly for me!

  • Shut-down the 68k Mac and take the microSD card from the SCSI2SD and connect it to a more modern Mac (I used a G4 eMac for this stage, not for any particular reason: I'm sure it would work on anything). You should see that the volume(s) created in Step 2 appear as external disks on your desktop.
  • Copy the install disk parts for OS 7.5.3 into one of the volumes you have created onto your chosen startup volume of the MicroSD card. With 7.5.3 you should have 19 files, the first with a .smi file type, and the remaining 18 with a .part suffix. Just copy them all across. I used BasiliskII to first of all check that all of them worked properly (because I am cynical like that), by using them to install 7.5.3 on the emulator, and then I used those for the copy onto the MicroSD card.
  • Now, replace the MicroSD card in the SCSI2SD, insert the Disk Tools 1 floppy into the 68k Mac, so that you can startup the 68k Mac;
  • Once the Mac is running, access the Volume in which the 7.5.3 install parts have been placed, double click on file 1 (the .smi one) and LO! you are now properly installing 7.5.3 onto your SCSI2SD card.
So there we are, finally an idiots guide, which definitely worked for me. After I did this, I set the SCSI2SD to SCSI ID = 1 using the utility, and again using the Disk Tools 1 as a boot disk, plugged both an old HD (that was too full to install the system software properly, but had loads of software I wanted to keep) and SCSI2SD in, so that I could transfer all the files and software I wanted to keep on the Mac. Once this was complete, I reset the SCSI2SD ID to 0 (so it works as the main startup disk) and restarted the Centris. The Centris seems to work very happily using the SCSI2SD, the only weird thing is just how quietly it runs now!

Anyway, I hope this is of some use to other out there; I've now bought a second SCSI2SD to put into a Mac Classic which I think could use the extra capacity!

Cheers,

Simon


joethezombie

Well-known member
Just a little additional information.  The vendor, product ID, and revision strings do not to be "setup" to work with the 68k Mac.  They are only necessary if you want to use the UN-patched version of Apple HD SC Setup.  If you are using the PATCHED version, or if you are using LIDO, or some other third party preparation tool, then it is not necessary to change those parameters.

Also, later versions of OS X dropped support for HFS (Mac OS Standard), but I am not sure exactly at what version that happened.

 
Last edited by a moderator:

Simon_Carr

Well-known member
Also, later versions of OS X dropped support for HFS (Mac OS Standard), but I am not sure exactly at what version that happened.
Good point, that's why I was using my eMac.... I think that HFS (MacOS standard) is only supported up to Leopard 10.5.8. You can only save disk images to floppy up to this point. Thanks for the reminder!


CC_333

Well-known member
To be more exact, write support for HFS Standard was dropped with Snow Leopard.

Whether or not the newest versions of OS X still support HFS Standard at all (including read-only support), I don't know (I do know that it is supported up to and including Mavericks, at the very least).

c

EDIT: Very good guide, by the way!

 
Last edited by a moderator:

clopes66

New member
In addition to the excellent post from Simon_Carr, here's some info how to setup SCSI2SD with other vendors and products recognised by Drive Setup.

I was having little luck with the patched versions of Drive Setup and then found this post that shows how Drive setup recognises attached SCSI drives. I examined the fSCR resources from Drive Setup 1.5 and made the following compatibility list.

Choose any combination from the first list below ( * means any character string). Avoid combinations from the second list.

I set the Device Type in scsi2sd_util to Hard Drive - I don't know if any of the suppoerted devices are Removable. I am not sure if the Revision matters - I always put 1.0

Supported "vendor_id,product_id"    The " are not part of the codes  :)
“QUANTUM,FIREBALL*”
“QUANTUM,*”
“CONNER,*”
“IBM*”
“IBM OEM,*”
“ SEAGATE,          ST225N”
“SEAGATE,ST250N”
“SEAGATE,ST157NB”
“SEAGATE,ST19171W”
“SEAGATE,*”
“CDC,*”
“SEAGATE,ST410800N”
“AVID,ST410800N”
“MICROP,*”
“DEC,*”
“SYQUEST,SQ55#”
“SYQUEST,SQ511#”
“SYQUEST,SQ310#”
“SYQUEST,SQ3270#”
“SyQuest,SQ5200#”
“SYQUEST,EZ135#”
“IOMEGA,BETA90”
“IOMEGA,BETA150”
“IOMEGA,BETA230”
“FUJITSU,M2511A”
“FUJITSU,M2512A”
“SONY,SMO-C5#”
“SONY,SMO-C3#”
“SONY,SMO-F331-00”
“RICOH,RO-506#”
“MOST,RMD-5200#”
“MOST,RMD-51#”
“SHARP,JY750#”
“SHARP,JY800#”
“RICOH,RO-301#”
 
Apple OEM driver. required (Drive Setup will show Unsupported)

“QUANTUM,Q280*”
“QUANTUM,Q250*”
“QUANTUM,P80S*”
“QUANTUM,P40S*”
“QUANTUM,LP40S*”
“QUANTUM,LP80S*”
“QUANTUM,LPS270S*”
“QUANTUM,LPS540S*”
“QUANTUM,EMPIRE_1080S”
“QUANTUM,MAVERICK 270S”
“QUANTUM,MAVERICK 540S”
“QUANTUM,LIGHTNING 365S”
“QUANTUM,LIGHTNING 540S”
“QUANTUM,LIGHTNING 730S”
“QUANTUM,LPS240S*”
“QUANTUM,GO40S”
“QUANTUM,GO80S1”
“QUANTUM,GO120S”
“QUANTUM,GO160S”
“CONNER,CP3045-40mb-3.5”
“CONNER,CP2025-20mb”
“CONNER,CP2045PK-40Mb”
“CONNER,CP2255-240Mb”
“CONNER,CP2175-160Mb”
“CONNER,CP2084-80Mb”
“CONNER,CFP1080S”
“IBM,DSAS-3270”
“IBM,DSAS-3360”
“IBM,DSAS-3540”
“IBM,DSAS-3720”
“IBM,DPES-31080”
“IBM OEM,DFMSS2F”
“IBM OEM,DFMSS4F”
“IBM OEM,DFHSS2F”
“IBM OEM,DFHSS4F”
“IBM,WDS240”
“IBM,WDS280”
“IBM,WDS2120”
“IBM,H2172-S2C”
“IBM,H2344-S4C”
“IBM,DHAS-2172”
“IBM,DHAS-2258”
“IBM,DHAS-2344”
“IBM,DHAS-2540”
“IBM,DVAS-2810”
“SEAGATE,ST1480”
“SEAGATE,ST11200N”
“SEAGATE,ST3600N”
“SEAGATE,ST12550N”
“SEAGATE,ST32430N”
“SEAGATE,ST15230N”
“SEAGATE,ST9235N”
“SEAGATE,ST9195N”
“Apple,SCSI_HD”
“ADTX,*”
 
Last edited by a moderator:

joebang

Member
I have a few question. When I download the files they all have .bin at the end. I'm assuming I need to remove the bin extension? After copying the files to sd card (using my g4) and putting it back in my LC475. When I try to open the smi file from my LC475 I get an error message that says application that created the file could not be found. Did I miss a step?

 
Last edited by a moderator:

Skate323k137

Well-known member
Signed up to thank you all for this thread.

I've been a mac enthusiast since I was a kid, and I do electronics / arcade repair in my spare time.

I recently rescued a SE from a filthy home. Cleaned it up, recapped the analog board, and it fired right up. I had an external scsi drive that worked for it, as the internal 20mb was pretty well dead. I've been booting off the external with plans for scsi2sd.

So I spent the last day or two fighting with the SCSI2SD in my SE. I have a scsi2sd in my 7500 that works great with several virtual drives (for v5 scsi2sd on power PC use parity, scsi2, QUANTUM FIREBALL*), but I just could not have the same success with my SE. Finally I decided I should write 0's over the card I was using, since I had changed the drive IDs so many times and there could be lingering drivers/data on the card. Long story short the brand new SD card I had bought for my SE was toast.  A long format failed miserably and I realized I really should have checked that first. Of course the 1988 macintosh is fine but a brand new memory card doesn't work >_<

I bought a new card today and it's working like a champ. I used QUANTUM FIREBALL1 and QUANTUM FIREBALL2 for identifiers. In all of my ghost chasing I found that you can format one of the syquest IDs (“SYQUEST,SQ3270#”) as a removable drive with large sizes (I did 1gb anyway). I didn't try hotswap or host wake, but it might work if someone is interested. I was using that ID on a whim because of strange issues (i.e. dead card) but on a working setup it doesn't unmount properly on reboot; you have to power cycle for the mac to find the disk again. I wonder if using host wake and ejecting/inserting the card would do it, but right now I'm just happy to have a working (dual boot 6/7) SE!

Cheers !!

 
Last edited by a moderator:

Skate323k137

Well-known member
Thanks!

I have an extra v5, so I ordered the adapter to hook it to the DB25. I will mess with configs and see if I can make an external SD slot compatible with both my 7500 and SE. For now the external SCSI hdd I have works for transporting files between the two Macs, and my 7500 has ethernet, so it's convenient enough. Still, I think a plug and play SD slot for the back of the SE that supports hot swap of cards would be awesome if nobody has already done it.

I upgraded my 7500 to a v6 SCSI2SD and the write speed is definitely noticeably improved. There's not much difference (if any) on read speed. I didn't benchmark but it boots about the same. Copying files between the internal virtual drives/partitions is much faster though.

 
Last edited by a moderator:

Juror22

Well-known member
I am a bit envious that everyone is getting these to work.  I have a couple of V5 SCSI2SD that I cannot get to work with an LCIII.  I boot the LC from a SCSI CD (ID 3 that is properly terminated and running the Apple Legacy CD (boots to 7.6.1).  Since I have two of them, I have tried setting them up in a couple of different ways:

First, I updated the firmware on both.

The first one had a 256MB SD card that came with the device when I bought it, the other has a 16GB Lexar card that I'm using with it.

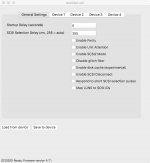
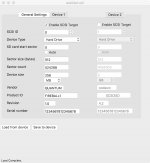
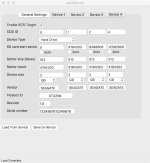
I started the card utility and set them as described above .i.e. set the vendor to the string " SEAGATE" , product ID to the string "          ST225N",  revision to the string "1.0 " and assigned the first to a SCSI ID of 0 and the second to SCSI ID's of 0,1,2,4. (see pics below - I later attempted to use the QUANTUM FIREBALL* settings on the 256MB one and combined all the tabbed settings that were different in the pics, to simplify them)

s2sd_setup01.jpg

s2sd_setup02.jpg

s2sd_setup04.jpg

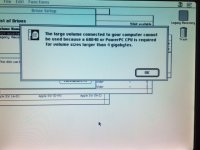
I attached the card (the 256MB equipped one) to the SCSI cable and started the LCIII and initialized the device, using HD SC Setup.  It completed initializing, so then I used Drive Setup 1.7.3 to partition the drive (1 partition - 242 MB), renamed it and had a drive icon on the desktop and when it was opened it was the right size (a little less than 250MB), so I rebooted and there was ... nothing.  I checked in Drive Setup and the device was seen on the SCSI bus.  Attempting to mount the device yielded the following dialog box that explains the problem, but based on what I saw in the Finder, before the reboot (it mounted with the correct size, well under 2GB, let alone 4GB), so I don't understand what setting is causing the issue.

s2sd_setup08.JPG

Re-initializing made the drive show again on the desktop and allowed me to install 7.5.3 off the CD, but since it doesn't show up after the reboot, there is still an issue.

To add a bit more complexity, the 4th device on the 16GB card does mount on reboots, but none of the other ones do.

Has anyone come across this issue and have advice?


Byrd

Well-known member
Are you formatting as HFS Standard not HFS Extended?  That could explain the error message.


joethezombie

Well-known member
That's pretty peculiar.  I'm running several SCSI2SDs in most of my machines from an SE all the way up to Q700, and have never had an issue with any of them.  Granted, I'm not using a CDROM (I use yet another, but externally connected SCSI2SD to install from), but I wouldn't think that would introduce any issue...

Some troubleshooting I would try:

Attach power to the molex connector if you are currently using bus power only.

Format the SD card using the official SDFormatter from the SD Association website and try again.

After writing the settings in the scsi2sd-util, read them back and make sure they are indeed setting.  Are any errors or strangeness apparent in the log window?

Try using only 1 device set to 1.8GB on the 16GB card.  If that works, add additional devices one at a time.

Try using slightly less than 256MB on the 256MB card, like 225MB.

Try using a different SCSI cable.

Have you tried them in another Mac besides the LCIII?

Make sure the SCSI2SD isn't shorting out on the solder side.  Anti-static bags are coated in conductive material.

Yikes!  And good luck!


Juror22

Well-known member
Yes, it was formatted as HFS standard (the other option was greyed out).

So, I didn't pursue the troubleshooting steps in order, but I did do the following...

Attach power to the molex connector - this one didn't seem to matter.

After writing the settings in the scsi2sd-util, read them back - I had already checked this, but a good reminder, I re-checked the settings.

Make sure the SCSI2SD isn't shorting out on the solder side - I had seen a few mentions of this, so I was using an envelope until I got it working and found a more permanent solution.

Try using slightly less than 256MB on the 256MB card, like 225MB - I liked this idea (one of the easiest to check) and set the device size to 254MB.

This worked (changing the card size) - I formatted the card and it stayed through reboots, so I installed 7.5.3.  Works great so far.

This solution also explains why the last partition on the other card worked, as there was extra space on the 16GB card after the 4th 2GB device partition.  It seems that it needed a few MB free on the card so that the OS didn't misinterpret the size.

I have a few more experiments and a little more research in mind, to clarify the rules, but I would like to say thanks, both for putting together this thread and for the responses that helped me to get mine working.

 
Top