• Updated 2023-07-12: Hello, Guest! Welcome back, and be sure to check out this follow-up post about our outage a week or so ago.

Apple /// restoration

pball52998

Well-known member
Hello!

Today while sitting in meetings at work I strolled across facebook marketplace when I saw "Apple Computer"

Thought to myself that's a Apple ///, this can't be real

313909146_5657409441008851_7394792126638046351_n.jpg


Contacted the person, offered $250, they said come get it.

I drive an hour an a half, pull up to a walmart, get my Apple /// and head back home. Angry Mac in passenger seat
Angry Mac in Car.jpg

I get home, lay everything out.

2x Apple Disk ///
1x Apple ///
1x Monitor ///
2x apple write /// floppies

Pics of floppys:

worst floppy.jpg1667972851994.png
floppy cleaning.jpg

This odd film/plastic modified is on both of them, worse on the one with the circle. It's physically burned into the Disk III sadly. But hey! It's character!

Tried hand washing, scraping, soap, purple power, about everything and the brown will not come down. The main dirt part next to the burn circle did though.

Insides are neat perfect shape, just very very dusty and in need of a good cleaning.

I would like any suggestions possible on that if I can, if not it's character!

On to the apple ///, it doesn't look to bad on the outside

I open it up to find this
disgusting inside.jpg

Is that a hornets nest on the side? Stuck into it? I can't see the board because there is so much dust? Bugs everywhere?

Pretty nasty

hornet nest?.jpg

Thankfully no hornets!

Looking closer at the board it's all dust.

board ew.jpg

Gotta get the board out and clean it.

Can't be that hard.

All screws out but one and the last one breaks in half and case lid comes off.. that's fine I guess, it was rusted.

Open the back
PXL_20221109_032211495.jpg

Not the best, not the worst. A bee and a extra treat, for me?

flintstones.jpg


Start taking the screws off the board and 2 look like this..
rust rust rust.jpg

The first one I get out just fine. This one though, I spent over an hour on.

I touched it and the whole screw fell apart.

I tried different screws, I tried different methods, wd40, pliers, everything.

I cleaned the screw down as much as I could.

Took a kitchen knife and made a slit for a flat head.

sawd off.jpg

Finally! Came off. Board off!


board off!.jpg
Have began to clean off some of the areas of specific dust. Love not being able to read anything then it becomes clear after cleaning off.
apple computer.jpg

The top of the case has rust. Where it covers the board, that has a vinager soak overnight.
soak.jpg

This is where I stop for the night, will update more as I continue.

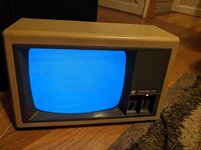
I will ask for some advice on the monitor, seems to usually come down to "clean it?" Need to do anything?

I thought it didn't work because it wasn't focused at first. Then I plugged in my c64 and it worked fine...c64.jpg


Spent an embarrassing amount of time looking at stuff for it.

Looks like I have a white phospher one which makes me very sad it's not green.

Now I have a amber, white but no green monitor. Damn.

Any tips for restoring the Apple /// Also appreciated.

Tips for cleaning this overly dirty board? Toothbrush and 91 IPA only seem to go _so_ far. I guess tooth picks work, but I'd use a whole box of a 1000.

Tips for actually cleaning the aluminum also or whatever the body it. It's so splotched and not so good looking...

Thanks!
 

Attachments

  • monitor.jpg
    monitor.jpg
    104 KB · Views: 11
Last edited:

pball52998

Well-known member
Meant to post the info! 256k version
info.jpg

Must've gotten a late one since "approximately there was only 120k made with the plus".

Guess I got one of the last batches. (If it really is by number produced and not some other scheme)
 

bibilit

Well-known member
Congrats, the pair of external drives are pretty rare, probably worth what you paid for the whole unit.
 

pball52998

Well-known member
Update on vinegar soak over night!

Before:

before rust.jpg

After ~8 hour soak:
PXL_20221109_120005090.MP.jpg

I have the bottom sheet that holds the logic board (Is that what we call the ///s motherboard..?) soaking in vinegar for rusty spots right now,

Removed bottom of machines oxidation with lemon and salt this morning. Came right off!

More the come this afternoon hopefully!


Power supply out (who put screws behind the power button? Really!?)

Looks really good!
Thank goodness it was locked away, no cap leakage that I can see

psu 1.jpgpsu2.jpg

psu3.jpg
 

Attachments

  • rust rust rust.jpg
    rust rust rust.jpg
    179.1 KB · Views: 11
Last edited:

LaPorta

Well-known member
For that frame corrosion, I’d suggest Evaporust. The stuff works incredibly, and is totally non-toxic. Submerge your part for 24 hr and the rust literally disintegrates. No manual labor.

This is one heck of a project: I’m anxious to see where this leads. All the best of luck: I’ve not seen this challenging of a restoration in a while.
 

pball52998

Well-known member
For that frame corrosion, I’d suggest Evaporust. The stuff works incredibly, and is totally non-toxic. Submerge your part for 24 hr and the rust literally disintegrates. No manual labor.
On the evaporust, you think take everything out of the chassis (leave bare metal as much as possible) and dunk the whole thing?

If so I'll go buy a jug and get to work!

Because it's the whole chassis that's not best of shape
 

LaPorta

Well-known member
I’d submerge it all. Evaporust isn’t cheap, but it is sold in gallons, and unless you completely exhaust it, it is completely reusable. After I de-rust something, I just place a funnel in the bottle, place some sort of filter paper, and just pour back in to strain out the rust particles. You can get a lot of use out of it.
 

pball52998

Well-known member
Remove those Rifa Caps asap.
Seems to only be 2 of them hopefully.. these 2? None on main board it seems unless I overlooked it

rifa1.jpgrifa 2.jpg

I've considered buying a new PSU entirely such as this one before even thinking about plugging it in..
Thoughts on this one?

Or buying a recap kit:

Leaning more towards the newer one rather than recap but will consider doing both for original sake (Keep original PSU, recap but replace with new if best idea)
 

joshc

Well-known member
Great find, and best of luck with the restoration! I really hope you can get it working.

I would opt for a new PSU over a recap of the old one personally.
 

bibilit

Well-known member
It's up to you, but most AII & AIII PSU are pretty reliable.

yes i only see two, already cracked by the way.
 

ScutBoy

Well-known member
I'd also recommend going with the ReactiveMicro Universal PSU. The /// has enough problems without having to factor in wonky power to the troubleshooting as well.
 

pball52998

Well-known member
After taking everything out and cleaning the chassis in a bucket of water it looks really good!
chassis clean.jpg


Really surprised how well it cleaned up considering what it looked like before.

Doesn't seem I need to de-rust it anymore? Opinions?

Working on the bottom part that holds the board, I've gotten some rust off/discoloration but trying different methods such as bar keepers friend, coke, vinegar. Trying different methods on each part of the board for a over night soak again.

Need to clean the top rust part again because I accidentally left it a little wet and it rusted a little over night, but flaked right off.

Getting ready to clean the logic board (do we call it logic board on these? Mainboard? motherboard? Sorry I'm still new..)

Any suggestions besides painstakingly cleaning everything with a tooth brush/qtips?

I plan to remove each chip, clean the area, reseat chip, move on. As anyone can imagine quite the lengthy process. Would love to hear any other ideas as I continue down this hole.

I plan to get the PSU ordered this weekend.

More to come!

Edit: forgot scrubadubdub photo
scrubadubdub.jpg
 

joshc

Well-known member
Any suggestions besides painstakingly cleaning everything with a tooth brush/qtips?

I plan to remove each chip, clean the area, reseat chip, move on. As anyone can imagine quite the lengthy process. Would love to hear any other ideas as I continue down this hole.
A soapy wash with a toothbrush followed by a very thorough rinse with isoproyol alcohol should do the trick. The key is making sure its rinsed well with isopropyl as it will displace the water.

Removing chips from the sockets before doing this is a good idea, and then allowing it to very thoroughly dry out before putting the chips back in.

Chips may have tainted/corroded/dirty legs - so those can be scraped with a scalpel knife to make them as clean as possible.
 

pball52998

Well-known member
Chips may have tainted/corroded/dirty legs
Lady luck did not play in my favor last night with this. Almost every ROM/PROM chip on the board looks less than desirable.. I found 341-0041 with a broken leg even before I pulled it up (photo after getting all the way up, wasn't socketed fully it seems..)

Seems it's PROM - CAS DRAM refresh control banks 0+3 and I think it was broken on R D Hires. (If wrong please let me know, learning as I go :))

I think there is a few options and I'll entertain anything else too.

1. See if chip works with leg still possibly in the socket?
2. Take the legs off of some of my legs over KM4164B-12 chips from my IBM 5150 and solder on in place of old pin
3. Use copper wire? I have 28g and can get 22 if more suited
4. Use a eprom somehow, don't have a eprom programmer, or no how to use one. But if needed I'll buy one and learn for this project

broke pin.jpg

This was at the beginning of cleaning so board looks better now, few touch ups needed but pretty happy from where it came from:
PXL_20221110_040233935.jpg

After row C I stopped removing apple III ROM/PROM chips and was just cleaning the pins with alchohol as much I could for fear of the same thing happening.
 
Last edited:

bibilit

Well-known member
I will have a try with WD40 on sockets to soak legs as far as possible and try to remove chips.

Take the legs off of some of my legs over KM4164B-12 chips from my IBM 5150 and solder on in place of old pin

I will do that in your place.
 

pball52998

Well-known member
Power supply ordered yesterday and will be in soon hopefully.

On to keyboard (least favorite thing to clean on every computer..) and floppies next.

Does the disk iii use the same belt as the disk ii? Main thing I found was "I used some random belt or bought a new one from console 5" https://console5.com/store/apple-di...ic-reinforced-rubber-spindle-belt-disk-2.html

Lightly wiped some of the dust off with my finger for the internal floppy and all the text started to come off with it.
Text came off.jpg
This was the internal floppy. I know it's only visual, just sad to see.

2 of the belts (external floppy) are still "okay" but don't know how long that'll last

I imagine it's easiest to follow a disk ii cleaning/fix guide, how much of that would be relevant?

Also still haven't figured out how to clean the floppy enclosures. The picture of it in the sink from post #1 is the cleanest I've gotten them.

Any suggestions there? Purple power, soap/water hasn't helped.

I might soak them more?

Thanks!
 

joshc

Well-known member
I might soak them more?
I've had good results by using Pink stuff and Vanish OxiAction (same as the products called OxyClean I think).

The brown is a stain in the plastic itself - reversing it can probably only be done with hydrogen peroxide (e.g. 'retrobrighting') but personally I would leave them as-is. The only other way I could think of is painting them...
 

pball52998

Well-known member
I've had good results by using Pink stuff and Vanish OxiAction (same as the products called OxyClean I think).

The brown is a stain in the plastic itself - reversing it can probably only be done with hydrogen peroxide (e.g. 'retrobrighting') but personally I would leave them as-is. The only other way I could think of is painting them...
That's what I thought, definitely not painting them though.

Probably leave them as is. Gotta love the character! Especially the burn mark lol

Was just wondering if anything else useful I could try
 
Top