• Hello MLAers! We've re-enabled auto-approval for accounts. If you are still waiting on account approval, please check this thread for more information.

3D-Printed Objects

20220428_183248_sm.jpg
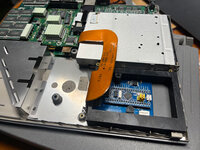
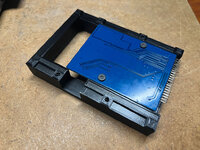
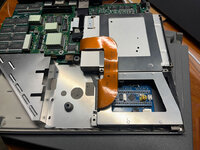
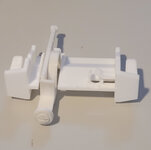
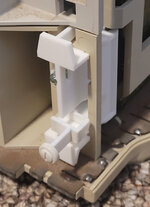
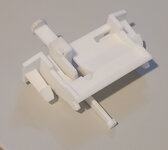
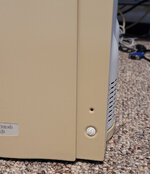
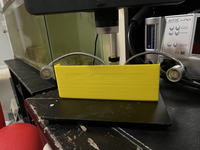
I finally finished working on the power actuator button thing for the Powermac 8500 and 9500! Been sitting on the mostly-finished model for a while now, but I recently found the gusto to polish it off. I've broken it into a few pieces to make printing a little bit easier, so in order to build it you're gonna need superglue (or some other strong adhesive). Here's a link with more details, or you can just download the STLs from this post.
 

Attachments

  • 20220428_183736.jpg
    20220428_183736.jpg
    196.4 KB · Views: 48
  • 20220428_184038.jpg
    20220428_184038.jpg
    402 KB · Views: 37
  • 20220428_183752.jpg
    20220428_183752.jpg
    187.7 KB · Views: 25
  • 922-1543 (Power Actuator for 8500 9500).zip
    922-1543 (Power Actuator for 8500 9500).zip
    505.1 KB · Views: 16
  • 20220428_183248.jpg
    20220428_183248.jpg
    404.8 KB · Views: 36
I have one for you guys I edited the CD-ROM drive bezel for a Quadra 900/950. This was commonly found online so I take no credit for it, I just edited it to fulfill my needs. for those that need or use the blank bezel, here are two different revisions I made.
 

Attachments

I decided to try the Color Classic stereo mod, but didn't have anything I'd want to cannibalise for a second speaker. So: I modelled one based off of the original in OpenSCAD.
IMG_6340.jpeg
This version matches the orientation of the original but has holes for self-tapping screws to hold the speaker in. Works pretty well but I might generate + print two shorter versions to better fit in the chassis. Wire holes can be on either side, too.
If anyone needs a different permutation, let me know; I went a little overboard with parameterisation. :)
 

Attachments

Hi Folks,

As part of a conversation with @JDW, I'm uploading a 'tabless' version of this speaker case. The reason being that, if you printed a tabbed version for the CC stereo mod, the tab crosses into the larger area of the original CC speaker and makes it hard to fit everything together. This attached version omits the tab and, as a consequence, works inside the CC in either orientation (albeit with some fudging of the placement of any velcro or other attachment mechanisms).

Screenshot 2022-08-22 at  Mon, 22 Aug 1.35 pm.png
If anyone needs a different permutation, do let me know.
 

Attachments

Is that the Q630 speaker's form factor? Makes sense for the design team to have used "outdated" tooling in storage and a bit of velcro.
 
@Jagmn I wonder if you could replicate the baffles & chamber design from some modern speakers and turn that simple shroud into a reasonable speaker. :) Anyone have an old BOSE speaker that can be hacked up?
 
68k CPU storage-frames
I can work on those. For one reason or another I kind of abandoned it due to one thing and another.

I have a 4x version, but it doesn't hold the things in the long term. It's more useful for holding them inside s snugly wrapped ESD bag.

I've thought about experimenting with some small tabs or something. Anyway.

I'm super jetlagged, so not today probably :P
 
@Jagmn I wonder if you could replicate the baffles & chamber design from some modern speakers and turn that simple shroud into a reasonable speaker. :)
I'm wondering if the print texture of the chamber improves the sound quality over that of the smooth injection molded OEM part? MongoSub aside, that's the best sounding internal speaker I recall. Is there a better one?

Anyone have an old BOSE speaker that can be hacked up?
Is there a modern speaker that might fit in the Q630 form factor's generous cubic? The amp on the 630/62xx or the beefier one for the 6400/6500 Sub is on the Video Out Board. Wondering if the circuit from there might be retrofitted to the CC stereo mod? Thinking a pair of those adjustable outputs might help balance the CC stereo mod?
 
Last edited:
I'd like to print some of those stackable single-CPU ones.
While you wait, here's the single version I was moderately okay with. The one I might've talked about with the cross piece to protect the pins also makes it difficult to extricate, so...no sort of pin protection, and I've thought of doing a ring around so you can push up on the flat die cover. Ugh, doing words is difficult atm.

Anyways, I'd actually be interested in your opinions with this one. It does need printing support (something I'm working on eliminating in the future version).
 

Attachments

@jessenator - I've now printed one. The CPU fits there quite snugly on the pins, kinda holds it in even when turned upside down. Perhaps down to printing precision too (mine was somewhat on the faster side).

As I had only one I couldn't test stacking, but it should work just fine (the posts here are not completely straight (again due to the faster print) so those might need trimming when stacking).
 

Attachments

  • 20220922_174407.jpg
    20220922_174407.jpg
    383.7 KB · Views: 19
  • 20220922_174340.jpg
    20220922_174340.jpg
    349.4 KB · Views: 28
(the posts here are not completely straight (again due to the faster print) so those might need trimming when stacking).
could work just fine :) I toned those down from the previous version, because they would just snap off, the tolerances were too fine. Gave a bit more wiggle room for that version.
 
Anyone knowledgeable enough to make a fan shroud for a MDD FW800 with a thin alluminum heatsink? Perferably one with that will work with 2 60mm fans attached behind the heatsink to help exhast the heat?
 
i am working on a couple PowerBook 180; one is missing the I/O door, so i made this.

this is quick & basic, i mostly made it to customize it (later). please remix and share.

also uploaded to printables and thingiverse.
 

Attachments

  • IMG_3451.jpg
    IMG_3451.jpg
    172.6 KB · Views: 26
  • IMG_3452.jpg
    IMG_3452.jpg
    163.1 KB · Views: 22
  • IMG_3453.jpg
    IMG_3453.jpg
    180.9 KB · Views: 24
  • PB180_ioDoor-stl.zip
    PB180_ioDoor-stl.zip
    7.8 KB · Views: 4
another PowerBook 180 piece, this is a Hard Drive shaped block to fill the space between a SCSI-SD adapter and the big empty inside the case. There is very little structure inside the 180: some parts are held in place simply by other parts. The hard drive has no sled, or even screws—just two pegs and a cage that holds the HD still until the case snaps around it. Using any alternative drive requires an adapter, so i made this block.

i got a BlueSCSI 2.5" for this project. I might do a ZuluSCSI version for the other 180.

also at printables and so on.
 

Attachments

  • case.jpg
    case.jpg
    183.3 KB · Views: 23
  • block.jpg
    block.jpg
    212.4 KB · Views: 21
  • cage.jpg
    cage.jpg
    173.3 KB · Views: 24
  • PB180_HD+BlueScsi-stl.zip
    PB180_HD+BlueScsi-stl.zip
    10.1 KB · Views: 3
Just just finished modeling a battery door cover for the PowerBook 1xx series. It is up on Thingiverse now.

PowerBook 1xx Battery Cover

i am working on a couple PowerBook 180; one is missing the I/O door, so i made this.

this is quick & basic, i mostly made it to customize it (later). please remix and share.

also uploaded to printables and thingiverse.

Thanks to both of you ! I made them in translucent plastic, because why not.

The IO door could use a bigger "notch" on my PowerBook so the door can stay closed while moving the PowerBook but I can probably fix that by myself.

Self note: don't try to sand the IO door, you will juste make it worse.

3D_print_1.jpg


3D_print_2.jpg


3D_print_3.jpg
 
Back
Top