• Hello MLAers! We've re-enabled auto-approval for accounts. If you are still waiting on account approval, please check this thread for more information.

Tips for desoldering corroded chips

I’m back with another SE/30 repair. I’m hoping that I’ll be able to resurrect this one, as I failed and had some outside help to fix up the last one that had some nasty cap goo trace damage.

This one’s a battery bombed unit, but it was fairly light. It seems it was luckily stored on its face or upside down as the majority of the battery acid rusted the chassis.

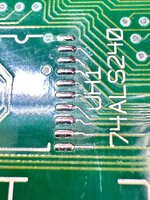
I stripped out all the caps, no lifted pads. I scrubbed it clean, removed the two diodes near the clock chip and the crystal, replaced them, placed new caps down. Also scrubbed the legs of UJ2, UJ3, and UJ4. Legs look intact, but the pads are suspect.

Currently, it’s giving simasimac pattern and death chimes after a short bit. As I understand that behavior, and as those chips are most suspect, this is down to an issue of RAM access.

So, I’ll be looking to lift those chips and clean the pads, check the legs much closer, and then hopefully that wraps up this project.

But I’ve not lifted a chip like this yet in my repairs. I can’t get solder to stick to them at all, so they’re clearly still corroded. I can just replace them, DigiKey has parts but I’d like to try and see if I can work with what’s here first.

I have a good iron and a hot air station to work with along with all the flux, solder and braid I’ll need to get this done. Just looking to solicit some advice on getting those chips off as safely as I can.

Thank you!

Bonus request: Can I soak the whole board in something to help clean up some minor corrosion on the RAM and ROM sockets? And some other spots. I’ve scrubbed where I can but it’s a bit unsightly. I’ll have a gallon of evapo rust tomorrow to work with.
 
I'm finding a cheap handheld engraving pen (or Dremel with pointy file attachment but it's a bit unwieldy) if used delicately is working well to remove corrosion from chips that don't take solder.

Others may not agree but I found those fibreglass pens are a waste of money and painful (literally) to remove the little spines from everywhere.

Bonus response: you can soak the board in vinegar or consider an ultrasonic cleaner to remove some minor corrosion.
 
this is down to an issue of RAM access.
As I recall, There’s a lot of ram slot traces on one of the internal layers of the PCB that run directly under the battery area, which may have been damaged even by a light leak, so might be a good idea to tone those out too.
 
I'm finding a cheap handheld engraving pen (or Dremel with pointy file attachment but it's a bit unwieldy) if used delicately is working well to remove corrosion from chips that don't take solder.

Others may not agree but I found those fibreglass pens are a waste of money and painful (literally) to remove the little spines from everywhere.

Bonus response: you can soak the board in vinegar or consider an ultrasonic cleaner to remove some minor corrosion.
Thanks! I’ll see about getting one of those. So, just scrape away until the solder starts to stick, reflow, then hot air and lift?
 
Currently, it’s giving simasimac pattern and death chimes after a short bit. As I understand that behavior, and as those chips are most suspect, this is down to an issue of RAM access.
yes, but also not always.

simasimac pattern is simply the video circuit displaying the initial values of the video memory ICs.
if no data is getting to them, that's what you'll see.

verify the traces of the Ux8 multiplexers. they're particularly vulnerable to corrosion from capacitor C7.
in particular, UD8 and UE8.

1763136452406.png
 
Thanks also for that advice! I will check those too, but I am less concerned with them given that there was minimal cap leakage there and the UJx and UIx chips are looking quite suspect.
 
So, when I get one of those I put it in an ultrasonic cleaner with the appropriate solution. It doesn't take long, but it wont get all the corrosion off the board. You don't want to leave the board in too long because other damage could happen. You can also use warm soapy water and a soft brush instead, Just rinse with tap water, then distilled water then IPA and blow then bake it dry. Soapy water has the added bonus of neutralizing any remaining leaked electrolyte still on the board.
Corrosion tends to get under pins and oxidizes the lead. Once that happens, you can't reflow the chip since oxidized lead won't melt and won't stick to fresh solder.
because of that, I often remove the corroded chips using plenty of flux and hot air, check the traces under and near them, do any repairs as necessary, then clean (or replace) and re-attach the chips.
Attached is a picture of the pads where I removed a corroded chip. I had to scrape the traces attached to the pads to test them. Here is after I re-tinned the pads and cleaned it up. You can see cracks right between the traces and pads. Those had to be addressed before I got the machine working again. The chip I removed looked similar to the condition of yours. In other words, not bad, until I removed it.
 

Attachments

  • IMG_5215 2.jpeg
    IMG_5215 2.jpeg
    2.6 MB · Views: 27
Thanks! I’ll give that procedure a shot this weekend.

I have already washed the board with warm water and soap with an IPA (not beer) rinse, scrubbing with a brush, etc. I was reading that evapo rust should be safe for the board in general so I’m going to give it an hour soak tonight and another clean.

I don’t have the space for an appropriately sized ultrasonic cleaner and I have yet to find someone locally that would let me use one too so that’s out of the question for now. I really need one, I used to have access to a large one and it was great.

I’ll post a before close up in a bit.
Evaporust works well on corroded iron or steel, but I haven't seen it work with the copper corrosion you often get on boards like this. I use it sometimes to clean frames for older all in one Macs, and also power supply cases, floppy drive parts, etc. The best way to deal with moderate to heavy copper corrosion is to remove the chip and scrape the pins clean with a fresh xacto blade. I've tried *many* different ways to do that, but manual scraping seems to work the best, though it's not really time efficient. For really light corrosion, you can try a fiberglass pen. Be prepared to itch for a while afterward.
 
Thanks! I’ll see about getting one of those. So, just scrape away until the solder starts to stick, reflow, then hot air and lift?

Practice on many others PCBs before going near the good stuff ... but you buzz off the corrosion on the metal without going overboard, then try to reflow with flux
 
Got it. I’ll do my best! And, I suppose, worst comes to worst I can always swap out the chips. I’ve already checked and can get them from DigiKey so if I ruin a chip it’s not the end of the world.
 
I am using the evapo rust on the frame. I bought too little to start and could only properly clean the floppy drive bracket but it did a wonderful job.

I don’t think it’ll do anything negative. I’ll report back.
 
Here's a close-up of UJ2 and UJ3, the two that appear to have the most corrosion from the battery leakage.


DSC03154.JPG

Seeing the photo in full, I think I can see some legs that look lifted already. They're unfortunately slightly out of focus but I can take another to get a better look at em.
 
DSC03158.JPG

Yup, definitely some lifted legs.

I've captured some photos of the corrosion areas, and I'll capture the same areas after an evapo rust bath to see how well it works. I wasn't able to get much definitive "before and after" evidence of how well it works for this sort of task, so maybe this will help people in the future who don't have an ultrasonic cleaner to get boards shaped up easily.
 
Ok, the board soak did a little but not a heck of a lot. I’ll probably skip it next time.

After cleaning, it was no longer doing death chimes. So, continuing on…

Lifting the chips was actually quite easy. My first time and it went wonderfully. Good to finally put my hot air station to use.

I cleaned underneath and cleaned the chips, legs, got rid of pretty much all the crusty junk and tacked them back down. There was one clearly bad pad, pin 14 (A4) on UJ3. Trace just loops back to pin 11 (A3), so I built a tidy wire bridge and checked to make sure it was good.

Unfortunately we’re just back to where we started; simisimac pattern and death chimes. At least the chimes are back, indicating it’s progressing in the right direction

I guess I’m starting to use this thread as general repair advice, but I’m now open to additional suggestions. I’m aware the best next steps are to beep out all the lines, but specific areas to check would be very welcome.
 
Here are three threads that will step you though SE/30 video repair:


Wow, that guide looks fantastic. I’ve got some upcoming travel, and this will be great to read through and do some learning.

Appreciate the resources! Let’s see if I can get this one going.
 
Thanks also for that advice! I will check those too, but I am less concerned with them given that there was minimal cap leakage there and the UJx and UIx chips are looking quite suspect.
It’s sometimes hidden underneath the chips, very hard to see, or the chips have already been damaged and need replacement. It’s not too uncommon for people to replace the whole row, those ICs are still made and they’re cheap.
 
Yep, I’ve got them set aside in DigiKey should I go replacement. However, as much as I’ve been trying to avoid it I’m going to need to check the lines first before I start swapping parts.
 
Back
Top