• Hello MLAers! We've re-enabled auto-approval for accounts. If you are still waiting on account approval, please check this thread for more information.

Novel method for restoring original coloration of Compact Mac cases

Hello gentlefrens,

I may have inadvertently discovered a method to restore original color (ie de-yellow) of compact Macs.

I have a modest but complete collection of compact Macs. As part of my inventory control, I had been placing Brother label printer labels directly onto the plastic below the screen. After about a month I realized that this would obfuscate solar radiation if any from impacting the surface and leave weird marks.

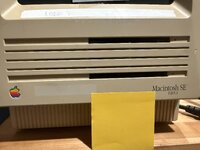
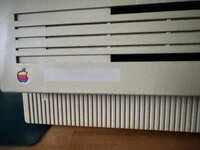
But my collection isn’t exposed to solar radiation and only rarely from artificial light. I didn’t want to have uneven coloration from further yellowing and so I moved the labels from the plastic to the glass screen. When I did this, i observed that the area beneath the removed label was indeed a different color, but it was either very close to, or the original platinum color. Pic attached shows the area from which the label was removed, exhibiting the platinum color beneath.

For further testing, I have applied a large segment of the Brother label printer tape to another yellowed area of the case as a treatment group in my experiment. If this works, I believe I have identified a method to de-yellow vintage Mac plastics without material degradation or weird splotchiness. I will leave the label on the treatment machine for a couple of months before removal and assessment.

I retrieved the MSDS for the labels themselves, but the adhesive component is a trade secret. The best I was able to ascertain was that the adhesive is alkyl based.

My hypothesis is that the adhesive off-gassing process is reversing the oxidation of the borine or chlorine fire retardant components of the plastic. Alternatively the adhesive is functioning as a mild bleaching agent. The surface of the plastic appears to be completely preserved with no reduction in surface texture.

For now, if this experiment is successful, covering the yellowed plastic with the label tape from Brother printers should provide an unparalleled restoration. If we were able to identify the exact compounds in the label’s adhesive, we may be able to formulate a product far superior to retrobrite.

I make no claims to this discovery and anyone else able to advance this research has my full permission to do so, including retail sales for profit.

God bless,

Matt
 

Attachments

  • IMG_1705.jpeg
    IMG_1705.jpeg
    1.7 MB · Views: 52
  • IMG_1703.jpeg
    IMG_1703.jpeg
    3.6 MB · Views: 50
  • IMG_1702.jpeg
    IMG_1702.jpeg
    3.1 MB · Views: 20
So you are saying to cover the entirety of the machine in post it notes and leave it like that for months then peel them off?

Lol
 
I personally like the yellowing to me its like petina on a bronze statue or that nice green oxidation copper gets. I found that acetone nail polish remover completely de yellows but it melts the plastic if you rub it. I accidently cleaned a big area on my IIe by letting nail polish remover simply sit on the plastic and not touching it. Perhaps a 5 minute bath in a tub of acetone for the plastic might clean it right up just dont rub it then dunk it in water afterwards.
 
So you are saying to cover the entirety of the machine in post it notes and leave it like that for months then peel them off?

Lol
Not post it’s. That is a separate experiment to test that adhesive. The Brother label printer labels definitely do this. But I don’t know the time interval so I’m running another experiment with the brother label, the big one under the crt. The upside to this method would be not bleaching out the lettering on the front. I’ve got a Drexel I want to clean up but don’t want to bleach the logo on front. This method allows for discrete control of the areas you wish to restore.
 
Perhaps a 5 minute bath in a tub of acetone for the plastic might clean it right up just dont rub it then dunk it in water afterwards.

I am fairly certain that it is a terrible idea to immerse most computer cases in a bath of acetone, which is an effective solvent for the ABS plastic that makes up the housings of many of the Macs that this forum discusses.

Apple 2 cases have a variety of plastics and (in some cases) finishes (cf.), so what works for one person's IIe might not work for someone else's.

Interestingly, the acrylic outer case that holds a G4 cube will probably be harmed by acetone in a different and more spectacular way than the fate that awaits an ABS case under the same brutal ministrations. The search term to use here is "solvent crazing".

Polycarbonate is another constituent of some case plastics and has its own way of degrading under acetone attack.

Don't do this.
 
I wasn't saying do it i said perhaps. I don't know where to get enough acetone but id test it myself if i could

edit: Id probably dip it in there and swirl it around, then put in water. and repeat see what happened if i did try it
 
I maintain that just about any exposure of a classic Mac case to acetone is a bad idea. The only exception I can think of is when you wish to use acetone to weld together two pieces of a broken housing. This is an effective repair technique (when used skillfully) because acetone melts ABS plastic.

A quick immersion in acetone probably won't cause much harm, in the same way that you might get away with holding your Mac case for a few seconds over a propane barbecue grill. That still doesn't make it a great idea and probably not something you want to do multiple times.

Do not use acetone to correct plastic case yellowing. No "perhaps" from me: just don't.
 
I immersed an ABS case of a 2.5” Rocstor USB/Firewire SATA external drive in acetone for about 30 seconds to dissolve the soft-touch coating that had become gummy. The result: I’m now shopping around for a replacement case - mine is now unsalvageable. I should have just covered it with contact paper.

Speaking of contact paper - if adhesive from removable contact de-yellows the Mac case, it would be a lot quicker to apply and remove than labels are. I’ll watch these experiments with interest.
Could you please clarify your last paragraph? I don’t quite understand what you mean.

Edit: never mind I understand now. I can source some contact paper and give that a shot as well. I am REALLY interested in sourcing just the alkyl based adhesive as I could cover the entire machine in it at once and then peel the yellow away.
 
Speaking of contact paper - if adhesive from removable contact de-yellows the Mac case, it would be a lot quicker to apply and remove than labels are.

It seems I inadvertently deleted a word.
Correction, with better wording:

“Speaking of contact paper - if adhesive from removable contact paper de-yellows the Mac case, it would be a lot quicker to apply and remove that in comparison with the Brother labels.”
 
Interesting find. I don’t know how practical this would be, but it might work for some.

I use high-powered reef lighting and all of my Mac’s in my collection are pristine brand new coloration. Works 100% of the time, even on the darkest yellowed cases.
 
Could you tell me a little bit more about your technique. Do you have a particular brand of reef lighting that you recommend?

I call the technique "light-blasting" (Copyright! ;)) Like sand-blasting but with high energy photons

My theory on why this works so well is that high-powered lighting can literally blast away the surface impurities, leaving you with pristine original plastic. But you need very high energy photons for this to work, and high "radiometric power" to do this efficiently. This is why reef lighting works so well. Reef lights generally emphasize short wavelength just above the UV range (400nm-450nm). The shorter the wavelength, the higher energy the photons. In other words, if all other aspects are the same, blue/violet light will emit much higher energy photons than yellow light, resulting in radiometric power will be order of magnitude greater.

It usually takes 24 hours to get a case from yellow/brown back to new condition. Sometimes 48 hours, if it’s stubborn. The big benefit is that I don’t have to fully disassemble computers, monitors, keyboards, because I don’t use any liquid. And unlike retrobrighting, I don’t have to wait for sunny weather.

The lights I use are hand-built LED fixtures I used for my coral farm back in the day, so that's probably not helpful. The setup consists of 16 Luxeon K16 LEDs (450nm), and a bunch of other LEDs (to provide full spectrum for the corals) mounted on 8 massive heat sinks, running at roughly 1,400 Watt at full power. Honestly, it would be very expensive to buy something similar off the shelf. And I would hate to recommend some expensive light and then people buy it and it wouldn't work. LOL. There were a bunch of old reef threads discussing DIY fixtures with the K16s. The K16 is probably still the most economical LED for 450nm photons per dollar.
 
Last edited:
I use the classic mix with hi o2 hair bleach developer in almost gel form. What I do is start with two parts 30% volume developer mix and tone it down with one part of distilled water - it makes it more fluid.
so I use one of those garden pressure pump spray bottles ( 10€ or so) to”spray paint” all parts under July or August sun. It never blotched anything as the blotches are due to uneven application.
 
I call the technique "light-blasting" (Copyright! ;)) Like sand-blasting but with high energy photons

My theory on why this works so well is that high-powered lighting can literally blast away the surface impurities, leaving you with pristine original plastic. But you need very high energy photons for this to work, and high "radiometric power" to do this efficiently. This is why reef lighting works so well. Reef lights generally emphasize short wavelength just above the UV range (400nm-450nm). The shorter the wavelength, the higher energy the photons. In other words, if all other aspects are the same, blue/violet light will emit much higher energy photons than yellow light, resulting in radiometric power will be order of magnitude greater.

The lights I use are hand-built LED fixtures I used for my coral farm back in the day, so that's probably not helpful. The setup consists of 16 Luxeon K16 LEDs (450nm), and a bunch of other LEDs (to provide full spectrum for the corals) mounted on 8 massive heat sinks, running at roughly 1,400 Watt at full power. Honestly, it would be very expensive to buy something similar off the shelf. And I would hate to recommend some expensive light and then people buy it and it wouldn't work. LOL. There were a bunch of old reef threads discussing DIY fixtures with the K16s. The K16 is probably still the most economical LED for 450nm photons per dollar.
Uhm while I do imagine this to be a very interesting technique, in Rome where I live the power in W per square meter from solar radiation approaches 995W in July, with an illumination again in July of almost 100.000 lux (basically 100k lumen per square meter!! ). that is a lot
the UV component of solar radiation accounts for 9% and that still gives out 9k lux of pure UV light. And I believe it’s what allows the process to work so well, at least for me….

Not trying to debate the merits of different techniques, I was just describing what I do. But Lux measurement only measures visible light, thus UV is completely excluded from the measurement. I.e. you can’t have “9k Lux of pure UV”. Furthermore, Lux measurement puts the highest emphasis on “the most visible wavelengths”, which also happen to be less energetic.

I’m sure if you put a Mac out in the sun (without peroxide), it would lighten up. But I would expect it to be a very slow process.
 
Back
Top