-
 Hello Guest! We're hosting a challenge to welcome vintage Intel macs to the MLA during the month of July! See this thread for more information.
 -
We've made some quality of life improvements to the Trading Post. More info here.
You are using an out of date browser. It may not display this or other websites correctly.
You should upgrade or use an alternative browser.
You should upgrade or use an alternative browser.
AppleColor RGB Monitor Repair
- Thread starter Sideburn
- Start date


Thanks for the link and wow that’s a lot of caps!
Keep in mind that the list was for the M1297 and the particular revision I had. There's also an M0401 (I think this was the earlier model) which looks nearly the same externally. And for M1297, I think there were two revisions. So I would use the list purely to give you an idea and as a cross reference to double check. If I have some time, I will crack it open to get the revision again, but it's not in a location I can easily get to right now so would take some effort.
Keep in mind that the list was for the M1297 and the particular revision I had. There's also an M0401 (I think this was the earlier model) which looks nearly the same externally. And for M1297, I think there were two revisions. So I would use the list purely to give you an idea and as a cross reference to double check. If I have some time, I will crack it open to get the revision again, but it's not in a location I can easily get to right now so would take some effort.
Yeah I saw your warning in that thread as well that you weren’t sure which monitor was because you were doing two of them. Mine is the M1297.

Ah, I’m not sure about this, anyone else?Would the caps causing the bad convergence be on the video color (b) board you think? Or more likely the deflections board (d) that has the most caps.

Definitely the cutoff adjustment as I had stated at the start of this thread. Adjust that and see how it looks. Set brightness on the knob up all the way, then turn down the cutoff adjustment until the diagonal lines disappear. After that, see how it looks, and look into a cap job.
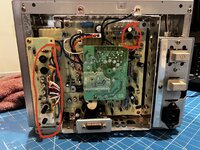
Ive got the casing off, Which Pot are you referring to as being the cutoff though?The retrace lines and the washed out image are the same issue and I would start by adjusting the ‘cutoff’ pot at the back of the display. It’s located above the other pots that you can access at the rear, but you have to have the casing off to get to it.
Set the contrast knob to maximum and set the brightness knob to the middle setting. Then, with the monitor on (but being careful not to accidentally touch any high voltage areas) turn down the cutoff until the black areas of the image are completely black. It may be easier to do this in a darkened room. You will find the retrace lines are gone at this point, too.
While you’re doing this I’d reduce the horizontal and vertical adjustments as the picture is too big. It shouldn’t go right up to the edges of the visible area, instead there should be a black border.
The convergence is a different issue and I suspect it’s probably caused by bad capacitors that are no longer operating in spec. It’s not an easy adjustment to do and personally I would recap the monitor before fiddling.
the manual mentions several:


It is likely one of those knobs on the H-board. Is there not a list on another page explaining which of those are which?
I’ve already got it a million times better by adjusting those. Now I just need to get the background to be black.

Attachments


Thanks for the help guys! Now I have a display I can use to fix these IICX boards from hell

Nice! Glad you got it much better without having to do more work
")
Could be before I cleaned it. Also it’s very hard to take a decent photo. I have to capture video and then find a frame that’s not out of sync with the camera.I'd definitely still say that there is something "fuzzy" going on. In some strange way, it almost looks like there is dust all over the screen.
Yeah an easy fix. For once.Nice! Glad you got it much better without having to do more work
Ive got the casing off, Which Pot are you referring to as being the cutoff though?
The very top one on the H board, is the one I meant.
How did you fix the convergence issue?
I'd definitely still say that there is something "fuzzy" going on. In some strange way, it almost looks like there is dust all over the screen.
I think the screen was dirty - op says they’ve cleaned it now.
Here are a couple of photos of my screen in case it’s helpful to compare the image. I don’t find it to be perfectly sharp either, but I think that’s just how it’s supposed to be? My SE/30 black and white display is much sharper but I think that’s because there’s no aperture grille.


My geometry is off in the lower left corner, I wonder if that’s a cap issue or if it could be solved by adjusting one of the magnets around the neck of the CRT.
My geometry is off in the lower left corner, I wonder if that’s a cap issue or if it could be solved by adjusting one of the magnets around the neck of the CRT.
Last edited:
That looks bowed in on the left side which should be adjustable via one of the geometry pots on the side of the monitor (inside the case).
My geometry issue was a curl only in like the top 16 pixels on the left and right upper corners which was clearly not geometry pot related and a recap fixed that.
My geometry issue was a curl only in like the top 16 pixels on the left and right upper corners which was clearly not geometry pot related and a recap fixed that.
Last edited:
I’ll check those pots out. I didn’t realise there were any on the side for geometry.That looks bowed in on the left side which should be adjustable via one of the geometry pots on the side of the monitor (inside the case).
My geometry issue was a curl only in like the top 16 pixels on the left and right upper corners which was clearly not the geometry pot related and a recap fixed that.
Similar threads
- Replies
- 0
- Views
- 222
- Replies
- 4
- Views
- 390
- Replies
- 4
- Views
- 689