• Updated 2023-07-12: Hello, Guest! Welcome back, and be sure to check out this follow-up post about our outage a week or so ago.

Retrobrite Fail :(

el_jeffe

Active member
I'm new to vintage computing and this is my first system. I thought I would try to de-yellow my beige Mac Plus. Before doing the case I tried the mouse and keyboard. All the keys looked good except for the spacebar. 

I got some vol 40 stuff from the beauty supply place. Didn’t have a good source of sunlight as I’m in an apartment and there are trees so I decided to do it inside with the treatment only and no light. It worked well on the beige plastics after about 18 hours but it didn’t seem to work on the mouse button or spacebar. 

So then I managed to find a space with some sunlight and I put them out and rotated after 30 min at which they were a bit lighter but not done. At an hour they were blotchy and platinum because I didn’t get the plastic wrap just right.

I scraped the mouse button lightly a bit with a hobby knife and the white stuff came off. Presumably the top layer of plastic. I’m thinking of trying some plastic polish that de-oxidizes. Worst case scenario I’ll see if I can find a keyboard or mouse that are in good shape or attempt to paint.

Thoughts? 


Themk

Well-known member
Please, use the default font and size, it makes reading posts so much easier.

I personally prefer to submerge the pieces in a H2O2 bath, with powdered oxygen cleaner added, I find that is the most fool-proof way of doing so, but you do need to stir it every once-and-awhile.

To remove some of the blotches, I have had good luck with distilled white vinegar, with 4-5% concentration of acedic acid. Do be careful, but it does help with the blotching.


unity

Well-known member
I dont get how with proven methods so well written, people still mess this up. Follow directions, its that simple. Don't have light? Get a proper UV lamp. And I really recommend doing just one part first to test things out and get some practice in, something that can be tossed is wrecked.


Johnnya101

Well-known member
It's really super hard to do the creme method if you haven't done it before...

I really wouldn't use this method more than once... I've tried many different ways using the creme and just about every one ends up the same way. Ruined. (Yes, followed directions... used uv lamp, etc.). Always comes out streaky or blotchy. My IIgs. Ruined. Classic II. Ruined. SE/30 (Luckily not ruined, still needs another go but has really light streaking. I can correct this). Streaky. Apple Color RGB. Streaky (Again, not fully whitened so can correct). The only things that came out okay was a mouse and keyboard...

What happens is that if there is too much oxygen the hydrogen peroxide creates a salt. That's why it's blotchy. I don't think there's anything to do...

Next time I'm going to submerge it in hydrogen peroxide. Never using creme again. Luckily a Mac Plus is very common. The Classic II case I ruined is too. Just... never try a 128k or anything like that unless you've got it all nailed down.

-This is my opinion, just sayin! Would hate for more people to try this without knowing about the oxygen and creating salt... I didn't know this till yesterday... I don't think any of the guides say this. They might say "brush thickly" once and never say why... THIS IS WHY! DONT LEARN THE HARD WAY!-

 
Last edited by a moderator:

Juror22

Well-known member
Themk, thanks for the de-blotching suggestion, I will have to try that on a mouse that came from one of my first attempts.


Schafeman

Well-known member
So, i've used the 'cream' method many times, and have had nothing but good luck.  Is it that you weren't using enough?  


Johnnya101

Well-known member
Probably was, however I'm not taking anymore risks. I always had a thick coat, but again, not gonna ruin anything else.


CharlieFrown

Well-known member
One must remember it's mandatory to clean your case thoroughly before applying peroxide cream, otherwise you'll get uneven tone. 

I kind of spoilt the case of Atari ST while retrobrighting it with a shrinkwrap on in order to prevent the cream from drying out.Different angles of sunlight rendered some patches. Luckily managed to get in balanced by putting cream on darker elements only and using UV lamp, as there was no enough sunlight at the time.


el_jeffe

Active member
My apologies on the font, I copied from a notepad and didn't realize it was different. I still don't quite understand what I did wrong, I pretty much did what 8-bit guy did here: https://www.youtube.com/watch?v=wLp6bzG9exk  Mine were only in the sun for an hour rotated at 30 min. I didn't expect it to happen so quickly. I had put a good coat of the vol40 stuff that he uses on and the application looked even. I just didn't smooth over the plastic wrap as much as much as I could have. What is an average time typically needed to be under the sun or UV?

Also thanks to everyone that's responded so far I appreciate the advice.


el_jeffe

Active member
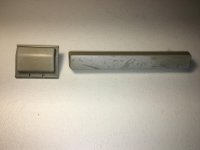
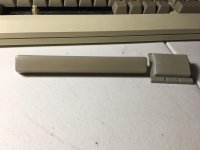
Don't mean to beat a dead horse but since I thought I ruined it I decided to try a headlight restorer since they sand down and remove oxidation. I only did light sanding but it's almost back to normal now and smooth. I need to go over it a couple of more times to fully get rid of the bleached area. Kind of hard to tell in my poor lighting.

Before

IMG_1017.JPG

After

IMG_1029.JPG


Corey986

Active member
1000 grit wet sand paper is faster, then use the plastic polish for a final buff.

Btw. On many heavily "used" keyboards the space bar naturally gets buffed in one spot, you can usually see it in bright lights like a museum uses to accent an artifact. Sometimes wet sanding is the only way to make it look even by to buffing the whole thing. If it winds up too shiny then you can simply use 2000 grit wet sand paper to make it not reflect by being careful in the pattern you sand. Another option is to use a spray matte finish clear.

Cheers,

Corey

 
Top