• Updated 2023-07-12: Hello, Guest! Welcome back, and be sure to check out this follow-up post about our outage a week or so ago.

Need soldering help, likely damaged board :(

I need some help from someone with more soldering experience than me. I am trying to repair a Macintosh SE/30 board that was given to me in good condition (they replaced the internal battery sometime in the 90s, but the caps were leaking pretty bad). Anyway the desoldering process went pretty well except for the radial caps in C2 and C11 which were a nightmare to get out! I think it was due to the ground plane absorbing almost all the heat my soldering iron could put out, but eventually they slid out leaving solder in the hole.

After that I was replacing the SMD caps tediously but things were going well until I got to C2. I managed to get enough solder hot enough to get one end of the cap in the hole, but the other end (connected to the ground plane) would just not melt. Things I tried:

* Adding fresh solder to both sides (I’m using lead-free btw) so its almost mounding, and then heating it while pressing one leg of the cap into the hole. No luck,.

* WIping a desoldering wick across the fresh solder. This actually worked pretty well at first but it didn’t remove the solder deep in the hole.

* Getting frustrated and turning the heat up higher and higher while wiping with the wick, which ended up scratching some of the board :(

* Using a solder sucker to try to suck out the solder, which really did nothing (see above about how difficult it was to even get the solder to flow!)

* Holding the iron against the  backside for a long time in an attempt to heat the entire ground plane, which ended up scorching the board!

I think the biggest problem here is that I ran out of patience. Due to COVID I wasn’t able to get help from my experienced friends and just kept pushing. 

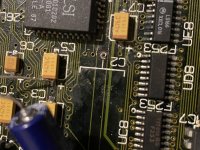
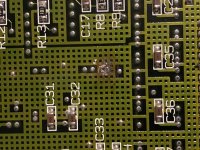
Anyway here’s some pictures of the damage for C2:
C2-top.jpg

The top doesn’t look so bad although you can see I scratched the trace next to it (argh).

And the bottom:
C2-bottom.jpg

Oh my god it looks so much worse zoomed in like this :( :( :(  

My questions:

* How screwed am I? Have I irreversably damaged the board?

* I’m using a Weller WES51 (https://www.amazon.com/gp/product/B000BRC2XU), is it possible it just can’t put out enough heat?

* How can I get the solder flowing so the leg can be put in? What temperature should I be using?


AlpineRaven

Well-known member
Do you have soldering flux? And clean it up with IPA, That'll help.

It might be ok/not damaged - flux will help to clean it up, and maybe a small drill bit to hand drill it out.

Cheers

AP

 
Do you have soldering flux? 

I’ve got a flux pen (https://www.sparkfun.com/products/16257) that I’ve been using before soldering. I didn't attempt to clean up the mess with it yet though, so I’ll try that.

Should I be using flux paste?

maybe a small drill bit to hand drill it out.
I didn’t think of using a hand drill to get through that inner layer, although given how badly the desoldering went I’m a bit hesitant to try it :(


Juror22

Well-known member
It doesn't look so bad (you just need to clean up the holes from the pictures that you posted), so  I would

a) clean it up a bit with some alcohol, using a Q-tip or similar appliance (don't get heat near the alcohol, you don't want to catch it or yourself on fire)

b) get a pair of locking pliers and a needle that has the same diameter (close is fine) as the lead on the capacitor

c) put the needle into the hole, while holding it with the locking pliers, then heat the needle close to, but not touching the pad/hole and pushing slightly, so that it melts the old solder and pushes it out of the hole.

d) clean it again with alcohol, using a Q-tip or similar appliance (see previous fire warning)

e) (my personal take - get rid of that crappy lead free solder, use some nice 85/14/1 with flux) and an appropriate (not high) heat.  Test by applying the solder to the tip of the soldering tool, if it melts quickly without scorching, you are ready to rock-n-roll

f) insert the capacitor (correctly oriented) into the newly clean holes, heat the wire attached to the capacitor near the holes and apply new solder, allowing it to wick onto the pad/hole/wire assembly.

Do not use a hand drill, unless you have done that before and KNOW what you are doing.

You can substitute IPA for alcohol if you got it.

 
Last edited by a moderator:
Thanks, that makes me feel better. Using a needle is a really good idea!

Question though - how can I effectively heat the needle with the soldering iron tip? Should I try to use solder between the tip and the needle (I’m guessing if its steel it won’t stick)?


Juror22

Well-known member
The needle is relatively thin and will pick up (and loose) heat pretty quickly.  You won't need solder to increase the heat conduction and it should work fine just placing the soldering iron tip in contact with the needle (that's why you need to hold the needle with locking pliers).


Byrd

Well-known member
My experience with the "needle" method to create a hole in contaminated solder is that you need to heat the opposite side of the PCB where you're firmly pushing the needle through, and be prepared to quickly pull it out otherwise it too will be lodged in there.  Hopefully this will leave a hole; clamp down the PCB vertically to do this.

I'm finding though this doesn't happen much for me these days, it's all very dependant on a good hot soldering tip and using flux, new solder before removing capacitors fully to make a clean removal process.

 
It worked! I was able to force the needle through and then seat the capacitor! I've soldered it in place and tested for connectivity, and so far it looks OK (the real hope is I didn't accidentally bridge any other connections). 

Thanks for the help everyone! I'll continue soldering (when I have time) and hope the thing boots :)


aeberbach

Well-known member
I just did this - literally the worst pad on the whole board, the ground plane soaks up all the heat. I have a good iron that has something like 80W behind it but I could not clear this hole either - no matter how much flux, fresh 60/40 solder, suction and wick I could not get the last bit of solder in the middle of the hole. Both sides of the board had solder removed so just a thin film of solder remained in the middle, I would guess in line with that heat-sinking ground plane.

In the end I pulled out the 0.6mm drill bit and cleared it by hand with a pin vise. I didn't like doing it but last resort, and the cutting was centred to stay confined to the remaining solder by the meniscus made by the solder.

 
Last edited by a moderator:
Ugh, I might have to do that. Tonight I finished soldering all the surface-mount components just fine but ran into the same problem with C11 (the other axial capacitor connected to the ground plane). I tried the needle method again and this time the needle snapped off inside the hole while heating!

I had my iron set around 600 F and was holding it pressed against the needle for almost a minute, and I barely made any progress (just a tiny hole into the solder). I wonder if my iron is just underpowered?


aeberbach

Well-known member
I did have that Weller iron, but when I switched to a Hakko 942 (now discontinued - FX-951 is a near current equivalent) it was night and day. The Weller is OK for many things but I think when you get into boards like this the better iron helps.

(but as I said, my iron couldn't melt that bit of solder either...)

 
Last edited by a moderator:

max1zzz

Well-known member
The TS100 is a good choice for a upgrade from a ordinary iron if you don't want to pay for something like a FX-951 (It has a integrated tip+element like the 951)

I love my FX-951, but at more than £200 for the station then £15ish for the tips I tend to only use it where it is really required (generally just modern logicboards) and use my TS100 or old style Antex iron for anything else


erichelgeson

Well-known member
Just wanted to say I had the exact same situation happen and tried everything in this thread too. What worked for me was getting a better solder iron where I could set my temp and used a cat5 wire to soak up the solder from the hole. Then some UV solder mask to cover up the trace I accidentally exposed during my numerous other attempts. Best advice is to walk away if you get frustrated :)

 
Update: I finally had success by switching the solder tip from a blunt chisel to a pointed tip. I held the tip perpendicular to the board and pushed it into the hole on the bottom side and had my solder sucker ready on the other. At first it seemed pointless because the tip was obviously not going to get hot enough to melt the solder, but after turning my iron to around 700F it suddenly melted and pushed through all that old solder. This is the first time I was actually able to get the solder sucker to work!

Thanks for everyone’s help! Now I just need to test all the connections, then clean it up and put it all back together to see if I’ve got sound!


joshc

Well-known member
Same thing happened to me, I bought a desoldering station which just sucks all solder from the hole effortlessly. All other methods failed for me. Glad you got yours sorted using the needle trick. 


Trash80toHP_Mini

NIGHT STALKER
Glad you got it all worked out as it were!

@joshc know of any good youboobtube vids on using a vacuum desoldering station/gun? Mine's a knockoff, couldn't afford the real deal, but I'd bet they're made to a far higher standard in the same place anyway. ::)


aeberbach

Well-known member
My number one tip is to keep the suction going until a second or two after you have moved the nozzle away from the desoldering site. If you stop the suction and let the solder harden before it is all the way into the glass tube you are in for a long and painful cleaning process. Mine is also a knockoff (name of ZD-917) and probably has the same flimsy cleaning rods as yours but they say they are almost as good as the genuine Hakko vacuum units. Dave at eevblog loved it.

 
Top