• Updated 2023-07-12: Hello, Guest! Welcome back, and be sure to check out this follow-up post about our outage a week or so ago.

My new SE/30

aeberbach

Well-known member
Hi everyone - first post.

I have looked on eBay for the SE/30 for ages but never before been quick enough or not been outbid. Well I finally got one. It's not perfect but I think it's. good buy!

First, the box. Shipping was from Western Australia to me in Victoria, it travelled about 3500km in just four days which has to be some kind of record. When I opened the box I felt pretty lucky that the side of the Mac hasn't been caved in by something placed on top, just a layer of bubbles and three thin layers of cardboard protected it.


Did it work? Works great!


Next, what's happening inside? Oh, someone has been here before... at least the battery isn't going to explode, though it was rattling around loose in there.


Someone who only had radial electrolytics in stock! And didn't know about cleaning flux.


Cleaning and removing them was a big job, lots of flux, lots of alcohol, lots of desoldering pump and wick. Those holes for the big radial caps are so hard to clear. C9 has me worried - when I was cleaning solder off I felt something move and I thought the pad had lifted, but it was just a piece of the old surface mount capacitor leg that someone hadn't bothered to remove.


Everything cleaned up nicely. The only lasting damage seems to be some corrosion near C12, solder mask has lifted but the copper trace is intact. Do you think I should scrape oxidisation off and tin that piece of exposed copper?


I'm waiting on new surface mount caps so for now I can't test anything but it came up very nicely after a clean with detergent and a rinse with some isopropyl alcohol, then a hot air dry. 

There is a wire connecting pin 3 of 341-0665-A to a via. It looks like a factory fix because of the neat Lynar wire used and the way it is glued down. Do most SE/30s have this?

And finally... it has this neat Radius video card! Anyone know what this is? I suspect it is a color card that will drive my Blueberry 12" Studio Display?


There's a lot of work do do on this Mac. I expect to replace caps on the video and power supply as well as the picture is a little jittery and it doesn't appear that those components were touched by the previous owner. 

Any disadvantage to staying with a pair of alkaline batteries for PRAM?

(sorry the images don't link to their full size images, imgur album below)

Imgur album

 
Last edited by a moderator:

cheesestraws

Well-known member
Any disadvantage to staying with a pair of alkaline batteries for PRAM?
Depending on what you're doing with it, you may be able to get away with not having a PRAM battery in at all (e.g. if you don't mind having the default boot device and network interface and you can set the time via the network or you don't mind too much about the time).  I know a number of people do that.


Daniël

Well-known member
The bodge fix is factory done, I believe. It's far too neat for whoever did that cap job, anyways.

As for the trace, yes, scrape the oxidized section clean to copper, tin it, and preferably coat it with UV solder mask or conformal coating for the best protection. A tip for tinning is to use a piece of spent solder braid, and some flux applied to the trace, to apply a nice, even coating of solder. That's a trick I learned from Bruce from the Branchus Creations channel on YouTube.

 
Last edited by a moderator:

ben68

Well-known member
If you’re going to use a battery why not wire it to the outside and keep it external. I wouldn’t risk it inside 


PotatoFi

Well-known member
Congrats on getting an SE/30! Seeing alkaline batteries in there makes me cringe, a bit. I've seen far too many Alkaline batteries leak inside Game Boy consoles to trust them.

If it were me, I think I'd remove those, get a proper 1/2 AA PRAM battery holder, and solder it in. Whether you actually want to install a battery is completely up to you. I have yet to hear of a modern PRAM battery blowing up, and if I plan to store a Mac for more than a few months, I pop the battery out. I question whether modern 1/2 AA batteries even have the right chemistry type to blow up, but that is probably best discussed in a separate thread.

Side note: A PRAM battery eliminator application for these old Macs would be pretty cool... read the PRAM values, write them to a file on shutdown. Read them again on boot. Time would drift, but whatever.

 
Last edited by a moderator:

LaPorta

Well-known member
For the trace by C12, as suggested, clean it. I use liquid electrical tape. Electric proof, and comes in green so it blends in with the board.


CC_333

Well-known member
Congrats on getting an SE/30! Seeing alkaline batteries in there makes me cringe, a bit. I've seen far too many Alkaline batteries leak inside Game Boy consoles to trust them.
Agreed.  I just found that not one, but two bedside clocks had their backup batteries leak.  I'm not sure if either of them work, but I think I caught the corrosion in time before it caused any major problems.

And in the past, I had an Apple keyboard almost ruined by leaking batteries (I managed to get them out as they were stuck, and replaced the controller board which, unsurprisingly, was pretty much destroyed).

All the batteries in question which leaked (except one, a Rayovac) happen to be Duracell, incidentally.

c

 
Last edited by a moderator:

Crutch

Well-known member
Side note: A PRAM battery eliminator application for these old Macs would be pretty cool... read the PRAM values, write them to a file on shutdown. Read them again on boot. Time would drift, but whatever.
You mean like this? :)  https://macgui.com/downloads/?file_id=23225&keywords=auto restore

(note - one thing it won’t restore is 32-bit addressing in case you have extra RAM in your SE/30 ... the addressing mode is locked in before this extension can load)


aeberbach

Well-known member
Progress...

I took the keyboard apart and found an interesting hack. The '*' key's stem was broken off, the keycap sitting in the broken switch with cleverly bent pins glued to the keycap keeping it there, a spring making the key feel like it worked but of course it did not! I did not have a spare salmon Alps switch but I did have a spare white one so easily fixed.

I designed and printed a plastic mount for the 5G SCSI HD I had in a drawer. The original drive works, the big drive will be faster. I am not sure if what came with the machine is original or not but the two mounting holes do not line up properly with the holes in the HD at all. The steel has a different look to it than all the other steel parts inside. A number stamped on the bottom is "805-5066-08". Right number, but ugly.

Also 3D printed a programmer's switch. They are not that expensive but shipping anything from USA to Australia right now, unless it is by expensive courier, takes about 10 weeks.

Then the Mouser order arrived and I replaced every electrolytic cap on the logic board, analog board and in the Astec power supply. Mac is happy, clean and the CRT display is rock solid.

Next I went to plug in my monitor to see just what the Radius card can do on a 21" CRT with my new HD15-15 adapter... and found that I bought the wrong adapter. I got HD15M to 15F, not HF15F to 15M. So if I ever need to plug an old Mac monitor into an old PC I'm sorted, but now I have to wait for my new, new HD15-15 adapter.


aeberbach

Well-known member
Floppy: every floppy I try to initialise in the SE/30 fails. Formatting proceeds normally until it's time to verify, then there is a message "Re-verifying" before I get the failure message. 

Capacitors? I have yet to replace those.

The entire drive has had a clean and re-lube according to JDW's video. I needed to replace the small brown gear in the gearbox, before than eject was not working correctly but it has never initialised a floppy successfully for me. Everything is moving smoothly now.


CC_333

Well-known member
There's a little spring that pulls the two halves of the head assembly together (kind of like a "pincer"), and I've found that on drives that do as you describe, that spring has lost some of its tension, either due to age, or maybe by being overstretched somehow.

There are little cams or steps on each spring mount that allow for some adjustment, and when I move the spring a step or two higher on each, the drive starts working like normal, presumably because the heads now have better contact with the disk.

c


jimjimx

Well-known member
My opinion on the battery....

Use the standard 6.3 volt lithium. 

Depending on where you get them, they’re relatively cheap, they last 12- 15 years, and they don’t “explode” until long after they have reached they’re useable limit. 

I personally like using them knowing that I don’t have to deal with it for a long time. 


aeberbach

Well-known member
More strangeness... front brightness knob does nothing.

Focus turned all the way clockwise makes a more or less normal focused picture. Anti-clockwise becomes unfocused but also increases brightness

Cut-off has very little effect and can not be increased to show raster lines (unless Focus is also 100% anti-clockwise)

Width and Height controls on the analog board work as expected.

All caps are replaced (JDW's Mouser cart, thanks again!). I have desoldered a lot of passives such as all the potentiometers, any resistors that seem related to the front brightness control. Checked carefully for dry joints and resoldered some. Everything seems OK. Is this symptomatic of some major component such as flyback or TDA1170 having issues?


CC_333

Well-known member
Hmm, that's weird.

I don't know much about this, but I think I've read in passing (while attempting to solve other problems) that symptoms like this can be indicative of either failed resistors or diodes somewhere in the affected circuit.

I guess you could check for burnt R's and D's and replace any that you find?  It could be as simple as a broken solder joint too, so check any connections for continuity while your at it.
 

c


aeberbach

Well-known member
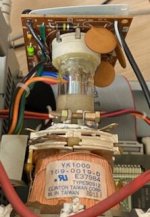
@CC_333 Thanks - I did spend a couple more hours removing and testing everything, tracing through the schematic as I went. Then I noticed the yoke connection seemed a bit wobbly as I went to reconnect the board hoping that reflowing solder might have had some effect since I found no bad parts. I noticed

small-hot-glue-yoke.jpeg

Someone has hot-glued the socket onto the tube!

small_cracks.jpeg

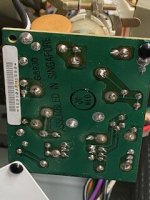
And behind the insulating label I find this - note the big crack in the solder above the printed 'M' - the pad above 'I' was loose from the fibreglass but still electrically connected. I repaired these and now I have all the brightness I could want. But the front brightness knob still does nothing. I think there may be some reason the socket is hot-glued to the tube and it isn't going to be easy to find out what. Maybe if I gently hot-air it I can get the socket off without cracking the tube?

As for the floppy drive, head tension seems OK. Heads will still come together with no air gap when removed from the drive. I don't see how the spring could be moved to an alternate position for more tension either? Also I replaced the caps and no change. Tried another cable - a Segger J-Link has the same 20-pin cable as a Macintosh floppy - and still no good. 


joshc

Well-known member
I think there may be some reason the socket is hot-glued to the tube
I do this with my Macs - it prevents it coming loose when you transit the Mac, the video board socket doesn't hold onto the CRT's neck too well on its own from my experience.

Have you checked continuity from the brightness knob on the analog board?

 
Top