jmacz
Well-known member
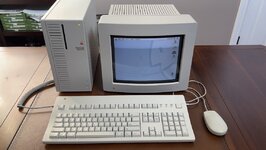
Over the past few weeks, I have gotten a lot of value out of this forum, just looking at the archive of helpful information. I decided to return the favor by documenting some of the work I have done to my Quadra 700 recently.
Here she is:
Exterior Cosmetics
Upgrades to Memory
ATX Power Supply Conversion
SuperDrive Floppy Rebuild
PRAM Battery
SCSI Drive
AppleTalk/PhoneNet Connector
Ok, some additional pictures. I wish I had more but I wasn't thinking of documenting when I got started so I apologize.
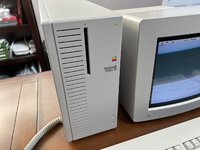
The above is a close up of the Quadra case. The upper left corner in the picture was cracked and a chunk was missing. The rebuilt corner looks ok Also you can see that the Macintosh Quadra 700 is a waterslide decal. But not bad from a grossly yellowed case with cracks and missing chunks. Same with the monitor front bezel.
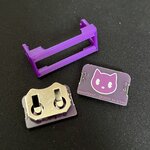
The above is the meowToast adaptor for the PRAM battery.
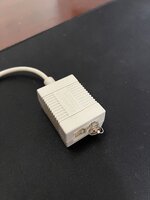
The above is the custom termination plug for the PhoneNet adapter.
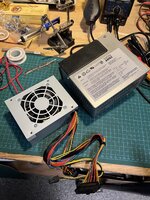
Original Astec power supply next to the donor Logisys PSU.
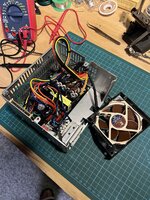
Wired up with the Noctua fan and sitting inside the old Astec casing.
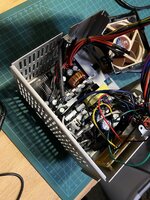
Another view. On the right side lower corner is a small board with the soft power transistor work.
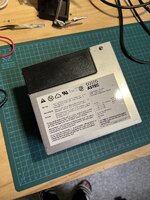
Reassembled. Can't tell from the outside that it was modified.
Here she is:

Exterior Cosmetics
- The Quadra 700 casing had some cracks / chunks missing from it when I purchased it. I unfortunately do not have the before picture but it was awful and the case was also very yellowed from aging. Likewise, the AppleColor High Resolution RGB Monitor (M0401) also had a crack on the front bezel and pits on some of the edges.
- Fix: I took JB PlasticWeld and filled in the cracks. I also used it to remold the chunks that were missing in the Quadra 700 case. You let it harden a bit until it gets tacky and then quickly mold it into shape and let it cure. After it was completely cured (over 24 hours), I used various files to sand it back into shape so that it fit in with the surrounding parts of the case. As you can see above, you can't see where the cracks and missing chunks were.
- Paint: Sorry to the purists... with the case work done, there was no way I could use retrobrite methods to remove the yellowing since there was plastic weld work done. So I had to go for paint. In particular, I used Rustoleum Satin Stone Gray spray paint. The satin mirrors the shine from the original plastic. The stone gray is off a bit from the original color - it's both slightly cooler in color temperature as well as slightly darker. You can compare it in the picture above with the Apple Extended Keyboard II which is the original non-yellowed color. But it was close enough and I didn't want to try to source custom spray paint matching the Pantone color that is floating around the Internet for what Apple used. It was good enough for me and looks great. Note that I fully disassembled both the Quadra 700 and the monitor before painting. And I let the paint cure for 5 days.
- What about the Apple logos? I used liquid mask. You brush it onto the Apple logo, the LED lights, and it dries as a mask you can later peel off. After spray painting, I peeled off the mask.
- What about the Macintosh Quadra 700 logo? Yeah, nothing I could do about this one. The spray paint obviously covered up the original silk screened model name. I had measured ahead of time the size of the logo and the position of it. Then to replace it, I used a water transfer decal. I purchased Koala Waterslide Decal Paper from Amazon. There are versions of this for both laser and inkjet. I used laser. I then sprayed some clear coat paint on top of it to preserve the decal. Then it was just transferring the decal to the case. For the font, I found Adobe Garamond Condensed online. It was still not condensed enough so I scaled the width down a bit before printing.
- Disassembly and Maintenance Doc for the Monitor: Repair Manual
Upgrades to Memory
- Found a vendor selling 30 pin 16MB SIMMs on eBay and so purchased four of them to upgrade the Quadra 700 from 20 MB (when I bought it) to 68 MB. It was pretty cheap. Of course I have 4 x 4MB sitting around now but oh well.
ATX Power Supply Conversion
- My Quadra 700 had an Astec power supply in it. It made some funky noises from time to time so I decided to replace it with an ATX conversion. The trick here was to find a PSU with the appropriate current on the -12V line as well as small enough to fit inside the existing metal PSU enclosure.
- Donor PSU: I purchased the Logisys Micro ATX 350W Power Supply from Amazon. It was small and fit all the specs.
- Wiring it up was pretty straightforward using the information found on this forum (links below).
- I reused the power port from the original Astec, so had to rewire that but it was easy.
- The only thing I could not get working unfortunately was the additional power port on the Astec (for connecting a monitor's power, etc). There was soft power circuitry on that power port so that it only delivers power when the CPU is on but I didn't bother figuring out how it works or how to wire it. I also don't think I had room to fit it inside the case. So I punted. That second port is wired up but it delivers power all the time which is not correct.
- New Fan: I also took the time to replace the fan with a Noctua NF-A8 80mm Fan. Note that mine came with 4 pins while the PSUs is expecting the normal 2 pins. I used the yellow/black wires and attached it to the original fan plug/wire that came with the Logisys PSU.
- For the soft power, I followed the documentation in the links below. I used a 2N2222 NPN transistor.
- Links: Eric Bylenga's ATX Conversion and Demi's ATX Conversion.
SuperDrive Floppy Rebuild
- My Quadra 700 came with a Sony MP-F75W-11G floppy drive. It wasn't working.
- I disassembled and completely cleaned and re-greased all the parts. But the drive had the usual issue where the one yellow eject gear completely disintegrated. After replacing it, the drive is working great.
- Replaced Eject Gear: I got replacement gears off of eBay which worked fine.
- Links: Adrian's Floppy Rebuild Video
PRAM Battery
- Luckily the Quadra 700 I got didn't have an issue with the PRAM battery. But I wanted to replace it.
- Picked up a meowToast CR2032 to 1/2 AA adapter which allows you to use common 2032 batteries instead.
- Links: meowToast
SCSI Drive
- My Quadra 700 came with a working Quantum 240MB (?) internal drive. But it also was making some strange noises so I decided to replace it with a flash card solution. I went with the ZuluSCSI 1.1 and a 32GB SD card. I've got 3 "drives" now, all are 2GB in size, all from this one SD card.
- I also added a 2 pin header to the ZuluSCSI to allow for the drive light and put together a quick LED for it (goes into the original drive light in the case).
- Links: ZuluSCSI and purchased it here Rabbit Hole Computing
AppleTalk/PhoneNet Connector
- I wanted to connect the Quadra 700 with another Mac I have via AppleTalk. I found a used Farallon PhoneNet connector on eBay. Problem is that it didn't come with the necessary termination plug. You can build them. Just requires you to get a 120 ohm 1/4 watt resistor. You get a RJ11 connector plug and bridge the 1st and 4th pins using the resistor. Simple.
Ok, some additional pictures. I wish I had more but I wasn't thinking of documenting when I got started so I apologize.

The above is a close up of the Quadra case. The upper left corner in the picture was cracked and a chunk was missing. The rebuilt corner looks ok

The above is the meowToast adaptor for the PRAM battery.

The above is the custom termination plug for the PhoneNet adapter.

Original Astec power supply next to the donor Logisys PSU.

Wired up with the Noctua fan and sitting inside the old Astec casing.

Another view. On the right side lower corner is a small board with the soft power transistor work.

Reassembled. Can't tell from the outside that it was modified.

