David Cook
Well-known member
As shipped, the Macintosh II is deceptively on the challenging side of the Macintosh technology curve: It...
1. Had multiple ROM revisions but doesn't include a ROM SIMM slot (like the IIx) to swap in a modern replacement
2. Didn't support 1440K drives
3. Didn't recognize memory SIMMs bigger than 1MB unless the SIMMs included compensating circuitry (such as a GAL)
4. Didn't support 32-bit mode (none of the ROM revisions are 32-bit clean). Software can compensate for this.
5. Didn't include a proper MMU (memory management unit)
The easiest path is to just install eight 1 MB SIMMs and be happy with 8 MB total. If you want more, you'll need to install both a Motorola 68851 MMU and special SIMMs. If you want 32MB or 128MB, you'll also need to upgrade the ROMs (see https://wiki.preterhuman.net/Macintosh_II).
I'll start with a Macintosh II that the seller said would not power up. A while back they had upgraded to a battery holder but believed it must have run out of power. Despite not including a picture of the inside of the machine, there were enough other valuable accessories in the auction to make it worth buying.
I was greeted by this glorious sight. It doesn't seem like an official AppleCare battery holder upgrade. That's a 18650 rechargeable lithium ion cell.
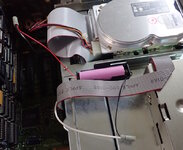
I have so many concerns here. The soldering job, the lack of heat shrink insulation, and the exact opposite choice of wire colors to battery polarity. Mostly though, why only 'fix' one of the batteries?
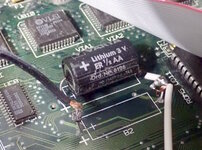
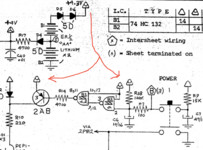
I don't want to get derailed here from the memory upgrade. It is a simple matter to replace the 18650 and dead cell with on-board battery holders and fresh proper cells. (The HC132 power-on chip was also dead.)
This Macintosh has the stock Apple PMMU. It does not support more than 8MB of memory, nor does it support System 7 virtual memory. If you see a black chip instead of a gold chip, that's the original PMMU.
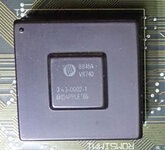
Use caution when removing the PMMU. More than once, I have pulled pins when removing the PMMU from the socket. Although this seems scary, if you align the pin notches with the oval hole, it press fits back in nicely. That is, the pins appear to be more like connectors than soldered pins.
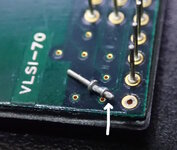
Although the Apple PMMU is kindly socketed, it seems nearly impossible to find the replacement Motorola 68851 MMU. I found only one. It was being sold for 'gold scrap' and hadn't been handled with love.
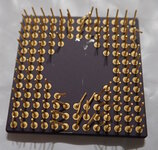
I know what you're thinking. Even though none of the pins are broken off, this thing has not exactly been stored in a static bag or protective foam. This isn't going to work, right?
We start with a first-order lever to lift the completely flattened pins. Rocking the dental pick against the chip's ceramic package ensures each pin is lifted with a smooth motion and cannot be bent beyond 90 degrees. In the picture below, note the great progress in lifting the pins without breakage.
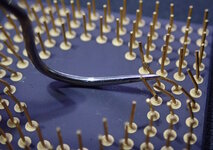
Next, we'll use @jwg1962 's mechanical pencil trick to straighten each pin individually. Removing the pencil lead from the tip of a 0.5 mm mechnical pencil creates a nice tube socket with a really long lever arm for precise control. See how straight most of the pins are looking now?
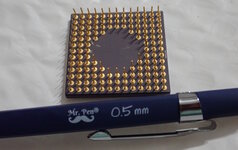
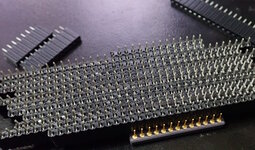
Now that the pins are lifted and straightened, they need to be aligned into rows and columns with respect to each other. I find female socket headers work nicely when the pins are nearly in shape.
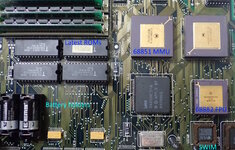
Below is the 68851 chip installed. Yes, it works!
Also note the pointless (but fun) upgrade of the FPU to a 68882, the ROMs to the latest revision, a SWIM chip for 1440K disks, and battery holders.
Memory
I've used tall composite memories to max out my IIx to 128MB. I have some 4MB GAL SIMMs on the way. However, something more interesting caught my eye.
There was an auction for a Performa 600 (IIvi) with four MicroMac SIMMdoubler II boards. The SIMMdoubler physically and logically combines two standard SIMMs (1 MB or 4 MB) to a single motherboard SIMM socket. The logical interface is a GAL -- which makes 4 MB SIMMs compatible with the II and IIx.
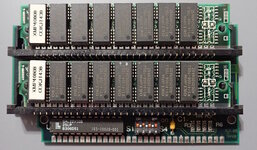
Amusingly, the fourth SIMMdoubler does not fit vertically in certain machines, like the IIvi. So, MicroMac provides a horizontal adapter. Here it is in action.
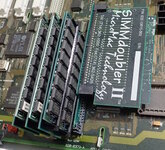
Here is the right-angle connector with the other doubler SIMMs removed.
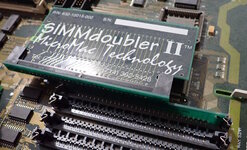
Removing the right-angle adapter from the SIMMdoubler is a chore. Unlike a Macintosh SIMM socket, the right-angle adapter socket has solid brackets on both sides (I guess for strength). There are two little latches that need to be pressed in as you try to wiggle the SIMMdoubler out. Do not attempt this if you are in a bad mood or have been drinking.
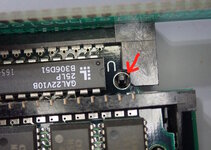
Below is the adapter after having been removed. Since I intend to use all four SIMMdoublers in the Mac II, I don't need the right angle adapter so I just threw it away.

Below are the SIMMdoublers in the Mac II. They fit snugly against each other. Notice that the upper memory SIMM sits above the height of the SIMMdoubler circuit board.
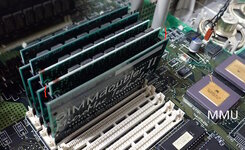
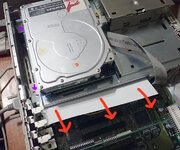
To test whether these are too tall, I placed a sheet of paper on top of the SIMMdoublers and then placed the Macintosh II's upper tray in place. Although the screw holes (purple below) showed the tray seemed to resting flat, I was unable to remove the sheet of paper. This indicates that the tray is likely pressing down on the SIMMdoublers and straining the SIMM sockets and motherboard.
With Apple's 32-Bit System Enabler software installed, the computer is successfully able to access more than 8MB. That's great.
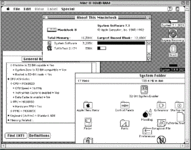
Oh wait. 4 MB SIMMs x 2 per board x 4 SIMMdoublers = 32 MB. Why are we only seeing 16 MB? The Macintosh II and IIx only recognize 256KB, 1 MB, 4 MB, or 16 MB SIMMs. The '8 MB' doubled SIMMs are seen as just 4 MB each. 4 x 4 =16 MB. Worst case, I can remove a SIMM from the top slot of each SIMMdoubler to provide enough room for the upper tray to sit flat and still get 16 MB of RAM. I can then add 1 MB x 4 SIMMs to the standard motherboard bank B to get 20 MB total.
Even though the SIMMdoubler does not expressly indicate support for 16 MB SIMMs, I may try it as an experiment. However, given that both the Macintosh II motherboard and the SIMMdoubler SIMM slots all use plastic retention clips rather than metal, I am hesitant to play with them.
- David
P.S. No, I did not actually throw away the SIMMdoubler right-angle connector.
1. Had multiple ROM revisions but doesn't include a ROM SIMM slot (like the IIx) to swap in a modern replacement
2. Didn't support 1440K drives
3. Didn't recognize memory SIMMs bigger than 1MB unless the SIMMs included compensating circuitry (such as a GAL)
4. Didn't support 32-bit mode (none of the ROM revisions are 32-bit clean). Software can compensate for this.
5. Didn't include a proper MMU (memory management unit)
The easiest path is to just install eight 1 MB SIMMs and be happy with 8 MB total. If you want more, you'll need to install both a Motorola 68851 MMU and special SIMMs. If you want 32MB or 128MB, you'll also need to upgrade the ROMs (see https://wiki.preterhuman.net/Macintosh_II).
I'll start with a Macintosh II that the seller said would not power up. A while back they had upgraded to a battery holder but believed it must have run out of power. Despite not including a picture of the inside of the machine, there were enough other valuable accessories in the auction to make it worth buying.
I was greeted by this glorious sight. It doesn't seem like an official AppleCare battery holder upgrade. That's a 18650 rechargeable lithium ion cell.

I have so many concerns here. The soldering job, the lack of heat shrink insulation, and the exact opposite choice of wire colors to battery polarity. Mostly though, why only 'fix' one of the batteries?

I don't want to get derailed here from the memory upgrade. It is a simple matter to replace the 18650 and dead cell with on-board battery holders and fresh proper cells. (The HC132 power-on chip was also dead.)
This Macintosh has the stock Apple PMMU. It does not support more than 8MB of memory, nor does it support System 7 virtual memory. If you see a black chip instead of a gold chip, that's the original PMMU.

Use caution when removing the PMMU. More than once, I have pulled pins when removing the PMMU from the socket. Although this seems scary, if you align the pin notches with the oval hole, it press fits back in nicely. That is, the pins appear to be more like connectors than soldered pins.

Although the Apple PMMU is kindly socketed, it seems nearly impossible to find the replacement Motorola 68851 MMU. I found only one. It was being sold for 'gold scrap' and hadn't been handled with love.

I know what you're thinking. Even though none of the pins are broken off, this thing has not exactly been stored in a static bag or protective foam. This isn't going to work, right?
We start with a first-order lever to lift the completely flattened pins. Rocking the dental pick against the chip's ceramic package ensures each pin is lifted with a smooth motion and cannot be bent beyond 90 degrees. In the picture below, note the great progress in lifting the pins without breakage.

Next, we'll use @jwg1962 's mechanical pencil trick to straighten each pin individually. Removing the pencil lead from the tip of a 0.5 mm mechnical pencil creates a nice tube socket with a really long lever arm for precise control. See how straight most of the pins are looking now?

Now that the pins are lifted and straightened, they need to be aligned into rows and columns with respect to each other. I find female socket headers work nicely when the pins are nearly in shape.

Below is the 68851 chip installed. Yes, it works!
Also note the pointless (but fun) upgrade of the FPU to a 68882, the ROMs to the latest revision, a SWIM chip for 1440K disks, and battery holders.

Memory
I've used tall composite memories to max out my IIx to 128MB. I have some 4MB GAL SIMMs on the way. However, something more interesting caught my eye.
There was an auction for a Performa 600 (IIvi) with four MicroMac SIMMdoubler II boards. The SIMMdoubler physically and logically combines two standard SIMMs (1 MB or 4 MB) to a single motherboard SIMM socket. The logical interface is a GAL -- which makes 4 MB SIMMs compatible with the II and IIx.

Amusingly, the fourth SIMMdoubler does not fit vertically in certain machines, like the IIvi. So, MicroMac provides a horizontal adapter. Here it is in action.

Here is the right-angle connector with the other doubler SIMMs removed.

Removing the right-angle adapter from the SIMMdoubler is a chore. Unlike a Macintosh SIMM socket, the right-angle adapter socket has solid brackets on both sides (I guess for strength). There are two little latches that need to be pressed in as you try to wiggle the SIMMdoubler out. Do not attempt this if you are in a bad mood or have been drinking.

Below is the adapter after having been removed. Since I intend to use all four SIMMdoublers in the Mac II, I don't need the right angle adapter so I just threw it away.

Below are the SIMMdoublers in the Mac II. They fit snugly against each other. Notice that the upper memory SIMM sits above the height of the SIMMdoubler circuit board.

To test whether these are too tall, I placed a sheet of paper on top of the SIMMdoublers and then placed the Macintosh II's upper tray in place. Although the screw holes (purple below) showed the tray seemed to resting flat, I was unable to remove the sheet of paper. This indicates that the tray is likely pressing down on the SIMMdoublers and straining the SIMM sockets and motherboard.

With Apple's 32-Bit System Enabler software installed, the computer is successfully able to access more than 8MB. That's great.

Oh wait. 4 MB SIMMs x 2 per board x 4 SIMMdoublers = 32 MB. Why are we only seeing 16 MB? The Macintosh II and IIx only recognize 256KB, 1 MB, 4 MB, or 16 MB SIMMs. The '8 MB' doubled SIMMs are seen as just 4 MB each. 4 x 4 =16 MB. Worst case, I can remove a SIMM from the top slot of each SIMMdoubler to provide enough room for the upper tray to sit flat and still get 16 MB of RAM. I can then add 1 MB x 4 SIMMs to the standard motherboard bank B to get 20 MB total.
Even though the SIMMdoubler does not expressly indicate support for 16 MB SIMMs, I may try it as an experiment. However, given that both the Macintosh II motherboard and the SIMMdoubler SIMM slots all use plastic retention clips rather than metal, I am hesitant to play with them.
- David
P.S. No, I did not actually throw away the SIMMdoubler right-angle connector.

