• Updated 2023-07-12: Hello, Guest! Welcome back, and be sure to check out this follow-up post about our outage a week or so ago.

Best way to open Mac Classic

Garrett

Well-known member
After about 6-7 years of wanting a vintage Mac, I finally acquired one. It's a 1991 Macintosh Classic. It works, but obviously needs some work as these untouched vintage Macs need. Also, I don't have an ADB keyboard or mouse, so I haven't been able to go through the system and find out more about it.

My first step of business is to open it up to remove the PRAM battery and get it recapped. Someone on the Macintosh Enthusiast Facebook group told me he could recap the board for a pretty fair price, and I'm definitely going to take him up on that offer. However, I'm having issues just getting the thing open.

First, I'm trying to find the correct Torx bit to remove the screws, specifically the screws up in the handle. Tonight I purchased a T15 bit and an extender from my local Lowes, but the extender has a piece (where the bit fits into it) that keeps it from fitting into the screw holes inside the handle. Other than that, I was able to get the two screws near the ports out just fine.

Second, what is the best way to separate the two halves of the cast? I've heard some people say its okay to use a flat head screwdriver as long as you wrap it in electrical tape or put a piece of cloth around it to prevent it from marring the plastic. Then I've heard others say that's a huge no-no and is just as bad as using the bare screwdriver. The person offering to recap the logic board recommended using something like a putty knife. What is the best thing I can use to open the machine up without damaging the case, preferably something readily available and cheap.

And lastly, when you get the case open, what precautions do I need to take when removing the logic board? Obviously I know to steer clear from the CRT and analog components. Also, when shipping the logic board to get recapped, what precautions should I take when shipping the board?

Any help would be greatly appreciated. It's nice to finally have one of these machines and I've learned a lot from various YouTube videos and articles over the year, but obviously actually doing it is another thing.

Here's a picture of the Mac:

C453FDE7-E6B2-4F15-A32B-639004757407.jpeg.8dbeb75112b386f3116755bd434c30b5.jpeg


P.S. This is my first post on this forum since I was last active around 2015 or so...

 
Last edited by a moderator:

bibilit

Well-known member
Yes, the two screws near the handle are a tight fit, so only a long T15 screwdriver will help, anything beefier won't suit the job.

Separating the two halves can be easy, or not.

Don't use a screwdriver to separate the two, the plastic is soft and you can easily be scratched.

You can try to separate using you bare hands, works fine most of the time for me.

If not, leave the screws half way and turn the screen facing down, holding the case by the sides.

The Logic board can easily removed.


cheesestraws

Well-known member
As far as taking the machine to bits etc goes, the service manual is here: http://tim.id.au/laptops/apple/legacy/classic_ii.performa_200.pdf which will talk you through how to get the thing open, how to remove the logic board, etc.

I use the T15 bit from one of those cheap precision screwdriver sets (a lot like https://www.amazon.co.uk/Screwdriver-Kaisi-Electronics-Electronic-Appliances/dp/B01IT28YU8 this one) plugged into the extender that came with the set, plugged into a long conventional screwdriver extender.  The shaft on the precision set is narrow enough to get through the hole around the screw. (Just an option in case you have one of these hanging around).

As regards getting the case open after the screws are out, I've never had to use a tool at all.  I put the mac face-down on a soft surface, remove the screws, then just wiggle/squeeze with my bare hands, one flat hand on either side of the machine.  Occasionally I need to actively pull the front case away from the rear case, but again just by pulling with my hands.  With the screws removed they are literally just held together by friction and not very much of it, so it shouldn't be too tricky.


Dog Cow

Well-known member
Second, what is the best way to separate the two halves of the cast?
This way: How to Open a Compact Mac Case

Basically, the only tool you use is the screwdriver. The Mac is face down. Loosen, but don't remove all 4 screws. Then with the screwdriver on a screw head in the top handle, push down on the shaft with one hand, while using your other hand to pull up on the plastic handle of the Mac's case.

The screws never leave the Mac's case. Set the case with the back of it facing up and then set the RFI shield on top.

With practice, you can open any compact Mac in 30 seconds using this technique.


LaPorta

Well-known member
I also have never had to use a tool, although some cases have needed more brute strength to pull apart with hands. One thing you always want when working on any compact is control: controlled, slow movements. The last thing you want is to pull off the case with a violent jerk and somehow bash the back of the CRT.

As far as the tool, you want a dedicated, long shaft T15. I was lucky enough to purchase one from Sears about 20 years ago under the Craftsman brand. Back then, those stores stocked everything in creation, even wrenches large enough to do steam pipe fitting. Try finding a store like that now...

 
Last edited by a moderator:

Garrett

Well-known member
Thanks everyone for the replies. I will return the T15 bit and extender I bought and purchase a long one from Amazon or something. I need to get ESD static-protective bags anyways for shipping the logic board.

To separate the halves of the case, all I need to do is leave the screws partially in (with the screen facing down) and jiggle the case until it comes loose, then remove the screws the rest of the way. Will that possibly do any damage?


JRL

Well-known member
Thanks everyone for the replies. I will return the T15 bit and extender I bought and purchase a long one from Amazon or something. I need to get ESD static-protective bags anyways for shipping the logic board.

To separate the halves of the case, all I need to do is leave the screws partially in (with the screen facing down) and jiggle the case until it comes loose, then remove the screws the rest of the way. Will that possibly do any damage?
You won't need to do any jiggling at all if you follow the method Dog Cow posted. Just push down on one of the case underside screws with your driver and pull the back case up in the opposite direction. The other methods that were posted aren't incorrect by any means but Dog Cow's method is the easiest and takes only about 30 seconds.

 
Last edited by a moderator:

Garrett

Well-known member
You won't need to do any jiggling at all if you follow the method Dog Cow posted. Just push down on one of the case underside screws with your driver and pull the back case up in the opposite direction. The other methods that were posted aren't incorrect by any means but Dog Cow's method is the easiest and takes only about 30 seconds.
Ok. I will do this when I get a bit long enough to fit down inside the handle. So just push down on one of the screws in the handle while pulling up on the handle with my other hand?

What is the dimensions of the Mac Classic logic board? I also need to purchase ESD protection bags for when I ship the logic board to get it recapped.


JRL

Well-known member
Ok. I will do this when I get a bit long enough to fit down inside the handle. So just push down on one of the screws in the handle while pulling up on the handle with my other hand?

What is the dimensions of the Mac Classic logic board? I also need to purchase ESD protection bags for when I ship the logic board to get it recapped.
Yes. Just follow the pictures in Dog Cow's article and you'll be fine.  :smiley:

The Classic board is 8.75 in by 5.25 in.


Garrett

Well-known member
Yes. Just follow the pictures in Dog Cow's article and you'll be fine.  :smiley:

The Classic board is 8.75 in by 5.25 in.
Great. I'm going to need to order ESD anti-static bags as apparently none of the local computer repair shops have them to give out/sell. I'm assuming modern motherboard ESD anti-static bags (like this one) should suffice.

I'm also going to order this Torx T15 bit, which is 6" long. According to my phone (oddly I don't have any rulers/tape measure around here) that should barely work.

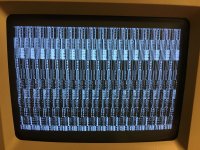
I've noticed that the Classic now takes a while to boot into the System Software. It will show the Simasimac condition until it decides to boot. Sometimes it boots right away as soon as you flip the switch, and other times it won't boot at all until you turn it off and back on again. And even then it can take a good minute or two. So it's definitely gonna need new caps. Should recapping the logic board suffice? I know in a perfect world I should go ahead and have the analog board recapped as well, but a) that would be more expensive and, b) I really want to avoid having to do anything to do with the analog board. I'm not going to lie: I've never worked on anything with a CRT inside of it before, and it kind of scares me.

I can't wait to get this thing open so that I can remove the PRAM battery and send this thing off to be recapped.

Here's the so-called "Simasimac" condition my Classic displays from time to time. Sometimes it requires hard restarting the machine to get it to boot, other times it'll take it a minute or two to boot, and other times it'll boot as soon as you flip the switch.

IMG_7022.JPG

 
Last edited by a moderator:

Peace

New member
I'm out of the game, sorry, but I'm really looking for condenser value at position cp11 on an.pow.board 630-0395-8 of my Mac Classic, please...my English might not be very good, I'm French speaking from Québec, Canada.  Thanks in advance.


SE30_Neal

Well-known member
Great. I'm going to need to order ESD anti-static bags as apparently none of the local computer repair shops have them to give out/sell. I'm assuming modern motherboard ESD anti-static bags (like this one) should suffice.

I'm also going to order this Torx T15 bit, which is 6" long. According to my phone (oddly I don't have any rulers/tape measure around here) that should barely work.

I've noticed that the Classic now takes a while to boot into the System Software. It will show the Simasimac condition until it decides to boot. Sometimes it boots right away as soon as you flip the switch, and other times it won't boot at all until you turn it off and back on again. And even then it can take a good minute or two. So it's definitely gonna need new caps. Should recapping the logic board suffice? I know in a perfect world I should go ahead and have the analog board recapped as well, but a) that would be more expensive and, b) I really want to avoid having to do anything to do with the analog board. I'm not going to lie: I've never worked on anything with a CRT inside of it before, and it kind of scares me.

I can't wait to get this thing open so that I can remove the PRAM battery and send this thing off to be recapped.

Here's the so-called "Simasimac" condition my Classic displays from time to time. Sometimes it requires hard restarting the machine to get it to boot, other times it'll take it a minute or two to boot, and other times it'll boot as soon as you flip the switch.

View attachment 31820
I like you i stayed away from the logic board and simply brought a spare board but i do recommend The motherboard as i priority. That said due to heat the logic board may also need some re flowing of solder as dry joints can occur, also look at the power supply.
I’m no expert on classics though as i have the older se/30 and each machine has it’s own quirks 


desiv

Member
I just recapped my Classic.  I wasn't seeing the Simasimac, but when I opened my Classic to check my battery (which was fine, but I still replaced it), I thought I saw some cap leakage.

When I removed the caps, one of them had some significant corrosion under it that I hadn't noticed before, and it had damaged the pad a bit.

Luckily not so much that it didn't work after recapping.

The other item I had was that after recapping, the Classic was acting up a bit, so I really cleaned the motherboard well.

After that, it's been stable. (knocking on wood)

So for now, I'd recommend cleaning the board as much as you can.

I just did the logic board also, not the analog one (yet).

Good luck!


Garrett

Well-known member
I just recapped my Classic.  I wasn't seeing the Simasimac, but when I opened my Classic to check my battery (which was fine, but I still replaced it), I thought I saw some cap leakage.

When I removed the caps, one of them had some significant corrosion under it that I hadn't noticed before, and it had damaged the pad a bit.

Luckily not so much that it didn't work after recapping.

The other item I had was that after recapping, the Classic was acting up a bit, so I really cleaned the motherboard well.

After that, it's been stable. (knocking on wood)

So for now, I'd recommend cleaning the board as much as you can.

I just did the logic board also, not the analog one (yet).

Good luck!
From what I've read and heard, these Macintosh Classics (as well as the Classic II and the SE/30) are suceptible to leaky caps. All of these vintage machines are, but I've heard that these have the worst luck with them. I've also seen a lot of Classics destroyed by the red Maxell bombs, so I'll be happy when I get this machine apart and that battery taken out.

The guy who is recapping the board says he also does a thorough cleaning to get all of the goo off.

Unfortunately, this whole Coronavirus/COVID-19 is putting some brakes on my plans. I was expecting to get the Torx tool today, but I found out that my dorm (I'm a broke college student) is holding mail because my university has essentially "shut down" because of this. I also lost my jobs, so I'm likely going to have to put the Classic project on the back-burner for a while until I can get back on my feet. If anything, I'll have it recapped - then I can worry about the keyboard/mouse and (eventually) the FloppyEmu later.

Kind of miffed at the whole mail thing... I just ordered a 2019 13" MBP and its due Monday/Tuesday. I hope they can figure out something before then so I can get it all setup.

I'm also curious to see how much memory this Classic has. A hunch tells me it's likely at its stock 2MB config, but who knows.


desiv

Member
I'm also curious to see how much memory this Classic has. A hunch tells me it's likely at its stock 2MB config, but who knows.
Yes, strange times indeed....

Hopefully it has 2M.  That's what mine had.  I have heard the only thing to look for memory wise is that it has at least 2M.  If it has 1M, then it doesn't have the RAM expansion card (where you can add the other 2M) and those are hard to find by themselves.

Luckily, 30 pin SIMMs aren't too hard to find nowadays...  Good luck!

Also, I have the hardest time opening mine.  It REALLY doesn't want to let go at the top.  Eventually it does, but .. it doesn't make it easy.  ;-)


Garrett

Well-known member
Yes, strange times indeed....

Hopefully it has 2M.  That's what mine had.  I have heard the only thing to look for memory wise is that it has at least 2M.  If it has 1M, then it doesn't have the RAM expansion card (where you can add the other 2M) and those are hard to find by themselves.

Luckily, 30 pin SIMMs aren't too hard to find nowadays...  Good luck!

Also, I have the hardest time opening mine.  It REALLY doesn't want to let go at the top.  Eventually it does, but .. it doesn't make it easy.  ;-)
I'm inclined to believe mine has the 2MB expansion, because mine came with a hard drive. The Classic was originally sold as two varieties - one without a hard drive/1MB RAM, and another with a 40MB hard drive and 2MB RAM (with that daughter-card.) I believe mine has the original hard drive. So unless someone removed the expansion card, it should still be in there.

If I'm really lucky, they may have maxed it out at 4MB. But I doubt I'll get that lucky - it seems like this computer is fairly stock and has never been opened. Which means opening it is likely going to be an even bigger PITA. I'm going to try Dog Cow's technique by holding down on the Torx bit while pulling up on the handle to see if that will separate the two halves.

Fingers crossed that the inside looks fine. I think I'll be devastated if the battery has already begun to leak. I don't even want to think about that.  ;-)

When the logic board is sent in to be recapped/cleaned, I'm going to give the case plastics a good scrubbing with some soapy water. The case is slightly yellowed, but I'm not even going to attempt a Retrobrite treatment on this system. It has some staining here and there, and the sides look extremely dirty. I was planning on making this my quarantine project but I guess those plans have been sidelined for now.  :(


Garrett

Well-known member
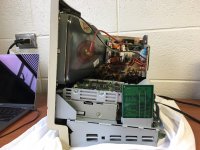
I finally received the Torx bit, so I cracked open the machine. The case didn't separate nearly as easy as I thought it would. I tried and tried to use Dog Cow's method (pressing down on the screwdriver while pulling up on the handle) but I had no luck on the top part of the case, near the handle. The bottom part of the case was separating fine. I took a plastic bicycle tire lever and, very carefully, separated the halves. It came apart with a little bit of prying. Didn't leave any marks or anything that I'm aware of.

IMG_7358.JPG

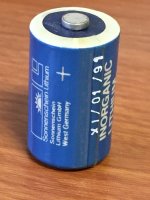
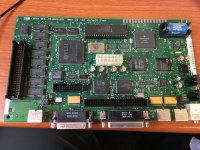
The inside actually didn't look too dirty. I removed the logic board to remove the battery. Oddly enough, this computer didn't use the red Maxell or the purple Tadiran battery. It had a blue "Sonnenschein Lithium" battery that was marked with a date code of January 1991 - made in West Germany. According to this machine's serial number, it was manufactured in Singapore either in the last week of April or the first week of May 1991.

IMG_7406.JPG

This machine, as I suspected, had 2MB RAM. Thankfully, the daughterboard was installed. I looked at the capacitors on the analog board and none look bloated. But I guess that doesn't mean anything.

IMG_7377.JPG

IMG_7383.JPG

Thankfully, I was able to get the logic board out, back in and the machine reassembled without killing myself (literally.) It took a little while to figure out how to get the logic board in straight, as the ports wouldn't line up in the case. Eventually I found that there are guides on both sides of the frame. After finally figuring that out, I buttoned the machine back up and powered on. There wasn't any sparks, pops, bangs or smoke. It powered on just like it did before: first to a Simasimac condition, and after about 10-15 minutes of being on it will eventually boot.

When I get the anti-static bags I hope to get the logic board recapped. Hopefully that will bring this machine back to life, taking care of that Simasimac condition.

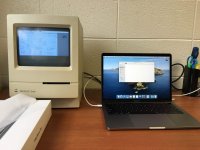
Today I also received my new laptop... the 2019 13" MacBook Pro. So I had a great photo op...

IMG_7333.JPG

 
Last edited by a moderator:
Top