

Alright. So recently I got a few (new to me) vintage Macs. A Performa 6205CD (see my previous post to see how well that's going), a Beige G3 Desktop, and a PowerMac 6100 DOS compatible. All were, more or less, in decent cosmetic shape, but in testing, only the 6100 gave any real signs of life. Basically, it Bonged! Right away too. So, for now, there doesn't seem to be any issues with it.
I'm not too worried about the G3, as I only bought it for its case (I had another, the guts of which now live in the case of the new one). As for the 6205… well… that's being covered in another post (and I'm trying not to think about it right now).
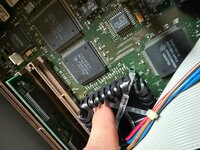
The 6100, on the other hand, is from what I can tell, a far more… desirable? important? I don't know what the right word is. For me, the point is that it appears to be working and completely intact. And I'd like to keep it that way! (Although, I won't know the full extent of its functionality until the video adaptor arrives. To say nothing of the unobtanium that is the DOS Y-adaptor). Still, before I do anything rash, like recapping the PSU or motherboard, I want to get some advice on the best maintenance for these. I know this is a mid-90s era Mac so leaking Capacitors aren't out of the question, but this may very between models. So how reliable is the 6100's motherboard? What about the PSU? How about the plastics? From what I understand, the fact that both the case tabs are intact constitutes something of a minor miracle. So how can I keep them that way? Should I be taking a 'if it ain't broke' approach? Or should I be more proactive?
Side note: YES! I did remove the P-RAM battery. It was the first thing I did. The thing was dead, but thankfully, it hadn't leaked or exploded.
I'm not too worried about the G3, as I only bought it for its case (I had another, the guts of which now live in the case of the new one). As for the 6205… well… that's being covered in another post (and I'm trying not to think about it right now).
The 6100, on the other hand, is from what I can tell, a far more… desirable? important? I don't know what the right word is. For me, the point is that it appears to be working and completely intact. And I'd like to keep it that way! (Although, I won't know the full extent of its functionality until the video adaptor arrives. To say nothing of the unobtanium that is the DOS Y-adaptor). Still, before I do anything rash, like recapping the PSU or motherboard, I want to get some advice on the best maintenance for these. I know this is a mid-90s era Mac so leaking Capacitors aren't out of the question, but this may very between models. So how reliable is the 6100's motherboard? What about the PSU? How about the plastics? From what I understand, the fact that both the case tabs are intact constitutes something of a minor miracle. So how can I keep them that way? Should I be taking a 'if it ain't broke' approach? Or should I be more proactive?
Side note: YES! I did remove the P-RAM battery. It was the first thing I did. The thing was dead, but thankfully, it hadn't leaked or exploded.


")
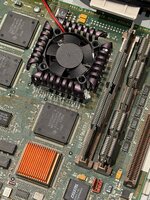
 You are lucky that the 6100 is fairly easy to fire up when it is outside its case. This means you can replace one cap at a time and test inbetween each replacement, without spending 15 minutes reassembling the thing. If something does go wrong, you will know exactly which cap is causing problems. Just be extra careful when it is powered on that you do not come into contact with any part of the computer or you can cause a short (ask me how I know). I recommend a power splitter with an on/off switch on it, so you can just hit the switch and stand back and watch it boot.