G4 Quicksilver PSU repair

Hi all! Has anyone here worked on the SMPS for a G4 Quicksilver? I've got one on the bench that seems to be failing to start up. It sort of pulses on and then off and is probably entering a protection mode. I've got a general book on SMPS repair that I'm reading, and will soon use it to apply more general diagnostics to the thing. If anyone is inspired to do something similar, you should know that safety precautions are needed to do this without getting hurt. I think it's extremely likely the capacitors in the secondary side have gone bad...

Anyhow, if anyone here has fixed one of these and has some anecdotal knowledge to share, that would be very helpful! There's not much about fixing these guys on the web. I know I could do an easy ATX mod, but that's not something I'm interested in right now. Otherwise, I'll try to keep folks here updated as I tinker and hopefully fix the PSU myself!
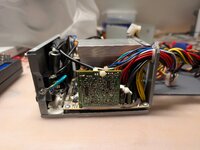
 
I've started working on this PSU again! A few notes, while work is still in-progress:

The PSU is really dense and cramped inside. I needed to remove all of the major power transistors and the heatsinks holding them in place. I didn't want to disassemble the PSU so substantially, but I have no regrets about doing so now. Servicing this power supply would have otherwise been miserable/impossible.

The twin daugterboards' capacitors on the primary stage all had terrible ESR and needed to be replaced. The daughterboard capacitors on the secondary stage were amazingly all in great shape. I'm planning to replace them all anyway, because I don't have any intention of tearing this PSU apart again any time soon.

The major bulk filtering capacitors on the primary side were both in good shape, and I'm going to leave them alone. They are nicer Rubycon parts, in contrast to the crummy smaller green Lelon caps scattered throughout the PSU.

I still have to finish recapping the PSU, which I hope to get to later this week. But now that I know definitively that several capacitors failed, I have hopes about getting this working again! Fingers crossed there are not any other mystery faults.

Stay tuned for the results of the repair, several photos, and a detailed list of all the electrolytic capacitors inside this unit. I have scoured the internet far and wide, and there just doesn't seem to be much info out there yet about Quicksilver PSUs.
 
I've recapped and reassembled the Quicksilver PSU! Unfortunately, it still doesn't seem to work. I'm seeing 0.00A current draw which is disappointing. As a test load, I've connected an IDE hard drive. I thought I could get away with shorting the green PSU power-on pin to ground, but I'm seeing no signs of life yet. I've verified that the mains AC is making its way into the PSU, and also that the full bridge rectifier is in good shape. I'm seeing about 350VDC across the big filter capacitors.

So now I'll need to start probing the scary stuff :). I'm not a huge fan of working on live switch mode power supplies for safety reasons (even though I'm plugged into an isolation transformer). But this PSU is just super dense internally, which makes probing and troubleshooting more difficult than I'd like.

Hopefully my test setup is appropriate. Maybe I should have thrown this thing into a G4 before beginning even more comprehensive bench checks. (Edit: I plugged it into the G4 and it's still dead) On the bright side, nothing is smoking or catching fire. Also the ticking noise of the PSU going into a protection mode has vanished ever since I've recapped the PSU, so that is either a sign of improvement, or a sign that things got messed up somewhere else down the line...

Stay tuned! And as always, any ideas or advice are appreciated!

As promised earlier, here is the Power Mac G4 Quicksilver AcBel API1PC12 PSU Capacitor List:
  • Filter Capacitor:
    • C4, C5: 820uF 200v
  • C39: 0.47uF 50v
  • C49: 100uF 25v
  • C32: 47uF 50v
  • C43: 100uF 25v
  • C53: 47uF 25v
  • Primary Side Daughterboard 1:
    • C309: 0.47uF 50v
    • C303: 2.2uF 50v
  • Primary Side Daughterboard 2:
    • C409: 2.2uF 50v
    • C403: 10uF 50v
  • C47: 0.47uF 50v
  • C35: 560uF 35v
  • C41: 560uF 35v
  • C7: 100uF 50v
  • C10: 2200uF 16v
  • C13: 2200uF 6.3v
  • C16: 2200uF 6.3v
  • C21: 3300uF 10v
  • C8: 47uF 25v
  • C29: 2200uF 6.3v
  • Secondary Side Daughterboard:
    • C208: 0.47uF 50v
    • C216: 47uF 25v
    • C210: 33uF 35v
    • C203: 0.47uF 50v
    • C211: 0.47uF 50v
    • C209: 470uF 16v
 

Attachments

  • PXL_20260319_023402354.RAW-01.COVER.jpg
    PXL_20260319_023402354.RAW-01.COVER.jpg
    1.8 MB · Views: 1
  • PXL_20260319_023404370.RAW-01.COVER.jpg
    PXL_20260319_023404370.RAW-01.COVER.jpg
    1.3 MB · Views: 1
  • PXL_20260319_023414982.RAW-01.COVER.jpg
    PXL_20260319_023414982.RAW-01.COVER.jpg
    1.7 MB · Views: 1
  • PXL_20260523_035240894.RAW-01.COVER.jpg
    PXL_20260523_035240894.RAW-01.COVER.jpg
    1.4 MB · Views: 1
  • PXL_20260523_041215689.RAW-01.MP.COVER.jpg
    PXL_20260523_041215689.RAW-01.MP.COVER.jpg
    1.3 MB · Views: 1
  • PXL_20260615_010353250.RAW-01.COVER.jpg
    PXL_20260615_010353250.RAW-01.COVER.jpg
    1.3 MB · Views: 1
Last edited:
Back
Top