Hey everyone,
I've been working for the past year on cloning the TAM with 3D printing and powering the clone with a Raspberry Pi CM5.
The TAM an amazing machine with such a unique design and a lot of cool stuff about it...but not a very reliable one. Both of mine are dead, one has a shattered CD door, and to even acquire one of them to measure cost a fortune.
So far I've managed to make the following with functional prototypes:
The project has not been cheap...with R&D not included (I had to buy two TAMs to get a fat back and slim back to measure!) I'd estimate the running total to build your own to be at $900+ USD. To be realistic...at that cost, you're better off buying a modern M1+ iMac, or the actual thing...
But then you don't get to say you built your own TAM")
Pictures below. I'd love to know what you think. Just note that the two renders are very much WIP - I haven't finished the buttons, port cutouts, or base on the computer yet.


I've been working for the past year on cloning the TAM with 3D printing and powering the clone with a Raspberry Pi CM5.
The TAM an amazing machine with such a unique design and a lot of cool stuff about it...but not a very reliable one. Both of mine are dead, one has a shattered CD door, and to even acquire one of them to measure cost a fortune.
So far I've managed to make the following with functional prototypes:
- A working subwoofer / power supply / very prototype stereo speaker set,
- 3D printable speaker grilles
- The tabs keep falling off though, so I need to figure out a good solution for that
- 3D printable Models for most of the computer, with the computer still being a WIP, subwoofer mostly complete, and keyboard mostly complete
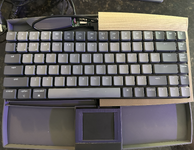
- Provisions for fitting a modern, backlit, off-the-shelf USB keyboard (Keychron V2) into a shell with an off-the-shelf USB trackpad modified to look like the all-in-one keyboard/trackpad/leather palm rest combo
- Note: My original TAM keyboard is awful. I could've made custom circuitry to replicate the design 1:1, but it would really suck to type on. I think using an off-the-shelf keyboard is the way to go, but I'd love to hear your opinions.
- Working 3D printed hinges that have been supporting a real TAM for a month and feel nigh identical to the original
- Working CD drive damper - the thing that allows the CD drive door to slowly open down
- Note: This part feels like a reason why CD doors in the real thing are shattering. Mine was gummed up with old grease, and the tabs holding onto the CD door weren't designed to handle much tension
- A working FM radio clone using modern software and a modern FM tuner board
- Working IR remote control and software to allow for control of a modern computer with brightness / volume / media controlTAM P
The project has not been cheap...with R&D not included (I had to buy two TAMs to get a fat back and slim back to measure!) I'd estimate the running total to build your own to be at $900+ USD. To be realistic...at that cost, you're better off buying a modern M1+ iMac, or the actual thing...
But then you don't get to say you built your own TAM
Pictures below. I'd love to know what you think. Just note that the two renders are very much WIP - I haven't finished the buttons, port cutouts, or base on the computer yet.