• Hello MLAers! We've re-enabled auto-approval for accounts. If you are still waiting on account approval, please check this thread for more information.

Apple Extended Keyboard II not working - All 3 LEDs on

mitchW

6502
I pulled out my trusty Apple Extended Keyboard II to test some vintage Macs. It has been stored for couple of years now.
Sadly I discovered that it doesn't work, just all 3 LEDs are on, and also the connected ADB mouse does also not function.

So any info on what I should do next?
Could there be any caps that need changing?
 
Probably a broken trace issue in the adb side as the adb connector is just a pass through from one side to another.
 
I started measuring voltages across three electrolytic caps, and found that on two there was normal 5V, but on the middle one (C6), there was just 2V and slowly climbing. I let it plugged in for about 5 more minutes and the LEDs turned off and keyboard started to work normally. The voltage on C6 was now at 3.5V.

Now after 30 minutes, the voltage is at almost 5V. And keyboard still working fine.

So what that tells us?
That C6 is apparently connected to the 5V through some high impedance. Perhaps a resistor of couple of 10s of kiloohms. As the capacitor ages it loses its formation, and needs to be "reformed". This means that it will draw lots of current (acting like a low resistance or even like shorted), and heat up. Being current limited via some resistor in this case, the voltage on it will slowly rise (which is actually good for the capacitor). And if that voltage is used to determine some state or being part of a reset circuit, then of course it will not work till the cap reforms. Of course if the cap was completely shorted, that would never happen.

Why this happened? Capacitor slowly going bad internally and not being used for more than 40 hours in the last 20 years. Of course using a 63V rated cap on a 5V line also isn't good practice as the cap will never see less than its 10% rated voltage, and lose its forming

Now the solution is just to recap the keyboard. I think there are three (3) 1uF 63V caps, but I will use some 1uF 25V tantalum caps as I have plenty. They never see more than 5V anyways :)
 
I just recapped it, and yes, those 3 capacitors were all 1uF 63V units. As I said, I used 1uF 35V tantalum caps to replace them, and the keyboard now works great.

Old caps were all looking fine, but the one that was causing the problem, measured almost twice the capacitance, which is to be expected as internal leakage is higher than usual and that adds to the capacitance measurement.
 
You know, this is a good reminder about the other bit regarding caps that we don't normally discuss; they can get "dirty" and need a few good slow charge/discharge cycles before they return to expected tolerances, especially if they're heavily overspecced.
 
Exactly. Just few weeks ago I recapped a LC 475 PSU. I changed every cap, except the main smoother (rated at 180uF 400V I think). When I plugged it in, I saw on the wattmeter that the wattage was very high (around 25W-30W with NO load). I quickly disconnected it, and tried it again, then the wattage started to fall, and it settled at just 7W, after about a minute.
After that I felt around if anything was warm, and guess what, that big main capacitor was bit warm. That cap should not get warm at all by itself.
Luckily all SMPS PSUs implement NTC thermistors to limit the current, and the NTC did its job correctly in this case. The PSU is from 1994, and probably hasn't run since the late 90s, so no wonder the cap got "dirty".

I think they simply used 63V 1uF caps simply because they were abundant and cheap.
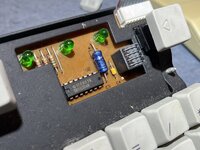
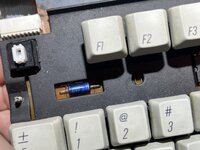
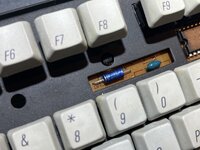
Anyways I added some photos of the caps, those were blue Philips axial caps, which makes sense as my keyboard was made in Ireland. The keyboard received full cleanup (all keys removed and everything washed) after the recap, so it looks like new.


P.S. About the regular exercise of vintage electronics, I lately came across a floppy drive (out of a PM 8100, so also about 1994 vintage) that worked fine, but just wouldn't eject. Mechanism was fine and not gummed up, so I decided to take the eject motor assembly out and plug it in a external 4V power supply (a 18650 cell). The motor struggled to turn by itself, but after every revolution it made, it picked up more speed. You could just hear going faster and faster, and after a minute it reached normal speed. I reinstalled it, put everything back, and now the floppy drive ejected like new.
 

Attachments

  • IMG_9226.jpeg
    IMG_9226.jpeg
    2.2 MB · Views: 6
  • IMG_9225.jpeg
    IMG_9225.jpeg
    2.3 MB · Views: 6
  • IMG_9224.jpeg
    IMG_9224.jpeg
    2 MB · Views: 6
Back
Top