• Hello, Guest! Welcome back, and be sure to check out this post for more info about the recent service interruption and migration.

SE/30 (and others) RTC Replacement / Emulator with ATTiny85

pgreenland

Active member
I've got a pile of battery damaged SE/30's I've been slowly resurrecting.

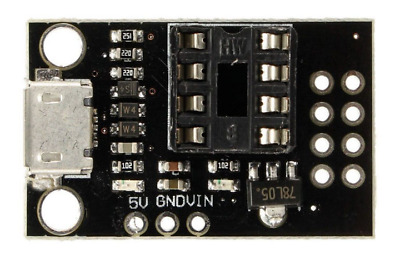
One of them needed a new RTC and I wondered if it could be replaced by a microcontroller.

Turns out a few smart cookies had beat me to it and published various versions of firmware for the Atmel ATTiny85 which is a drop-in (ish) replacement for the Apple RTC.

Unfortunately neither of the reproductions I found worked in my SE/30, which appears to use much faster data transfers than the Mac Plus for which (I believe) they were originally designed (250Khz vs 20Khz).

I've had a go at my own drop in replacement, again using the ATTiny85. Re-written from the ground up using their work as inspiration, specifically for the SE/30.

If anyone wanted to have a go with it, I've dropped the source on GitHub: https://github.com/pgreenland/attinyrtc

I've also detailed its inner workings on my blog in case there's interest: https://www.quantulum.co.uk/blog/new-timepiece-for-a-classic-mac-part-1/

By default it's configured to store everything in the ATTiny's EEPROM allowing settings (startup disk in my case) to be preserved without power.
But can be configured to emulate the original RAM only behaviour, relying on the RTC battery to save settings when powered off. Although this is currently untested as none of my Mac's have intact RTC battery circuitry :-(.

Credit to the original MacPlus RTC developers:

https://pastebin.com/baPZ4nN4

Possibly the same @quorten?

https://github.com/quorten/macsehw/blob/master/firmware/rtc/MacRTC.c

If you give it a try, I'd be interested to hear from you and if you make any improvements!

Thanks,

Phil
 

schampango

Member
Hi Phil,
thats sounds awesome. I just ordered some Attiny85 and will be happy to test your work. But it will probably be a few weeks before i get around to it.
 

schampango

Member
Hello Phil,
I have tested it but with me the first SCSI device (all on one zuluSCSI) is not detected automatically and I have to mount it manually with LIDO. With the original RTC this behavior does not occur. Maybe my SE/30 is also broken.
Best regards
Daniel
 

pgreenland

Active member
Hello Phil,
I have tested it but with me the first SCSI device (all on one zuluSCSI) is not detected automatically and I have to mount it manually with LIDO. With the original RTC this behavior does not occur. Maybe my SE/30 is also broken.
Best regards
Daniel
Hey Daniel,

Sorry I've taken so long to reply, I either missed or didn't get a notification for your post.

I've not seen any problems with SCSI mounting myself. I've been using a ZuluSCSI too. I did manage to select a drive which didn't exist after swapping SD cards as the startup disk once. That upset the system quite a bit, but it was still happy to boot from floppy after some sort of timeout.

A simple test of the RTC would be to boot the machine, set the time and restart it (reboot it that is, rather than power cycle it). If the time's still there + a while for the reboot you've got some basic comms going.

I used Snooper I believe (would have to fire up my machine to confirm) to test the ATTiny's RTC and PRAM functions. That may be a good port of call if you try it again sometime.

Thanks,

Phil
 
Last edited:

pgreenland

Active member
Hi Phil,

Would love to know if these are programmable on a Windows box? Let me know what I may need to do (if you can)
Hey @Lyokian159

I've not tried building on Windows but that would be doable. I can certainly upload a pre-built binary to github if you like, save having to work that bit out.

Flashing an ATTiny from Windows shouldn't be too much trouble, I know of a few different ways of doing it.

You could use a dedicated ICSP programmer if you had one, they're not super expensive to buy. But possibly not worth it if you're not planning on programming a load.

Or you could program via an Arduino with a special sketch to emulate an ICSP programmer.

If you wanted to give it a quick try. A breadboard, few dupoint cables, ATTiny85 and an Arduino acting as a programmer may be the easiest route.

Let me know what you're thinking and we can work out what you'll need.

Thanks,

Phil
Thanks for the response Phil, it is super appreciated.

Was thinking of getting the SparkFun Tiny AVR programmer.

Based upon the language in the product description I can program it directly in the Arduino IDE.

Do you think I would be able to put your code into the IDE and use this tool to program it directly?

I am absolutely a novice to microcontroller programming. The last time I played with this stuff was using BasicStamps in '06
 

pgreenland

Active member
Thanks for the response Phil, it is super appreciated.

Was thinking of getting the SparkFun Tiny AVR programmer.

Based upon the language in the product description I can program it directly in the Arduino IDE.

Do you think I would be able to put your code into the IDE and use this tool to program it directly?

I am absolutely a novice to microcontroller programming. The last time I played with this stuff was using BasicStamps in '06

That looks like the perfect programmer for the job, chip drops straight in, no fiddly connections to make.

The source code was written with the avr-gcc toolchain in mind, which sits under the hood of the Arduino framework. I used it directly, partly because I always do and partly because it does away with the C++ and some user friendliness in exchange for a bit more performance and control. You probably could get it to build in the Arduino IDE by swapping out main for a setup / loop function but I haven't yet tried it I'm afraid.

If you weren't too concerned with building yourself, I've dropped a release on the GitHub page with the programming files from the build, release 1.0.0.

With the ArduinoIDE installed, you'll have access to avrdude, the tool typically used to program AVRs, which supports the SparkFun programmer.

After installing the Windows driver for the programmer.

With the released programming files, you should be able to drop the chip in the programmer, find the avrdude binary and run something similar to the following from a command prompt in the directory containing the release files:

%USERPROFILE%\AppData\Local\Arduino15\packages\arduino\tools\avrdude\6.3.0-arduino17\bin\avrdude.exe -v -c usbtiny -p attiny85 -U flash:w:ATtinyRTC.hex

%USERPROFILE%\AppData\Local\Arduino15\packages\arduino\tools\avrdude\6.3.0-arduino17\bin\avrdude.exe -v -c usbtiny -p attiny85 -U eeprom:w:ATtinyRTC.eep

If the above two go well the chip should be fully programmed, but needs to be configured, via setting the fuse bits. The following command will take care of that.

There's one slightly annoying thing to be aware of. Once the fuse bits have been set the programmer won't be able to reprogram the chip. For the attiny to act as a true drop-in replacement, the fuses are set to re-assign the reset pin used by the programmer to become an extra GPIO pin. This pin is then used to generate a one second reference tick for the mac. The chip is still fully re-usable after this, it just requires what Microchip (Atmel) call high voltage programming. Which involves applying a 12v pulse to the reset pin to get it into a special mode, before instructing it to return the fuse settings to defaults using a special command set. Thereby allowing the standard ICSP programmer like the Sparkfun to work again. I've done this a few times with a 12v supply, an Arduino running a special sketch and a common transistor. Can dig the guide I followed out if you need it.

%USERPROFILE%\AppData\Local\Arduino15\packages\arduino\tools\avrdude\6.3.0-arduino17\bin\avrdude.exe -c usbtiny -p attiny85 -U lfuse:w:0xe1:m -U hfuse:w:0x5f:m -U efuse:w:0xff:m -U lock:w:0xff:m

I've not been able to try the commands above but was able to look up the paths having installed the latest MSI installer version of the Arduino 2.x IDE on a Windows VM....had to dust it off all special like :p

The arguments are straight out of the CMakeLists.txt file in my repo, with the programmer updated for the Sparkfun unit.

If you give it a go and get stuck feel free to drop me a DM, or continue the conversation here.

The code's still slightly experimental, although its been running on my two battery bombed SE30's seemingly ok. I've not had a chance to try it in a machine with a working battery....or a machine with anything resembling a battery holder come to think of it 🙈. I wasn't too bothered by having the correct time when I started the machines up, just wanted all my preferences and startup disk to be preserved. So any settings are stored in the ATTiny's EEPROM, thereby requiring no power....or a battery I'd definitely forget to replace / check on.

Good luck!

Phil
Hey Phil,
You are a legend.

I have everything on order and will test in my working SE/30 and the bombed one we are building into a Bolle Reloaded board.

Should I avoid putting battery power in the circuit to not damage the chip?
 

pgreenland

Active member
Hey Phil,
You are a legend.

I have everything on order and will test in my working SE/30 and the bombed one we are building into a Bolle Reloaded board.

Should I avoid putting battery power in the circuit to not damage the chip?
Nice + Just started the process of gathering the bits for a Bolle Reloaded board myself. After fixing traces on the better of two machine, I decided I'd be chasing them forever on the worse one.

No harm in having the battery in, it may well work just fine, but won't do any harm if it doesn't. The potential issue is that the 3.6v battery which supplies the RTC when the machine is powered off is right on the edge of the recommended supply voltage range for the ATTiny when operating at 16Mhz. I suspect it'll be just fine but you'll be the first to try it with a battery :).
 
We have a booting Reloaded board with the ATTinyRTC!
Waiting on a Battery Holder to make sure it isn't impacted by having the battery installed!
 
Top