A lot of Compacts lose their 800k FDD when somebody damages them while trying to clean the heads. If the top head is lifted more than about 1cm the metallic spring "hinge" is permanently bent too far to snap the head down onto the disk surface when the head-lifter is released. I've done this with a Sony MPF51-W before I knew better.
Now I can share a way to recover from this accidental damage.
The spring-alloy hinge is too difficult to remove. I was also reluctant to force it, because it needs to maintain the lateral alignment of the upper head.
The solution is to make your own spring clip to apply the necessary downward force on the top head. The clip must ride on the head assembly as it travels across the disk. Also, it must not impede the head travel to its outermost limit where its projecting arm triggers the Track 0 optical sensor. The back of the clip must not make contact with any components on the circuit board at the rear of the drive.
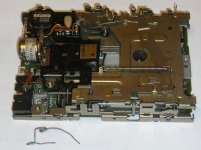
Here is the clip outside the drive. Note that in this picture the upper head assembly is raised higher than it should be, in the open position with no disk present, because of the bent hinge.

A suitable clip can be fashioned from ordinary mild steel wire of about .8mm thickness. The form of the clip has a bottom prong that goes about 1cm into an existing hole in the bottom head carrier, just beside the screw that holds the original spring hinge. The top prong of the clip extends about 2/3 of the way across the top head carrier, with the point lodged in the corner of the depression in that carrier.
The tension of the clip can be adjusted to match the resilience of the particular piece of wire that you have available. One or more loops wound around a 3mm screwdriver shaft or similar will make the clip more flexible and less stiff for each loop added. I tried first three loops, but found more tension was needed, so reduced to two loops as pictured. By experimentation, you can arrive at the right tension to allow enough stretch when fitting in onto the head assembly, while applying enough tension to hold the clip in place and press down the top head to make proper contact with the disk.
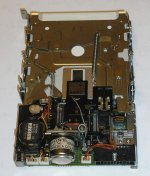
Here is the clip in position on the head assembly. The bottom prong goes in to the left of the screw holding the hinge. To attach it, I used long-nose pliers to position the bottom prong, then wiggled the top prong into position.

This clipped drive is now in use in my 512ke. The drive reads and writes with no problem.
Rick
Now I can share a way to recover from this accidental damage.
The spring-alloy hinge is too difficult to remove. I was also reluctant to force it, because it needs to maintain the lateral alignment of the upper head.
The solution is to make your own spring clip to apply the necessary downward force on the top head. The clip must ride on the head assembly as it travels across the disk. Also, it must not impede the head travel to its outermost limit where its projecting arm triggers the Track 0 optical sensor. The back of the clip must not make contact with any components on the circuit board at the rear of the drive.
Here is the clip outside the drive. Note that in this picture the upper head assembly is raised higher than it should be, in the open position with no disk present, because of the bent hinge.

A suitable clip can be fashioned from ordinary mild steel wire of about .8mm thickness. The form of the clip has a bottom prong that goes about 1cm into an existing hole in the bottom head carrier, just beside the screw that holds the original spring hinge. The top prong of the clip extends about 2/3 of the way across the top head carrier, with the point lodged in the corner of the depression in that carrier.
The tension of the clip can be adjusted to match the resilience of the particular piece of wire that you have available. One or more loops wound around a 3mm screwdriver shaft or similar will make the clip more flexible and less stiff for each loop added. I tried first three loops, but found more tension was needed, so reduced to two loops as pictured. By experimentation, you can arrive at the right tension to allow enough stretch when fitting in onto the head assembly, while applying enough tension to hold the clip in place and press down the top head to make proper contact with the disk.
Here is the clip in position on the head assembly. The bottom prong goes in to the left of the screw holding the hinge. To attach it, I used long-nose pliers to position the bottom prong, then wiggled the top prong into position.

This clipped drive is now in use in my 512ke. The drive reads and writes with no problem.
Rick
