• Updated 2023-07-12: Hello, Guest! Welcome back, and be sure to check out this follow-up post about our outage a week or so ago.

Retrobrite Failure

davidg5678

Well-known member
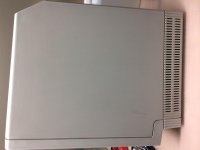
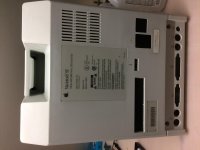
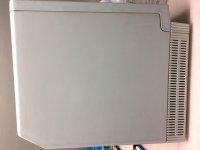
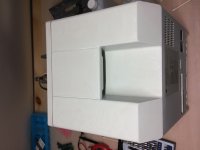
     I attempted to Retrobrite my Macintosh SE using the 8-Bit Guy's method of 40 volume developer and plastic wrap. (see here: https://youtu.be/VU7vXMezW_I) It failed miserably and left my entire Mac looking like a marble sculpture. During the process, I cleaned my computer thoroughly -first with a garden hose which I followed up by isopropyl alcohol. I was sure to massage the cream around every half hour while it sat in very bright sunlight for about 4 hours. It stayed this way for a few months until I tried fixing it with total submersion method recently shown by the 8-Bit Guy (https://youtu.be/qZYbchvSUDY) skip to 16:15. This time, I used 2 bottles (64 ounces) of peroxide to try and offset the massive difference in water that the 8-Bit Guy had for his Macintosh LC. The marble effect seemed to clear up when I was outside, and from its appearance, the computer looked normal. I rinsed off the water and peroxide and dried off the computer -only to see that there was no difference in the marbling. The surrounding plastic looked a tiny bit brighter, but the marbling is very visible. This was also outside for four hours.

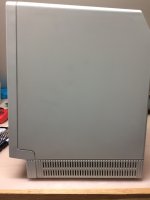
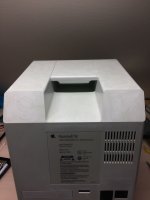
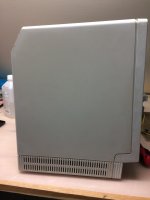
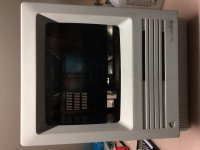
     Is there something I did wrong during the initial Retrobright process that caused my computer to look the way it does? Does anyone know what I can do to fix this issue? Was the second treatment not strong enough? Pictures of the disaster below:

Edit: Images added
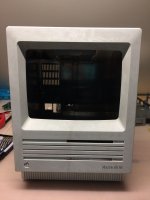
IMG_1174.jpg

IMG_1175.jpg

IMG_1176.jpg

IMG_1178.jpg

IMG_1179.jpg

 
Last edited by a moderator:

Alex

Well-known member
Using Saran Wrap is the dumbest method. I tried it on a keyboard and the results were exactly the same. I will never use the method again. I use a paint brush, takes long but works.


Juror22

Well-known member
I'm sorry this happened to you.

I would never use any creme method, period.  There are plenty of other methods that work, without the danger of mottling, do a search on the forum for more of them.

I know that you have learned this lesson, but for those who come after...

Never, ever, ever ever, experiment with a method that you have not tried first on stuff that you don't care about.

This goes for retrobriting, soldering, removing capacitors, pretty much everything associated with this hobby.  Work on a test piece first.

I don't think that more retrobrite is the answer, since the mottling is from areas that are over-bleached.  Over-bleaching the entire bucket may give you a unified color, but it will never be a natural one.  Alternatively, I suppose that you could see if belgaonkars SE/30 shell would work for you, or you could look for another SE bucket from some member or else from online.

 
Last edited by a moderator:

falen5

Well-known member
i tried a bit of retrobrighting recently as well

had mixed results

some good , some like what you got

i found that if you use the cling film you have to keep going back to it every 5 minutes, lift the film, and keep spreading the goo. keep working it.

dont just let it sit in the sun for hours without checking on it.

The sun in ireland ( when it decides to show itself) can retrobright a case in 30 minutes. I did a color classic last month. I could literally see the case changing color by the minute

on the color classic, as the color was getting brighter i could see those patches forming. Lifted the cling film, used a small paint brush, and just spread the goo everywhere again. Only small amounts. The patched i was getting were the same as what you have, but i kept re-spreading the goo, kept am eye on it, and ended up with a perfect retrobright. If i didnt keep checking it , it would of ended up like yours.

I found that by tilting the case you can see where the goo/solution is and is not. Within 1 hour the case was like new.

However! !!!!!!!!

I tried the same on an atari st case  using same process   - disaster.

This time i ended up with patched as well, but these patches were brighter than the original color. The peroxide goo had actually bleached the plastic, brighter than its original color.

So far i cant see a way to undo this damage, except maybey to let it in the sun for 10 years to go yellow again. You can try different polishes but it wont fix the problem.

The case was beyond rescue so i decided to experiment with it.

I took a small bit of p200 sandpaper to the bleached parts, did a bit of sanding and the  original color come back. But this destroyed the original finish of the plastic.

Then broke off another bit of the bleached plastic and took a look under a scope.

my eyes are not the best but from what i saw it looked as if the plastic has basically melted from the peroxide. Even the surface finish felt different.

I think it all comes down to the plastic itself and what additives were used in creating the batch. ABS is what most computer cases are made from. There are many many additives in plastic, plastizer, uv stabilizer, fire retardents etc etc. 

Long story short , if i want to retrobright something , take the case in question and TRY A SMALL TEST PATCH ON THE INSIDE OF THE CASE FIRST

I have done a few cases so far and cant see and consistancy in the process. I am using the same peroxide goo, clingfilm and process, but get different results, mostly good, each time.

Id advise anyone who wants to retrobright their beloved machine do a test patch first. Dont cover the entire case and hope for the best. You could ruin the case

And when I say ruin , i mean it. You could end up with a case that is 40 shades of cream. Ugly !!

Retrobrigting does work, but not on all plastics. Be warned.

 
Last edited by a moderator:

falen5

Well-known member
davidg5678 - there is a solution for your case

the original color can be restored by sanding.

You will loose the surface finish but you will get a consistant color all round.

just get a bit of 2x1  and some p100 sandpaper and get stuck in.

finish it off with p200 and it will be as smooth as a babys %$£"

you will have to do the whole thing.

I was going to do it to the atari st i mentioned above, but there were loads of thin, strips( like a vent) on the case and would of taken to much time

give it a shot. Your case will end up looking like a brand new prototype case!!

 
Last edited by a moderator:

davidg5678

Well-known member
     I appreciate the quick responses. I decided to use the idea of sanding the plastic. I used 150 grit and 220 grit sheets and went all around the case. I sanded every part of the case until the streaking was bearly visible, and touched up/smoothed with the finer grit paper. To my surprise, the texture of the case did not come off as much as I thought it would, and I was left with a significantly better-looking case. The streaks are still bearly visible but are faint enough not to bother me or be noticeable. Because I was able to avoid all of the stickers on the back of the computer, they look normal. However, I lightly sanded the words Macintosh SE and somehow made them vulnerable to rub off with isopropyl alcohol. I would appreciate any suggestions on how to fix this. Besides the lettering issue, I would highly recommend using sandpaper to remedy a similar issue. Below are some pictures of the computer after I have sanded it down.

IMG_1180.jpg

IMG_1181.jpg

IMG_1182.jpg

IMG_1183.jpg

IMG_1184.jpg

 
Last edited by a moderator:

joethezombie

Well-known member
i have a mac that the previous owner tried to clean and took off the name. i’ve been meaning to try some Palissade transfer paper and restore it, but haven’t gotten around to it.


falen5

Well-known member
Great Job man.

dont know if it would work, but how about printing off the SE/30  logo, on a label sticker, and make a stencil out of it. You would have to , by hand, cut out the letters.

If its good enough , peel off the back and stick it in place , mask off the rest of the machine, and get a tin of black spray paint - 2 or 3 shots from the right distance , let it dry

Theres probably a much easier way

id be happy with the case as it is!

How long did it take to sand ?

good recovery.

 
Last edited by a moderator:

Alex

Well-known member
 I decided to use the idea of sanding the plastic.
Damn, I meant to come back and edit my reply earlier. If you had gone through another retrobrite phase it would have likely saved it. You see, the light areas in those patchy areas wouldn't go lighter then the original color of the plastic but those darker patches would have continue to lighten. This is how I fixed a keyboard that ended up like your mac, I just ran it through another phase of brightening with another application using just a pain brush. Sorry that you had to use sandpaper.


jongleur

Well-known member
My preferred retrobriting is http://www.callapple.org/vintage-apple-computers/apple-ii/shining-a-light-on-retrobrite/and Javier has demonstrated it at the past 3 KansasFests https://www.kansasfest.org/ and the last KansasFest demonstration was also recorded on Assembly Lines #52 https://www.google.com.au/url?sa=t&rct=j&q=&esrc=s&source=web&cd=2&cad=rja&uact=8&ved=0ahUKEwjuo-uO47LWAhUIgLwKHXtUDtkQtwIILjAB&url=https%3A%2F%2Fwww.youtube.com%2Fwatch%3Fv%3DaFGS9xaaO_M&usg=AFQjCNEIW4nJDIw7rCty3vx475GPM_1z9Q 

Always test with something expendable, or less precious, and keep an eye on it.  You cannot just leave it alone.

 
Last edited by a moderator:

olePigeon

Well-known member
You might be able to fix the lettering by buying some water slide decal paper and printing the "Macintosh SE" text.  You could then apply the decal.  You'll need to be careful and make sure it's exactly the same size & font.  Practice with some thin paper (or even better, a transparency)


Trash80toHP_Mini

NIGHT STALKER
I've seen some interesting things being done over on Fine Scale Modeler. Don't remember what or where, but that's where I'd start doing research on transfer lettering.

As an ex-sign painter/screen printer, I'd definitely go the screen printing route, but that's not for everyone.

As a second choice, I'd cut the copy in thin, high performance vinyl, apply transfer tape without weeding it. Transfer the vinyl to the case and then weed out the lettering leaving the "waste" as a stencil. Hopefully you can find a can of gray spray paint that's a close enough match. Give it a couple of very light coats and then peel the vinyl masking. There will almost certainly be a ridge along the edges, but it could very likely be remedied with Q-Tips, mild abrasive and TLC.

YMMV, so try it on the case bottom first using Scotch tape to simulate the vinyl. Once you have the artwork done in Illustrator or the like, it'll probably be a minimum charge job to get some multiple copies cut. I'd lay it out so that the vinyl would be a panel that would register top, bottom and side without measurement needed for application.


cbmeeks

Well-known member
I really like the 8-bit Guy's show (and I've been a Patreon donor for him too) but people really do need to remember that not everything he says is accurate or highly scientific.  Granted, I don't have my own show with lots of fans so take what I say with a grain of salt.   :)

I'm sure he's had success with his cling wrap method but I would never do that myself.  I tried doing that to an Amiga 500 once and it came out awful.  Total submersion is really the best way.  I used to use cream but not any more.

Now for keys, I once created a rig to hold the keys upright and prevent them from floating.  I then covered them with peroxide liquid in a glass bowl for a few hours and they worked great.  The trick, however, it uniformity and consistency.  Meaning, don't treat some keys for 4 hours and other for 6 hours.  You'll get different shades.  They all need to be done at the same time.  Extra treatment for the ones that are stubborn but only in small doses.

Retrobrighting is a slow process.  And, it's not permanent. 

I've been toying with an idea on how to submerge classic Mac's.  One idea is to get a large clear container that is just big enough to hold the Mac but have enough room around the sides so that UV can get there too.

Then, find something that doesn't float to fill in the empty space inside the Mac.  Something that is water tight and form-fitting for the inside.  That way, you need less water/peroxide to fill the container (less volume).  Then mix the strong stuff with water.

One thing people seem to forget is good old-fashioned painting.  Granted, painting isn't an option many times.  Especially where lettering is involved. Plus, it's harder to do and not come out like crap.  But it can be done and when done right, is very permanent and awesome.   If you could find the exact font for the front cover (of classic Mac's, for example) then it should be easy to create a stencil that can be painted.  


TjLaZer

Active member
Magic eraser can help fix that better than sand paper.  The best method I have found is to use 40 volume clear conditioner and a small brush.  No need to dismantle the computer either.  Apply thin coats and leave it in the hot sun!  Reapply with the brush every 15-20 min for several hours!  Yes it's a pain!  BUT no marbled looking relic.  Then wipe down with some simple green and a lint free cloth and rinse with clean damp cloth until it's all off.  I do this for all my retro computers, even keyboard keys.  No issues.  Just have to be careful not to brush on too much that it leaks inside.


SE30_Neal

Well-known member
     I attempted to Retrobrite my Macintosh SE using the 8-Bit Guy's method of 40 volume developer and plastic wrap. (see here: https://youtu.be/VU7vXMezW_I) It failed miserably and left my entire Mac looking like a marble sculpture. During the process, I cleaned my computer thoroughly -first with a garden hose which I followed up by isopropyl alcohol. I was sure to massage the cream around every half hour while it sat in very bright sunlight for about 4 hours. It stayed this way for a few months until I tried fixing it with total submersion method recently shown by the 8-Bit Guy (https://youtu.be/qZYbchvSUDY) skip to 16:15. This time, I used 2 bottles (64 ounces) of peroxide to try and offset the massive difference in water that the 8-Bit Guy had for his Macintosh LC. The marble effect seemed to clear up when I was outside, and from its appearance, the computer looked normal. I rinsed off the water and peroxide and dried off the computer -only to see that there was no difference in the marbling. The surrounding plastic looked a tiny bit brighter, but the marbling is very visible. This was also outside for four hours.

     Is there something I did wrong during the initial Retrobright process that caused my computer to look the way it does? Does anyone know what I can do to fix this issue? Was the second treatment not strong enough? Pictures of the disaster below:

Edit: Images added
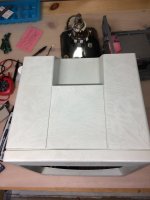
View attachment 14080

View attachment 14081

View attachment 14082

View attachment 14083

View attachment 14084
I used the same process small brush, 40% volume cream, cling film. I didn’t even take it apart just put it on lightly so it didn’t go in to the holes, cling filmed it and left under uv for 3 hrs checking every hr. did this to my se/30, keyboard, mouse, CD-ROM and performa 6200 on my kitchen table. Maybe the uv isn’t as powerful 

BCDE959E-DF7A-4AF0-85E2-F84F6DA37707.jpeg


rickrob

Well-known member
When you used the plastic wrap-- were there lots of wrinkles?  I just did the plastics on a Laserwriter II and noticed that where I had wrinkles ended up with a similar effect to your SE. Not as bad, however. I reapplied the 40 developer and smoothed out the plastic wrap and was able to even things out.

 
Top