David Cook
Well-known member
I recently purchased a Macintosh IIx that was listed as untested.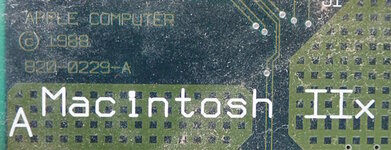
Other than the usual yellowing and gunge, the case arrived unbroken except for one internal snap. That snap was probably broken long ago by the original owner, and doesn't impact the lid staying in place.
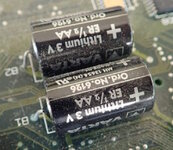
The board was dusty and had some capacitor leakage. The batteries remained intact. Kudos to Varta!
Unfortunately, one end of the case's metal shielding had a significant amount of rust. Since there wasn't a trail from the batteries or capacitors, I suspect the IIx was stored vertically in a location that experienced a spill or light flooding.
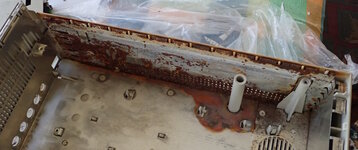
I usually treat rust with Evapo-Rust, but this is a really large object. They claim you can cover areas with soaked paper towels, but I haven't had any luck with that technique. I placed the IIx vertically at a slight angle to try to submerge as much as I could in a bin.
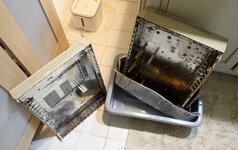
It worked well enough to remove all rust except for some brown stains in the plastic itself. If I had used numerous gallons of Evapo-Rust and had the patience to soak it for days, I'll bet the brown stains would have been removed. Still, it was good enough to clean the rust from the metal, leaving a black carbon coating. I treated the metal with Boeshield to leave a waxy protective barrier.
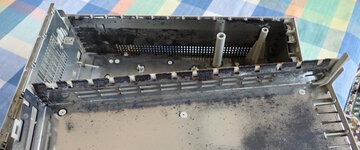
The reset and programmer interrupt buttons are located on the rusted end of the computer. The buttons look wrecked. But, after the ultrasonic bath, they both proved to work fine. No kidding.
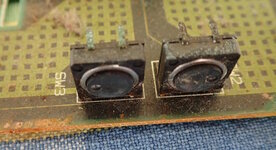
The PCB included early surface-mount capacitors with cool-looking yellow bands, rather than the value being printed atop the can.
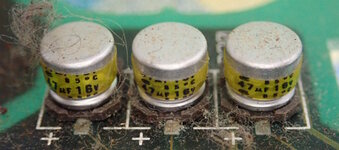
Desoldering the old capacitors proved surprisingly stubborn. The cause ended up being TWO dots of glue holding them in place. Modern boards have no glue, whereas other Macintosh models have a single dot of glue.
The solution is to wiggle the brown plastic base of the capacitor to crack the glue. Don't grasp the metal can. The plastic base is not firmly attached to the can or the soldered leads. There is enough play that you can safely wiggle the base without putting stress on the traces or pads.
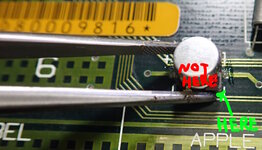
After freeing the base from the glue dots, desoldering is just as easy as an unglued capacitor. In the image below, look at that nasty adhesive ruining my day. Pads are fine.
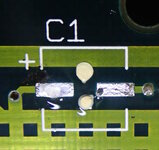
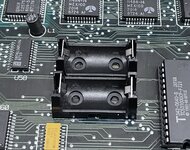
And now on to the batteries. The IIx batteries did not include holders like on newer models. Some lucky people have Macintosh IIx computers that were serviced by Apple that added a carrier board with a capacitor and two battery holders.
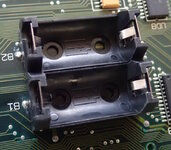
I tried just installing holders, but there isn't quite enough room for them to fit side-by-side.
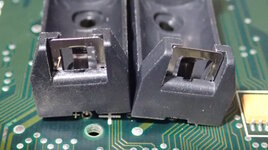
You can use a metal file or sandpaper to gently remove some of the adjoining surfaces of the holders. I used a small milling machine.
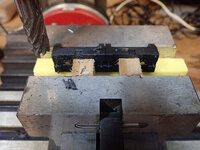
The holders are a little short for the existing holes. But, by soldering one end in the hole and bending the pin to touch the top of the second hole, then the off-the-shelf battery holders fit firmly.
Despite adding the required fresh batteries, the computer would not power up using either the main power button or the ADB keyboard power button. Tracing the power line from the power supply connector, I deduced that UB1 and UB2 controlled the power signal.
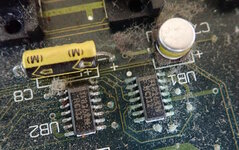
After recapping and cleaning, I discovered a tiny trace disconnect on pin 13 (see image below). Yet, fixing that didn't solve the power problem.
These 74HC132 chips reminded me of something similar. On the IIci, these chips are almost always damaged, so I just replace them during recapping as a matter of habit.
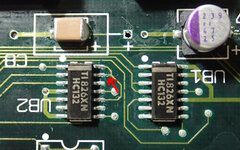
I replaced both chips (they are off the shelf and cheap) by simply desoldering them with Chip Quick low-temperature solder. Basically, coat the leads with a generous amount of that type of solder. Because of the special low-melting point, it stays liquid for much longer than regular solder, permitting the chip to just float off the pads. No heat gun needed.
Still, that repair didn't get the computer to power up.
I began at the power switch and checked continuity on various vias and connection points on the under side of the board. A long trace connecting both the switch and the keyboard power had disintegrated. See the shiny long repaired line in the image below. What's weird is, the traces above and below it are fine.
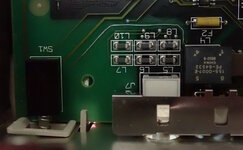
Holy moley! There were at least five breaks between the switch and the power circuitry. All for that same trace. Nearby traces were healthy.
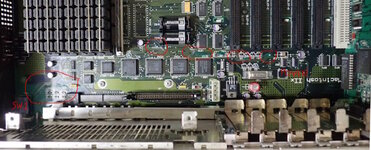
That's when it occurred to me. The power chips and trace to the switch were powered on when immersed in capacitor leakage. In an undesirable form of electrolysis, the battery power accelerates corrosion for components associated with standby / power up.
After carefully repairing the trace end-to-end, the computer powers up and passes testing with an external drive.
HARD DISK REPLACEMENT
Sadly, the massive 5 1/4 Quantum Q280 hard drive was DOA.
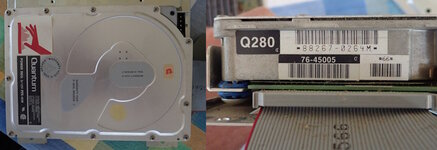
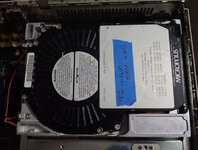
On eBay, a seller named "our_drives_work" has 100% positive feedback for 6078 sales of legacy hard drives. This seems highly skeptical. For $25 plus another $25 for shipping, I replaced the drive with a Micropolis 1624. The drive was amazingly well packaged for safe arrival. I don't normally call out sellers, but it this seems like such an improbable business model for satisfaction, that I just have to mention how pleased I am.
MEMORY
Lastly, this gets us to the big problem with the Macintosh IIx --- RAM.
Despite having 8 memory slots, there are four memory challenges with the IIx. First, the slots have plastic clips. I cringed every time I had to insert or remove a SIMM. Honest sellers that photograph the board often show rubber bands or spacers being used to hold memory in place.
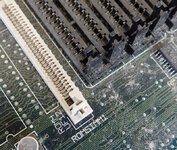
Second, the IIx was designed before standard 4 MB SIMMs were commercially available. According to Apple Macintosh Technical Notes #176 (attached), the order in which the /W line is switched is incompatible with most memory that subsequently came to market. So, if you try to install more than 8 MB total into a Macintosh IIx, you'll likely have a bad time.
The computer arrived with four 1 MB Apple SIMMs and four 256K other SIMMs. These work fine. It provides a total of 5 MB, which is not great. I mean, we complain about the 10 MB intentionally imposed limit on other Macs.
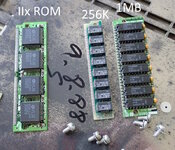
One solution is to somehow find PAL or GAL SIMMs which compensate for the /W line sequence. A GAL or PAL is usually a little square chip on the SIMM that looks different than the usual long memory chips. (Another solution is to build your own SIMMs with a logic gate to add a wee bit of delay to the /W line. There's a project posted on GitHub.)
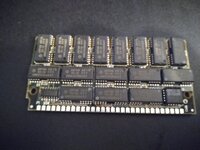
I tried searching eBay for all combinations of keywords to find IIx compatible memory without any success. Weeks later, a listing in the middle of an unrelated search caught my eye. Someone was selling really tall (i.e. composite) 30 pin SIMMs that I could see a GAL on (can you spot it?). The presence of a GAL does not guarantee the SIMM will be compatible. I wasn't even sure these tall boys would physically fit.

That brings us to problem three. Even with more memory installed, the IIx ROMs only support 24-bit addressing. Thus, an 8 MB software limit. Apple licensed a third-party product, Mode 32, to overcome this issue.
Which brings us to problem four. The 16 MHz 68030 isn't exactly speedy. If you put a lot of memory into a IIx, the power up RAM check sequence is going to take a long time. Not the end of the world, just annoying.
Problems three and four are solved by buying a new ROM. I bought a 2 MB preprogrammed PurpleROM which supports 32-bit addressing AND skips the RAM test for large quantities of memory.
Gaze at the final monstrosity! Feel the heat!
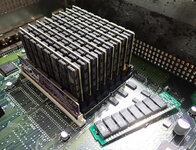
The result?
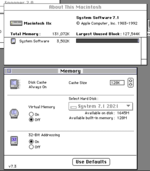
Memory testing utilities confirm that all the memory is working great. The only downside of the replacement ROM is that Apple Personal Diagnostics and MacTest Pro believe something is wrong due to the checksum being different than stock.
CONCLUSION
I would not recommend buying a IIx.
1. Many sellers charge too much
2. It is a physically big machine, which affects shipping, storage, desk space, etc.
3. It is likely damaged due to capacitors or batteries
4. There is not a schematic available, although the Macintosh II is similar except for the processor portions
5. It isn't particularly fast, nor does it have the cache or cachet of the IIfx.
6. Memory beyond 8 MB is difficult to find.
7. Not 32-bit clean
Including shipping, this cost $180 for the computer, $35 for the ROM, $50 for the drive, $20 for the programmer switch plastic insert, and $175 for the massive memory, and maybe $40 for chips+batteries+holders+capacitors. That's $500. It was fun and interesting for me. So, worthwhile as entertainment, not as a resaleable computer.
David

Other than the usual yellowing and gunge, the case arrived unbroken except for one internal snap. That snap was probably broken long ago by the original owner, and doesn't impact the lid staying in place.
The board was dusty and had some capacitor leakage. The batteries remained intact. Kudos to Varta!

Unfortunately, one end of the case's metal shielding had a significant amount of rust. Since there wasn't a trail from the batteries or capacitors, I suspect the IIx was stored vertically in a location that experienced a spill or light flooding.

I usually treat rust with Evapo-Rust, but this is a really large object. They claim you can cover areas with soaked paper towels, but I haven't had any luck with that technique. I placed the IIx vertically at a slight angle to try to submerge as much as I could in a bin.

It worked well enough to remove all rust except for some brown stains in the plastic itself. If I had used numerous gallons of Evapo-Rust and had the patience to soak it for days, I'll bet the brown stains would have been removed. Still, it was good enough to clean the rust from the metal, leaving a black carbon coating. I treated the metal with Boeshield to leave a waxy protective barrier.

The reset and programmer interrupt buttons are located on the rusted end of the computer. The buttons look wrecked. But, after the ultrasonic bath, they both proved to work fine. No kidding.

The PCB included early surface-mount capacitors with cool-looking yellow bands, rather than the value being printed atop the can.

Desoldering the old capacitors proved surprisingly stubborn. The cause ended up being TWO dots of glue holding them in place. Modern boards have no glue, whereas other Macintosh models have a single dot of glue.
The solution is to wiggle the brown plastic base of the capacitor to crack the glue. Don't grasp the metal can. The plastic base is not firmly attached to the can or the soldered leads. There is enough play that you can safely wiggle the base without putting stress on the traces or pads.

After freeing the base from the glue dots, desoldering is just as easy as an unglued capacitor. In the image below, look at that nasty adhesive ruining my day. Pads are fine.

And now on to the batteries. The IIx batteries did not include holders like on newer models. Some lucky people have Macintosh IIx computers that were serviced by Apple that added a carrier board with a capacitor and two battery holders.
I tried just installing holders, but there isn't quite enough room for them to fit side-by-side.

You can use a metal file or sandpaper to gently remove some of the adjoining surfaces of the holders. I used a small milling machine.

The holders are a little short for the existing holes. But, by soldering one end in the hole and bending the pin to touch the top of the second hole, then the off-the-shelf battery holders fit firmly.

Despite adding the required fresh batteries, the computer would not power up using either the main power button or the ADB keyboard power button. Tracing the power line from the power supply connector, I deduced that UB1 and UB2 controlled the power signal.

After recapping and cleaning, I discovered a tiny trace disconnect on pin 13 (see image below). Yet, fixing that didn't solve the power problem.
These 74HC132 chips reminded me of something similar. On the IIci, these chips are almost always damaged, so I just replace them during recapping as a matter of habit.

I replaced both chips (they are off the shelf and cheap) by simply desoldering them with Chip Quick low-temperature solder. Basically, coat the leads with a generous amount of that type of solder. Because of the special low-melting point, it stays liquid for much longer than regular solder, permitting the chip to just float off the pads. No heat gun needed.
Still, that repair didn't get the computer to power up.
I began at the power switch and checked continuity on various vias and connection points on the under side of the board. A long trace connecting both the switch and the keyboard power had disintegrated. See the shiny long repaired line in the image below. What's weird is, the traces above and below it are fine.

Holy moley! There were at least five breaks between the switch and the power circuitry. All for that same trace. Nearby traces were healthy.

That's when it occurred to me. The power chips and trace to the switch were powered on when immersed in capacitor leakage. In an undesirable form of electrolysis, the battery power accelerates corrosion for components associated with standby / power up.
After carefully repairing the trace end-to-end, the computer powers up and passes testing with an external drive.
HARD DISK REPLACEMENT
Sadly, the massive 5 1/4 Quantum Q280 hard drive was DOA.

On eBay, a seller named "our_drives_work" has 100% positive feedback for 6078 sales of legacy hard drives. This seems highly skeptical. For $25 plus another $25 for shipping, I replaced the drive with a Micropolis 1624. The drive was amazingly well packaged for safe arrival. I don't normally call out sellers, but it this seems like such an improbable business model for satisfaction, that I just have to mention how pleased I am.

MEMORY
Lastly, this gets us to the big problem with the Macintosh IIx --- RAM.
Despite having 8 memory slots, there are four memory challenges with the IIx. First, the slots have plastic clips. I cringed every time I had to insert or remove a SIMM. Honest sellers that photograph the board often show rubber bands or spacers being used to hold memory in place.

Second, the IIx was designed before standard 4 MB SIMMs were commercially available. According to Apple Macintosh Technical Notes #176 (attached), the order in which the /W line is switched is incompatible with most memory that subsequently came to market. So, if you try to install more than 8 MB total into a Macintosh IIx, you'll likely have a bad time.
The computer arrived with four 1 MB Apple SIMMs and four 256K other SIMMs. These work fine. It provides a total of 5 MB, which is not great. I mean, we complain about the 10 MB intentionally imposed limit on other Macs.

One solution is to somehow find PAL or GAL SIMMs which compensate for the /W line sequence. A GAL or PAL is usually a little square chip on the SIMM that looks different than the usual long memory chips. (Another solution is to build your own SIMMs with a logic gate to add a wee bit of delay to the /W line. There's a project posted on GitHub.)
I tried searching eBay for all combinations of keywords to find IIx compatible memory without any success. Weeks later, a listing in the middle of an unrelated search caught my eye. Someone was selling really tall (i.e. composite) 30 pin SIMMs that I could see a GAL on (can you spot it?). The presence of a GAL does not guarantee the SIMM will be compatible. I wasn't even sure these tall boys would physically fit.

That brings us to problem three. Even with more memory installed, the IIx ROMs only support 24-bit addressing. Thus, an 8 MB software limit. Apple licensed a third-party product, Mode 32, to overcome this issue.
Which brings us to problem four. The 16 MHz 68030 isn't exactly speedy. If you put a lot of memory into a IIx, the power up RAM check sequence is going to take a long time. Not the end of the world, just annoying.
Problems three and four are solved by buying a new ROM. I bought a 2 MB preprogrammed PurpleROM which supports 32-bit addressing AND skips the RAM test for large quantities of memory.
Gaze at the final monstrosity! Feel the heat!

The result?

Memory testing utilities confirm that all the memory is working great. The only downside of the replacement ROM is that Apple Personal Diagnostics and MacTest Pro believe something is wrong due to the checksum being different than stock.
CONCLUSION
I would not recommend buying a IIx.
1. Many sellers charge too much
2. It is a physically big machine, which affects shipping, storage, desk space, etc.
3. It is likely damaged due to capacitors or batteries
4. There is not a schematic available, although the Macintosh II is similar except for the processor portions
5. It isn't particularly fast, nor does it have the cache or cachet of the IIfx.
6. Memory beyond 8 MB is difficult to find.
7. Not 32-bit clean
Including shipping, this cost $180 for the computer, $35 for the ROM, $50 for the drive, $20 for the programmer switch plastic insert, and $175 for the massive memory, and maybe $40 for chips+batteries+holders+capacitors. That's $500. It was fun and interesting for me. So, worthwhile as entertainment, not as a resaleable computer.
David

